Etched Halloween Candy Jar
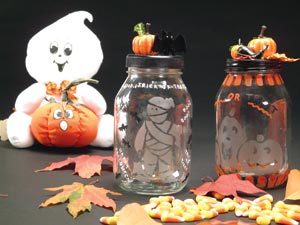
Create these spooky etched Halloween candy jars from Etchworld Armour that make sorting the kid's loot easy and fun.
Materials:
- Armour Etch® Cream
- Jar with Lid (we used a mayonnaise jar)
- Glass Paint
- Black Gloss Paint for lid
- 6" x 6" piece of Contact® shelving vinyl
- Halloween decorations
- Glue(to adhere halloween decoration to top)
- Ball point pen
- Hobby knife
- Glass cleaner
- Masking Tape
- Running water
- Paper Towels
- Transfer paper (or carbon paper)
- Black & white paint pens
Steps:
- Remove all previous jar labels and glue. Wash jar thoroughly.
- Wrap shelving vinyl around the glass jar.
- Secure transfer paper to top of vinyl. Place design on top and trace design through transfer paper onto shelving paper. Make sure to press hard when tracing. Remove design and transfer paper.
- Using your design as a guide, cut out design with a hobby knife.
- Clean exposed areas of your design to remove remaining glue, if any.
- Apply a layer of Armour Etch generously and wait for 1-2 minutes.
- Wash off all Armour Etch® cream under running tap water.
- While wet, peel off and remove all vinyl stencil pieces.
- Clean your project with glass cleaner and dry with paper towels.
- Paint the lid black and allow to dry. Decorate lid with pumpkin and bat.
- With black paint pen, paint bats on either side of the design.
- With white paint write Halloween sayings around jar.
Read NextBaby Bat Crochet Costume
Your Recently Viewed Projects
Hannah
May 02, 2017
I have made one of these for our halloween party last year. You can put candies, spiders or small toy body parts in it. Or maybe use colored marbles. We also made it look like a lantern. Cut out scary tree patterns or skeletons. Stick on the bottles and put candle inside.
Report Inappropriate Comment
Are you sure you would like to report this comment? It will be flagged for our moderators to take action.
Thank you for taking the time to improve the content on our site.

