A Deep V Top Crochet Pattern
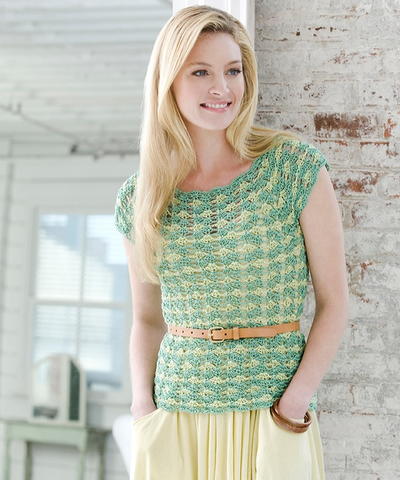
This lace free crochet pattern from Bernat Yarns helps you to create a stylish top with cap sleeves and a deep V-neck. The simple beginner crochet pattern creates a light and breezy top for warm summer months and the shape is flattering for many.

Materials:
- Yarn: Bernat® Bamboo Natural Blends (60 g/2.1 oz) 92130 (Water)
Extra-Small/Small 8 balls
Medium 8 balls
Large 9 balls
Extra-Large 11 balls
2/3 Extra-Large 13 balls
4/5 Extra-Large 15 balls
- Crochet Hook: Sizes 6 mm (U.S. J or 10) and 6.5 mm (U.S. K or 10½) crochet hooks or size needed to obtain gauge.
Gauge: 10 hdc and 7 rows = 4 ins 10 cm with larger hook.
Sizes:
To fit bust measurement
Extra-Small/Small 28-34 ins 71-86.5 cm
Medium 36-38 ins 91.5-96.5 cm
Large 40-42 ins 101.5-106.5 cm
Extra-Large 44-46 ins 112-117 cm
2/3 Extra-Large 48-54 ins 122-137 cm
4/5 Extra-Large 56-62 ins 142-157.5 cm
Finished bust
Extra-Small/Small 36 ins 91.5 cm
Medium 40 ins 101.5 cm
Large 44 ins 112 cm
Extra-Large 48 ins 122 cm
2/3 Extra-Large 56 ins 142 cm
4/5 Extra-Large 64 ins 162.5 cm
Instructions:
The instructions are written for smallest size. If changes are necessary for larger sizes the instructions will be written thus ( ). When only one number is given, it applies to all sizes. For ease in working, circle all numbers pertaining to your size.
Note: Turning ch 2 does not count as hdc.
BACK
**Ribbing: With smaller hook, ch 11.
Foundation row: (RS). 1 sc in 2nd ch from hook. 1 sc in each ch to end of ch. Turn. 10 sc.
Next row: Ch 1. Working through back loops only, 1 sc in each sc to end of row.
Rep last row until work when slightly stretched measures 16 (18-19-22-27- 31) ins [40.5 (45.5-48-56-68.5- 78.5) cm], ending with a WS row. Do not fasten off.
Body: With RS facing, working along side of Ribbing, change to larger hook and proceed as follows:
1st row: Ch 2. Work 46 (50-54-60- 70-80) hdc evenly along side of ribbing. Turn.
2nd row: Ch 2. 1 hdc in each hdc to end of row. Turn.**
Rep last row 14 (14-16-16-18-18) times more, ending with a WS row.
Shape sleeves: 1st row: Ch 2. 2 hdc in first hdc. 1 hdc in each hdc to last hdc. 2 hdc in last hdc. 48 (52-56-62- 72-82) hdc.
2nd row: Ch 2. 1 hdc in each hdc to end of row.
Rep last 2 rows twice more. 52 (56-60- 66-76-86) hdc. Place markers at each end of last row.
Next row: Ch 2. 1 hdc in each hdc to end of row. Turn.
Rep last row 11 (11-11-13-13-13) times more. Fasten off.
FRONT
Work from ** to ** as given for Back.
Divide for Front: 1st row: (RS). Ch 2. 1 hdc in each of first 18 (20-22-25-30- 35) hdc. Hdc2tog over next 2 hdc (neck edge). Turn. Leave rem sts unworked. 19 (21-23-26-31-36) sts.
Work 3 rows even.
5th row: Ch 2. 1 hdc in each hdc to last 2 hdc. Hdc2tog over last 2 hdc. Turn.
Work 3 rows even.
Rep last 4 rows 1 (1-1-1-2-2) time(s) more. 17 (19-21-24-28-33) sts.
Sizes XS/S, M, 2/3XL and 4/5XL only: 1st row: (RS). Ch 2. 1 hdc in each hdc to last 2 hdc. Hdc2tog over last 2 sts. Turn.
2nd and alt rows: Ch 2. 1 hdc in each st to end of row. Turn.
Shape sleeve: 3rd row: Ch 2. 2 hdc in first hdc. 1 hdc in each hdc to end of row. Turn.
5th row: Ch 2. 2 hdc in first hdc. 1 hdc in each hdc to last 2 hdc. Hdc2tog over last 2 sts. Turn.
7th row: As 3rd row. Place marker at beg of row.
9th row: Ch 2. 1 hdc in each hdc to last 2 hdc. Hdc2tog over last 2 sts. Turn. Work 3 rows even.
Sizes L and XL only: 1st row: (RS). Ch 2. 1 hdc in each hdc to last 2 hdc. Hdc2tog over last 2 sts. Turn.
2nd and alt rows: Ch 2. 1 hdc in each st to end of row. Turn.
3rd row: Ch 2. 1 hdc in each st to end of row. Turn.
Shape sleeve: 5th row: Ch 2. 2 hdc in first hdc. 1 hdc in each hdc to last 2 hdc. Hdc2tog over last 2 sts. Turn.
7th row: Ch 2. 2 hdc in first hdc. 1 hdc in each hdc to end of row. Turn.
9th row: As 5th row.
11th row: As 3rd row.
13th row: Ch 2. 1 hdc in each hdc to last 2 hdc. Hdc2tog over last 2 sts. Turn.
Work 3 rows even.
All sizes: Rep last 4 rows 1 (1-1-1-2-2) time(s) more, then 9th row 1 (1-0-1-0-0) time more. 15 (17-19-21-26-31) sts.
Work 3 (3-3-1-3-1) row(s) even. Fasten off.
With RS facing, miss next 6 hdc. Join yarn with sl st to next hdc.
1st row: Ch 2. Hdc2tog over first 2 sts. 1 hdc in each hdc to end of row. Turn.
Work 3 rows even.
Rep last 4 rows 2 (2-2-2-3-3) times more. 17 (19-21-24-28-33) sts.
Sizes XS/S, M, 2/3XL and 4/5XL only: 1st row: (RS). Ch 2. Hdc2tog over first 2 sts. 1 hdc in each hdc to end of row. Turn.
2nd and alt rows: Ch 2. 1 hdc in each st to end of row. Turn.
Shape sleeve: 3rd row: Ch 2. 1 hdc in each hdc to last hdc. 2 hdc in last hdc. Turn.
5th row: Ch 2. Hdc2tog over first 2 sts. 1 hdc in each hdc to last hdc. 2 hdc in last hdc. Turn.
7th row: As 3rd row. Place marker at end of row.
9th row: Ch 2. Hdc2tog over first 2 sts. 1 hdc in each hdc to end of row. Turn.
Work 3 rows even.
Sizes L and XL only: 1st row: (RS). Ch 2. Hdc2tog over first 2 sts. 1 hdc in each hdc to end of row. Turn.
2nd and alt rows: Ch 2. 1 hdc in each st to end of row. Turn.
3rd row: Ch 2. 1 hdc in each st to end of row. Turn.
Shape sleeve: 5th row: Ch 2. Hdc2tog over first 2 sts. 1 hdc in each hdc to last hdc. 2 hdc in last hdc. Turn.
7th row: Ch 2. 1 hdc in each hdc to last hdc. 2 hdc in last hdc. Turn.
9th row: As 5th row.
11th row: As 3rd row.
13th row: Ch 2. Hdc2tog over first 2 sts. 1 hdc in each hdc to end of row. Turn.
Work 3 rows even.
All sizes: Rep last 4 rows 1 (1-1-1-2- 2) time(s) more, then 9th row 1 (1-0-1- 0-0) time more. 15 (17-19-21-26- 31) sts.
Work 3 (3-1-3-1-1) row(s) even. Fasten off.
FINISHING
Sew shoulder seams.
Front Band: With RS facing and smaller hook, join yarn to first missed st at center front.
1st row: Ch 1. Work 7 sc evenly across missed sts. Turn.
2nd row: Ch 1. Working through back loops only, 1 sc in each sc to end of row.
Rep last row until work when stretched fits around fronts opening and neck edge, sewing in place as you work. Fasten off.
Sew last row to missed sts on WS.
With WS tog, sew sides from markers to bottom.
Armhole edging: Join yarn with sl st to side seam. Ch 1. Work 1 row of sc evenly around armhole opening. Join with sl st to first sc. Fasten off.
Read NextCoffee & Cream Market Bag
Your Recently Viewed Projects
bobbylonardo 50143 99
Aug 26, 2013
I have to agree with the sizing comments - if you actually are crocheting to "Gauge" the top is only going to be about 8-10 inches from the arm hole to the waist band. That wouldn't make it as long as the top in the photo appears. It would be easy enough to adjust the back by adding more rows but the front is a different story. Maybe the designer should correct this??
VickiRehman
Jun 15, 2013
hi everyone, so the finished top is too short and needs few more inches... ok, no problem, but where am i supposed to crochet the extra rows (i mean bottom, middle, top or like double up each rows, etc)? could somebody help me please? many thanks in advance
VickiRehman
Jun 15, 2013
hi everyone, so the finished top is too short and needs few more inches... ok, no problem, but where am i supposed to crochet the extra rows (i mean bottom, middle, top or like double up each rows, etc)? could somebody help me please? many thanks in advance
joannhollenbeck 01 20402
Mar 12, 2013
I just completed this after working on it for 2 days. I read another reviewer's comment on the fact that it ended up inches short. So I added some rows guessing and it still ended up like a crop cardigan and I'm 4'11". I think it's cute but I was hoping that it would turn out as in the pic. This was my first time to crochet anything other than hats, scarves, and other small things. It was a lot of work and I'm okay with the outcome but wish it was the length pictured above. I felt like I should have kept adding rows to lengthen it but didn't. I'll know for next time. :-)
Brittany93
Feb 04, 2013
I am a little confused. I am where it says to With RS facing, miss next 6 hdc. Join yarn with sl st to next hdc. 1st row Ch 2. Hdc2tog over first 2 sts. 1 hdc in each hdc to end of row. Turn. Work 3 rows even. Rep last 4 rows 2 (2-2-2-3-3) times more. 17 (19-21-24-28-33) sts. I do not understand where it wants me to start at
joannhollenbeck 01 20402
Mar 12, 2013
Where the v begins at the bottom on the front (right) side. Join on the right side and work to the left. I hope this helps.
Patches1958
May 11, 2012
I LOVE THIS PATTERN!!!!! I AM 54 AND MY DAUGHTER, 28 AND DAUGHTER-IN-LAW,27, BOTH LOVE IT TOO. IT IS TIMELESS!!!! THANK YOU SO MUCH
Melissa Ryan
Sep 14, 2012
@Patches1958 Thanks so much for your comment! And we're so glad you love the pattern! Feel free to share photos on our Facebook wall! We'd love to see them :)
abesneighbor143
Oct 12, 2011
I would love to knit this pattern!! No, I don't crochet but it's on my to-do list for things to learn. Does anyone know where I can get such a pattern?......hopefully for free! ;-)
Pami
Dec 07, 2010
When I was printing this pattern, the ad for Olay Pro pop-up came up and was printed right over the 2nd page. Looks like this needs some work, or there will be some disappointed hookers.
kellie7 6933397
Nov 11, 2010
I made this pattern a few years ago. I found the finished product to be too short. It needed a few more inches (yes inches) otherwise it was perfectly like the picture.
Janine186
Jun 23, 2010
Hi, I am at the end of this project and I'm really confused. I have two finished pieces a back and a v-shaped front. Am I supposed to sew the back and front shoulder seams together? After that, I understand about where to start the 7 single crochet, but I don't know where to stop. I was going to give up, but after getting this far I was hoping I could get some help. Maybe I can email a picture of what I have to you?
INSPIRED CREATIONS
Jun 19, 2010
I've crocheted for years but never attempted anything in the way of sweaters or vests. I'm anixous to give this pattern a try. Hopefully it will work out for Christmas presents for my two daughters and one daugther-in law. Gandma Pitcher, wish me luck!
Diana L Burris
Apr 08, 2010
I am a full figure woman and it's so hard to find so I am really excited to start this project!!! Thank you for the free pattern, it is greatly appreciated Happy sewing, Dee Burris
CassandFay
Mar 04, 2010
for Grandma Pitcher... follow the pattern... you only work on the right hand side of front piece until it says to "Fasten off". You then join in centre front band to work the other side as follows With RS facing, miss next 6 hdc. Join yarn with sl st to next hdc. 1st row Ch 2. Hdc2tog over first 2 sts. 1 hdc in each hdc to end of row. Turn. Work 3 rows even. Rep last 4 rows 2 (2-2-2-3-3) times more. 17 (19-21-24-28-33) sts. ......... continue to end of pattern.
grandma pitcher
Feb 26, 2010
I am confused about this pattern. Can someone help me.? Where it says FRONT Work from to as given for Back. Divide for Front Does this mean make 2 ? Is this the front ribbing? I don't know where to start this row?? Divide for Front 1st row (RS). Ch 2. 1 hdc in each of first 18 (20-22-25-30- 35) hdc. Hdc2tog over next 2 hdc (neck edge). Turn. Leave rem sts unworked. Grandma Pitcher
kaeci
Oct 31, 2009
I crochet knit. Whenever I make crochet sweaters, I knit the ribbing instead of crocheting it. This sweater would look nice that way.
Report Inappropriate Comment
Are you sure you would like to report this comment? It will be flagged for our moderators to take action.
Thank you for taking the time to improve the content on our site.

