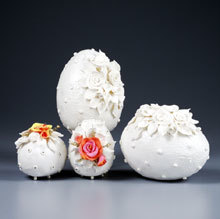
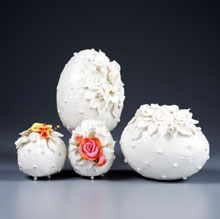
Floral Pearlized Eggs
You can create these elegant collectible Easter egg decorations from an everyday craft staple for kids, air-dry modeling compound. With a foam egg forming the sturdy base, these pearlescent, pretty designs will have everyone wishing they had some of their own.
Materials:
- STYROFOAM™ Brand Foam:
- Eggs, one each: 5"; 3"
- White; gold acrylic paints
- Acrylic mediums: Thickening; Pearlizing (DecoArt)
- Air-dry modeling compound: white; red; orange; yellow
- Pearl beads: five 1mm; four 5mm
- Gold craft wire, 24-gauge
- Flower paper punch
- Leaf clay cutter, small
- Ruler
- Serrated knife
- Paraffin or Candle stub
- Wire cutters
- Rolling pin
- Small paintbrush
- Disposable palette
- Water basin
- Paper towels
- Small sponge
- Scissors
- Fresh leaf
- White, thick craft glue
Steps:
- Wax serrated knife with candle stub or paraffin. Cut thin slice from wide end or one side of foam egg.
- Use rolling pin to roll ball of white modeling compound to 1/8" thickness, turning several times to prevent sticking. Drape compound over egg; press out visible air bubbles while wrapping egg. Use scissors to trim excess. Let dry. (Note: Cracks may appear during drying process and are normal.)
- Mix together equal parts white paint and pearl medium; treat as "one part" for next step. Follow manufacturer's instructions to mix together paint/pearl medium and thickener. Sponge paint mixture over egg; let dry. Repeat until cracks are hidden.
- To marbleize compound for roses on smaller eggs, roll 1" balls of desired colors into logs and twist together. Fold in half and repeat twisting until desired effect is achieved.
- To form petals, pinch 1/4" ball of white or marbleized compound into rounded teardrop shape between thumb and index finger. Take time to thin edges for realistic look. Rosebuds require two petals; full roses require five or more petals.
- Tightly roll a single petal for rose center. For rosebud, wrap two slightly overlapping petals around center. For full rose, wrap three slightly overlapping petals around center. Flare petal edges outward slightly. As each row of petals is added, move down rolled center to achieve balance. Continue until rose is desired size. Pinch off excess compound at bottom; let dry.
- Roll white compound to 1/8" thickness. Use clay cutter to cut several leaves. To create veining, press back of fresh leaf onto top of each cut-out leaf. Pinch leaf ends to points; let dry.
- Glue roses, buds and leaves to front or top of egg as desired; let dry.
- For all-white egg, roll 1" ball of compound into 1/4"-thick log. Pinch off small amounts and roll into tiny balls; dip into glue and press to surface of egg; let dry.
- For colorful egg, thread small bead onto wire and bend end to secure. Tightly wrap wire around paintbrush handle to form coil; remove coil and cut wire. Repeat for total of five coils. Glue wire ends to egg under leaves; let dry.
- Roll 1" ball of white compound to 1/8" thickness; let dry. Use paper punch to punch several flowers from dry compound. Glue flowers to colorful egg surface; use paintbrush handle to dot flower centers with gold paint. Glue large beads to egg bottom for feet.
®™ Trademark of The Dow Chemical Company ("Dow") or an affiliated company of Dow.
For more project ideas, please see styrofoamstyle.com.
Read NextRustic Cross Centerpiece
Your Recently Viewed Projects
Marilyn B
Mar 10, 2017
This is a very elegant egg design. It sort of reminds me of those sugar eggs made from candy molds, but these are even better as they would be much more durable! The flower topper is so pretty and could be embellished with a pretty seed pearl here and there for added elegance! Thanks for the super instructions!
Report Inappropriate Comment
Are you sure you would like to report this comment? It will be flagged for our moderators to take action.
Thank you for taking the time to improve the content on our site.

