Pink Cabled Hat and Scarf
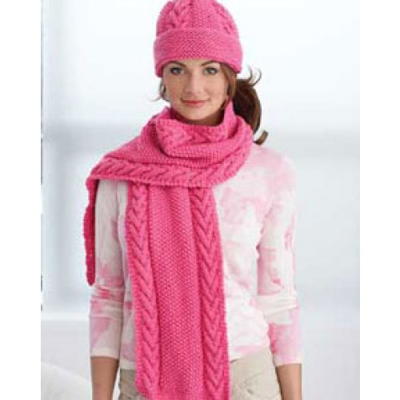
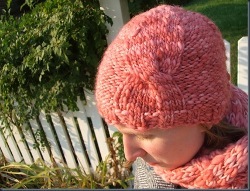
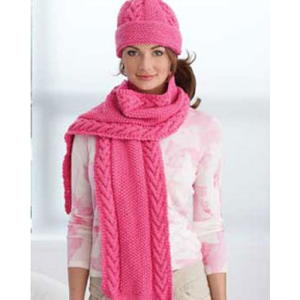 Knit yourself a pink cable hat and scarf with this great free knitting pattern from Bernat Yarns. They'll keep you nice and warm during the fall and winter months. Pink brings out the style in you. This Pink Cabled Hat and Scarf pattern is the perfect, pastel pair to wear this winter. Free knitting patterns make fabulous winter projects because they are toasty warm and extra practical. Plus, this pink knitting pattern makes a great project for Breast Cancer Awareness crafts. Wear your awareness in style with these free knitting patterns. This free hat pattern for knitting and free scarf pattern would make a great gift, as well.
Learn how to knit even more snuggly warm free knitting patterns with the cozy and warm projects in our list of 50+ Free Scarf Knitting Patterns.
How to Knit: Pink Cabled Hat and Scarf
Materials:
- Yarn: Bernat® Berella ‘4’ (100 g/3.5 oz; 197 m/216 yds) #00732 (Ultra Pink) 3 balls
- Knitting Needles: Sizes 4.5 mm (U.S. 7) and 5 mm (U.S. 8) knitting needles or size needed to obtain gauge
- Cable needle (cn)
Gauge: 18 sts and 24 rows = 4 ins [10 cm] in stocking st.
Abbreviations:
C4F = Slip next 2 sts onto cn and leave at front of work. K2, then K2 from cn.
C3F = Slip next 2 sts onto cn and leave at front of work. K1, then K2 from cn.
C3B = Slip next st onto cn and leave at back of work. K2, then K1 from cn.
Size: Hat: To fit average lady.
Scarf: Approx 8 x 64 ins [20.5 x 162.5 cm].
Instructions:
CABLE PANEL (CP) (worked over 10 sts).
1st row: (RS). P3. C4F. P3.
2nd row: K3. P4. K3.
3rd row: P2. C3B. C3F. P2.
4th row: K2. P6. K2.
5th row: P1. C3B. K2. C3F. P1.
6th row: K1. P8. K1.
7th row: C3B. K4. C3F.
8th row: P10. These 8 rows form
Cable Panel (CP).
SCARF
With larger needles, cast on 37 sts. Work 7 rows garter st noting first row is WS and inc 6 sts evenly across last row. 43 sts.
1st row: (RS). K2. Work 1st row CP. P2. (K1. P1) 7 times. K1. P2. Work 1st row CP. K2.
2nd row: K2. Work 2nd row CP. K2. (K1. P1) 7 times. K3. Work 2nd row CP. K2. Last 2 rows form Seed St Pat in center. CP is now in position.
Cont in pat until Scarf measures 62½ ins [159 cm], ending on a 2nd row of CP and dec 6 sts evenly across last row. 37 sts. Work 7 rows garter st. Cast off knitwise (WS).
HAT
With smaller needles, cast on 79 sts. Work 4 ins [10 cm] in garter st inc 8 sts evenly across last row. 87 sts. Place marker at end of last row.
Change to larger needles.
1st row: (RS). (K1. P1) twice. K1. *P2. Work 1st row CP. P2.** (K1. P1) 3 times. K1. Rep from * twice more, then from * to ** once. (K1. P1) twice. K1.
2nd row: (K1. P1) twice. K1. *K2. Work 2nd row CP. K2.** (K1. P1) 3 times. K1. Rep from * twice more, then from * to ** once. (K1. P1) twice. K1. Last 2 rows form Seed St Pat. CP is now in position.
Cont in pat until work from marker measures 5 ins [12.5 cm], ending on a WS row.
Shape top: 1st row: (RS). K1. P3tog. K1. *P2. Work CP. P2.** K1. P1. K3tog. P1. K1. Rep from * twice more, then from * to ** once. K1. P3tog. K1. 77 sts rem.
2nd and 4th rows: Work even in pat.
3rd row: K1. P1. K1. *P2. Work CP. P2. ** K1. P3tog. K1. Rep from * twice more, then from * to ** once. K1. P1. K1. 71 sts rem.
5th row: K1. P1. K1. *P2. (K2. K2tog) twice. K2. P2. K1. P1. K1. Rep from * to end. 63 sts rem.
6th row: K1. P1. K1. *K2. P8. K3. P1. K1. Rep from * to end.
7th row: K1. P1. K1. *P2. (K2tog) 4 times. P2. K1. P1. K1. Rep from * to end. 47 sts rem.
8th row: K1. P1. K1. *K2. P4. K3. P1. K1. Rep from * to end.
9th row: K3tog. *P2tog. (K2tog) twice. P2tog. K3tog. Rep from * to end. 21 sts rem. Break yarn, leaving a long end and draw tightly through rem sts. Sew back seam, reversing for cuff turnback.
More Patterns to Knit and Crochet for Breast Cancer:
Read NextBeginner Hat Knitting Pattern
Your Recently Viewed Projects
chpiyada13 5109756
Jan 04, 2015
How can do inc 6 sts evenly across last row. 43 sts?
paver2
Jan 12, 2017
To increase evenly, take the number of stitches to be increased into the number of stitches you already have. In this instance it would be 6 into 43, which is 7 with one stitch left over. It isn't critical to have them exactly evened out, so if you increase one stitch near the beginning, then do 5 more increases every 7 stitches or so, it should work out.
Report Inappropriate Comment
Are you sure you would like to report this comment? It will be flagged for our moderators to take action.
Thank you for taking the time to improve the content on our site.


