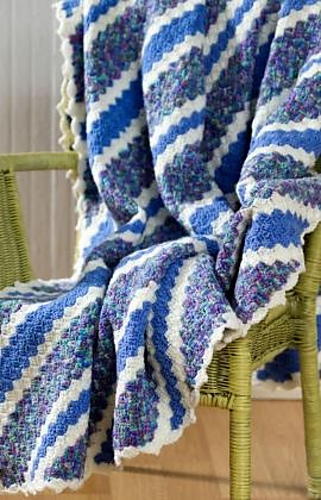
Crochet Corner to Corner Throw
This crochet afghan will keep you warm and make cold weather so much more enjoyable!

Check out this Crochet Corner-to-Corner Throw Pattern from Red Heart Yarn! This makes a great free crochet afghan pattern for the intermediate crocheter.
One of the biggest advantage of C2C patterns is that you start in a corner, increase until you like the size of the blanket, and then begin decreasing. This is a recipe for mindless crochet you can do while listening to an audiobook or your favorite TV show.
The C2C method also means your project size is totally customizeable. You can make a coaster, dishcloth, baby blanket, throw, or a king sized blanket! It's a fantyastic method for using up scrap yarn, too.
I'd also suggest it's easier to maintain gauge with C2C patterns. Inconsistencies are less obvious.
Enjoy learning this method and creating beautiful new projects! It's addictive!
PLUS: Get free crochet patterns delivered straight to your inbox!
Sign up for the FaveCrafts newsletter
Check out the video below to show you how to get started on working a corner to corner crochet pattern! Great for all you visual learners!

Crochet HookH/8 or 5 mm hook
Yarn Weight(4) Medium Weight/Worsted Weight and Aran (16-20 stitches to 4 inches)
Crochet GaugeGAUGE: 6 blocks = 4"; 6 rows = 4" in pattern. CHECK YOUR GAUGE. Use any size hook to obtain the gauge.
Finished SizeThrow measures approximately 67" x 67" square (including edging).
Materials List
- RED HEART® "Super Saver®": 4 Skeins 316 Soft White CA
- RED HEART® "Super Saver®": 5 skeins 885 Delft Blue CB
- RED HEART® "Super Saver®": 7 skeins 310 Monet Print CC
- Crochet Hook: 5mm [US H-8]
- Yarn Needle
Crochet Corner to Corner Throw Pattern
Note: To change color in dc: Work last dc before color change until 2 loops are left on hook, drop color in use, with next color to be used draw through 2 loops on hook and continue with new color.
Instructions:
-
With CA, ch 6.
-
Row 1 (Right Side): Dc in 4th ch from hook and in next 2 ch; turn – 1 block made.
-
Row 2: Ch 6, dc in 4th ch from hook and in next 2 ch, (slip st, ch 3, 3 dc) all in ch-3 space of previous row changing to CB in last dc; turn – 2 blocks made.
-
Row 3: With CB, ch 6, dc in 4th ch from hook and in next 2 ch, [(slip st, ch 3, 3 dc) all in next ch-3 space of previous row] twice; turn – 3 blocks made.
-
Row 4: Ch 6, dc in 4th ch from hook and in next 2 ch, [(slip st, ch 3, 3 dc) all in next ch-3 space of previous row] 3 times; turn – 4 blocks made.
-
Continue in in this manner, increasing 1 block on each row until there are 96 blocks across AND working Stripe pattern as follows: 2 more rows CB, 2 rows CA, [7 rows CC, 2 rows CA, 2 rows CB, 2 rows CA, 7 rows CC, 2 rows CA, 4 rows CB, 2 rows CA] 3 times, 4 rows CC.
-
Now work in decreasing rows as follows:
Row 97: With CC, slip st across first 3 dc, * (slip st, ch 3, 3 dc) all in next ch-3 space of previous row; repeat from * to last ch-3 space; slip st in last space; turn, do NOT make a block in last space – 95 blocks. -
Repeat Row 97 for decreasing block pattern and work 2 more rows with CC, [2 rows CA, 2 rows CB, 2 rows CA, 7 rows CC, 2 rows, CA, 4 rows CB, 2 rows CA, 7 rows CC] 3 times, 2 rows CA, 2 rows CB, 2 rows CA, 2 rows CC –1 block remains.
-
Fasten off.
-
Edging: With right side facing, attach CA in same ch-3 space as last slip st; ch 3, 4 dc in same space, * sc in center dc of next block, 3 dc in next ch-3 space or over dc; ch 3, slip st in top of last dc –picot made; 2 dc in same space, sc in center dc of next block, 5 dc in next space; repeat from * to corner; (4 dc, picot, 3 dc) all in corner space; repeat from * around, adjusting if necessary at corners and end of rnd; join with a slip st in top of ch-3.
-
Fasten off. Weave in ends.
Up Next:
Waves Of Grains C2C Blanket
What do you think of corner to corner patterns versus traditional ones?


