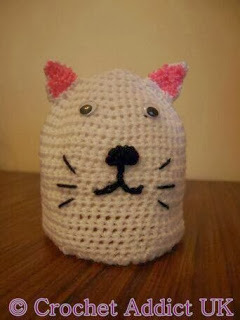
Purrfect Winter Beanie

Keep your head warm and toasty with this Purrfect Winter Beanie. What makes this crochet hat pattern unique is the cute cat design on the front. Start by constructing a plain hat and then add on embellishments to bring your piece to life. If you're willing to try something new, this is the perfect design for you to try. Kids and fun-loving adults will appreciate the look of this hat, so feel free to make one for anyone on your gift list. This is a great holiday gift idea but would also be appreciate at a shower or birthday party. Crochet hat patterns are often great for beginners, and this project is no different.

Yarn Weight(3) Light/DK (21-24 stitches to 4 inches)
Crochet HookG/6 or 4 mm hook, H/8 or 5 mm hook
Materials:
- 4mm (6) and 5mm (H) hooks. If you don’t have a 4mm (6) hook use a 4.25mm (G) hook.
- Double knit white (8 ply), pink & black yarn
- Stitch marker
- 2 Googly eyes
Notes:
- At the end of each round just carry on.
- Mark the start of each round and then move marker as a round is completed.
Abbreviations:
HK – hook CH – chain SS – Slip Stitch
HDC – half double crochet HDC Inc – Half double crochet Increase. Increase by placing 2 hdc in 1 stitch.
HDC Dec – Half double crochet decrease. Yarn over hook, through 1st stitch, yarn over hook through, hook through next stitch, yarn over hook pull through. Yarn over hook and pull through all the loops.
Gauge
7 sts & 6 rows = 2”
If your hat is coming out too big go down one hook size and vice versa if it’s too small.
Sizing Guide:
Age Measurement Around Height
Newborns cm 29.21cm - 33cm 14cm - 15.24cm
" 11.5"-13" 5.5" - 6"
3-6 Months cm 35.56cm - 43.18cm 16.51cm - 17.78cm
" 14" - 17" 6.5" - 7"
6-12 Months cm 40.64cm - 48.26cm 19.05
" 16"-19" 7.5"
Approximate Yardage
Cat Beanie Hat Newborn yd
- White 54.05
- Pink 2.91
- Black 6.15
Cat Beanie Hat 3-6 months yd
- White 77.27
- Pink 2.91
- Black 6.15
Cat Beanie Hat 6-12 months yd
- White 97.97
- Pink 2.91
- Black 6.15
Instructions:
Hat
Using 5mm (H) hook & white yarn.
At the end of each round just carry on.
Mark the start of each round and then move marker as a round is completed.
Ch 2 (or use magic circle)
Round 1) 6 hdc in the 2nd ch from the hook (6)
Round 2) 6 hdc inc (12)
Round 3) *1 hdc, 1 hdc inc * x 6 (18)
Round 4) *2 hdc, 1 hdc inc* x 6 (24)
Round 5) *3 hdc, 1 hdc inc * x 6 (30)
Round 6) *4 hdc, 1 hdc inc * x 6 (36)
Round 7) *5 hdc, 1 hdc inc * x 6 (42) (newborn go to round 11)
Round 8) *6 hdc, 1 hdc inc * x 6 (48)
Round 9) *7 hdc, 1 hdc inc * x 6 (54) (3-6 months go to round 11)
Round 10) *8 hdc, 1 hdc inc * x 6 (60)
Round 11) hdc around (newborn 42, 3-6 months 54, 6-12 months 60)
Newborn need another 9 rounds after round 11
3-6 months need another 10 rounds after round 11
6-12 months need another 12 rounds after round 11
When you have finished the above slip stitch x 2, finish.
Ears x2
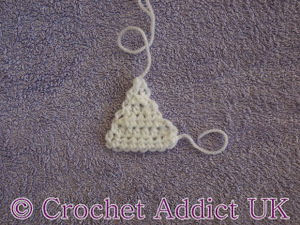
Back of ear x2
Using White Yarn & 4mm (6) hook (make 2)
Ch 8
Row 1) 1 hdc in 3rd ch hk, 5 hdc, ch 2, turn
Row 2) 1 hdc dec, 2 hdc, 1 hdc dec, ch 2, turn
Row 3) 1 hdc dec, 1 hdc dec, ch 2, turn
Row 4) 1 hdc dec, finish off (leave enough yarn to sew to pink part of ear and to the hat)

Front of ear x2
Using Pink Yarn & 4mm (6) hook (make 2)
Ch 6
Row 1) 1 hdc in 3rd ch hk, 3 hdc, ch 2, turn
Row 2) 1 hdc dec, 1 hdc dec, ch 2, turn
Row 3) 1 hdc dec, finish
Attach to the hat
Nose
Using Black Yarn & 4mm (6) hook
Ch 2
Round 1) 6 hdc in 2nd ch hk (6), leave enough yarn to sew to hat
Take the spare yarn at the start of making the nose and pull up through the middle and fasten off so it looks like a nose.
Attach the items to the hat, pictures below show them in the order I attach them: ears, nose, mouth & whiskers, eyes
Mouth
To make the mouth you put your hook from front to back and pull a loop of yarn through. You then move to the next hole and put the hook from front to back and pull a loop through the hat and the loop you have on the hook.
Carry on till you make the shape of a mouth. I find it easier to carry on and complete one side of the mouth. Finish off and then start the other side of the mouth from where the mouth goes off in the two different directions. Then add whiskers by embroidering as well.
