Decoupaged Sea Shell Plate
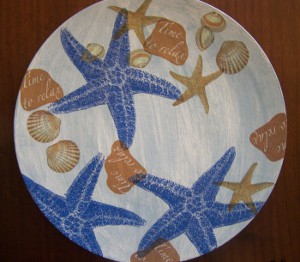
Use simple decoupage techniques to create this lovely Sea Shell Plate, perfect for adding a lovely beach ambiance to your home, living room, or bathroom. Use it to show off shells you collected at the beach or put it on display for all to admire and enjoy.

Materials:
- Round, light blue bamboo fiber plate
- 10/32” flat paint brush
- Mod Podge
- Water-based varnish
- Hairdryer
- Acrylic paint in the following two colors: white and antique bronze
- Napkins with suitable pictures printed on them ~ for this project, napkins with different seashells and the words “Time to Relax” were used
- Standard scissors
- Old newspapers to protect the working area
- Old cloth
Instructions:
-
With a slightly wet brush, give the top side of the plate a wash with the white-colored acrylics. Remember not to use too much paint ~ remove excess paint by dabbing the brush onto a sheet of newspaper before starting to paint. Try and keep the edges and the bottom of the plate clean.

-
Dry the plate thoroughly with the hairdryer.
-
Cut out the desired sections from the napkins and decide how they will be arranged on the plate. Making a collage, where the different cutouts overlap with one another and placing them on different levels, creates a more interesting end result.
-
Remove the bottom layers from all the napkin cutouts.
-
Put the first cutout in place and paint a substantial amount of Mod Podge over the top of the cutout, so that it will stick to the plate. As the napkin can stretch or tear easily, it is best to start painting from the middle of the cutout towards the sides, working in small triangles. The Mod Podge must only be applied to the top, and must not be allowed to run underneath the cutout.
-
Use the hairdryer to dry the cutout.
-
Repeat steps 5-6 with all the other cutouts, until the collage has been completed.
-
Paint a thin layer of Mod Podge over the whole top side of the plate, again keeping the edges and the bottom of the plate clean. The Mod Podge will protect the pictures and give the product a smoother finish. When applying the first layer of Mod Podge, be careful not to lift the cutouts at the edges when brushing over them with the paint brush.
-
Dry the plate with the hairdryer.
-
Repeat steps 8-9 ~ you need to apply at least 4 coats of Mod Podge, but remember that with every layer, the direction in which the Mod Podge is applied, must be changed from horizontal to vertical to horizontal, etc. Also, remember that after every layer of Mod Podge, the plate must first be dried thoroughly with the hairdryer.
-
Give the plate a wash with the antique bronze acrylic paint ~ the antique bronze paint will link all the pictures together, creating a more unified impression. Remember again not to use too much paint ~ remove excess paint by dabbing the brush onto a sheet of newspaper before starting to paint.

-
Dry the plate with the hairdryer.
-
Turn the plate upside down, and add a layer of water-based varnish to the back of the plate and to the edges. Dry thoroughly with the hairdryer.
- Turn the plate around, and now paint the top side of the plate with the varnish. Again, dry with the hairdryer.
Tips:
- When doing napkin decoupage, do not use dark acrylic paint as the base color, as this will show through the napkin.
- To clean, wipe off gently with a damp cloth and do not use strong detergents. Not dishwasher safe.
- When doing decoupage, do not use the highest heat setting on the hairdryer.
- When sticking the cutouts to the plate, it may be easier to use your finger instead of a brush when applying Mod Podge.
Read NextSuper Simple Etched Mason Jar

