Spring Paper Pinwheel Wreath
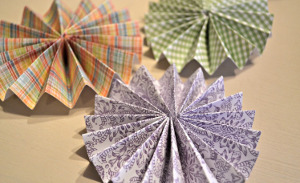
A bright and sunny wreath is the perfect way to get your home ready for spring. This lovely Spring Paper Pinwheel Wreath is a quick and easy wreath to make, even if you don't have a lot of crafting experience! Embellished with fun pinwheels of all colors and styles, this wreath is great for spring and summer and can be hung on your door or anywhere inside your home. Use up those paper scraps and create a lovely spring wreath with this fun and easy tutorial!
Primary TechniquePaper Crafts
SeasonSpring
You can find this project, and many more, in our new eBook, 13 Spring Crafts: Easter Craft Ideas, Spring DIY Home Decor, and More! Download your own free copy today!
Materials:
- Straw Wreath Form
- Wide ribbon
- Scrapbook paper of your choice
- Paper cutter or scissors
- Wooden circles for the centers of the pinwheels
- Washi tape for the circles
- Contrasting ribbon for bow
- Hot Glue/Glue Sticks
Instructions:
- Start by wrapping your wreath form with the ribbon of your choice.
- To make the pinwheels, cut two pieces of paper the same length and width. I used the length of the paper and the width varied from 1-1 ½ inches each. Remember that one piece of the paper will just be one half of the pinwheel, so if you go wide the pinwheel will be huge.

- Lay your strips on top of each other and accordion fold them back and forth evenly.

- Lay one end on top of the other and hot glue it down.

- Glue both ends of the paper together to create a circle.

- Then push it all together and down to form your pinwheel.

- Add a large amount of glue to the center and allow to seep into the pinwheel a bit, then hold together for a minute or two by hand until the glue hardens. Flip it over and you have your pinwheel!


- I added wooden dots with Washi tape covering them to the center of my wheels by gluing them down the same way on the front.
- Attach the pinwheels to the wreath with hot glue.

Celebrate National Craft Month All Month Long!

