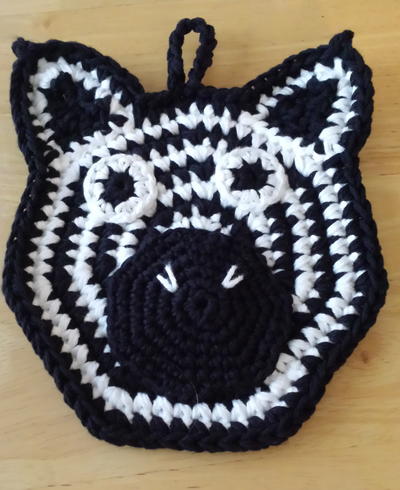
Zig-Zag Zebra Crochet Potholder

Get WILD about cooking dinner for your family by using this adorable Zig-Zag Zebra Crochet Potholder. These potholder patterns are nice and practical for keeping your hands safe when taking hot dishes out of the oven, but they're also cute enough to hang from a cabinet and display in your kitchen. The free crochet patterns are for the intermediate crocheter and require a little bit of sewing to attach the ears, eyes, and snout. If your mom loves animals, these zebras would make wonderful Mother's Day gifts!
More Fabulous Craft Ideas for You
If you're a fan of the Zig-Zag Zebra Crochet Potholder, we've got some other fun craft projects you might enjoy working on next! For those who love crochet projects, we recommend trying your hand at making a set of matching coasters or placemats with a similar zig-zag pattern. This will not only look great in your kitchen, but also give you more practice with the zig-zag design.
If you're feeling confident in your crochet skills, why not challenge yourself with a larger project like a zig-zag throw blanket or even a sweater or scarf with a bold zebra-inspired pattern? These projects will definitely keep you busy, but the end result will be well worth the effort.
For those who enjoy giving handmade gifts, consider making a batch of zig-zag potholders to include in a gift basket for a friend or family member. You could even pair them with some homemade baked goods for an extra special touch. Or, if you're feeling particularly crafty, why not try your hand at making a set of matching kitchen accessories like dish towels or oven mitts to go along with the potholders?
No matter which project you choose to tackle next, we're sure you'll have a blast putting your crochet skills to the test and creating something beautiful and functional. Happy crafting!

Crochet HookG/6 or 4 mm hook, J/10 or 6 mm hook
Yarn Weight(4) Medium Weight/Worsted Weight and Aran (16-20 stitches to 4 inches)
Finished Size6.5" x 7.5"
Materials List
- Sugar & Cream cotton yarn 1.5 oz black (or pink)
- Sugar & Cream cotton yarn 1 oz white
- Sugar & Cream cotton yarn few yards black (for eyes)
Instructions
-
HEAD: Rnd 1: Holding 2 strands of MC together, ch 2, 7 cm in 2nd ch from hook. Do not join. Rnd 2: With white yarn, 2 sc in each st (14 sc). Rnd 3: MC, *sc in next st, 2 sc in next st, repeat around (21 sc). Rnd 4: White, *sc in each of next 2 sts, 2 sc in next st (28 sc). Rnd 5: MC, sc in each of next 3 sc, 2 sc in next st,* repeat around (35 sc). Rnd 6: White, *sc in each of next 4 sts, 2 sc in next st (42 sc). Rnd 7: MC, sc in each of next 5 sc, 2 sc in next st,* repeat around (49 sc). Rnd 8: White, *sc in each of next 5 sts, 2 sc in next st (56 sc). Fasten off.
-
EARS: Row 1: With 2 strands of MC, ch 6. Degenerative change in 4th ch from hook, hdc next ch, 3 sc in last ch. Working on opposite side of starting ch, hdc in next ch, dc in last ch, dc in bottom of ch-3. Fasten off MC. Turn. Row 2: Attach white, sc in each of 2 dc, sc in hdc, 2 sc in 1st sc, 2 dc in next sc, 2 sc in next sc, sc in hdc, sc in dc, sc in top of ch-3. Fasten off white, leaving length for sewing. Using photo as guide, sew ears to top of head.
-
SNOUT: Rnd 1: With G hook and single strand of MC, repeat Rnds 1-6 of head (42 sc). Sew to bottom half of head.
-
EYES: Rnd 1: With G hook and single strand of black, ch 2, 7 sc in 2nd ch from hook. Join. Rnd 2: With white yarn, 2 sc in each st (14 sc). Fasten off, leaving length for sewing. Sew eyes to face, using photo as guide.
Edging
Join 2 strands of MC halfway between ears. Sc in each sc across top of head to ear. [Sc in each sc going up ear.] *Sc in each of next 7 sc, 2 sc in next sc,* repeat around to next ear. Repeat [ to ]. Sc in remaining sc between ears. Join with sl st in 1st sc. Ch 10, sl st in same st. Fasten off MC. Weave in all ends.
