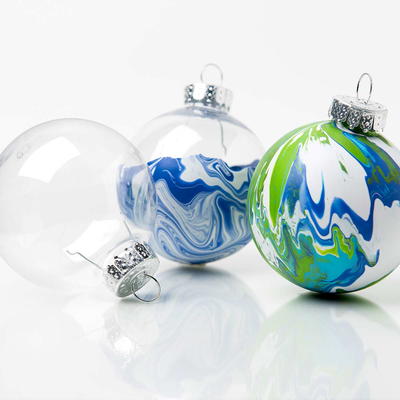
Melting Ice Marble Ornaments Tutorial
Warm up your holiday home decor with these icy DIY Christmas ornaments!

Want to give your Christmas tree a classy marble finish? Your search for high-end holiday decor ends here, with this simple Melting Ice Marble Ornaments Tutorial! Snowdrift white, icy blue, and garland green, these painted glass ornament patterns will be the wintry decor that will last all season long. All you need to do is apply some FolkArt Marbling Paint to clear glass ornaments for a sophisticated and far-out Christmas vibe. These homemade Christmas tree ornaments aren't just for the tree, either. Display them in a decorative bowl for a table centerpiece your family will fawn over!
Estimated Cost$31+
Time to CompleteWeekend project
MaterialsGlass, Paint

HolidayChristmas
Age GroupTeens
Project TypeMake a Project
Materials List
- FolkArt Marbling Paints (White: 16921, Sour Apple: 16941, Blue: 16927)
- FolkArt Clearcote Acrylic Spray Sealer (Matte or Hi-Shine)
- Stencil tape
- Clear glass ornaments
- Waxed paper
- Paper towels
- Styrofoam block
- Popsicle sticks
- Rubbing alcohol
Instructions
-
Remove the ornament cap and prepare each clear glass ornament before marbling by washing it in warm, soapy water. Rinse well and allow to dry. Next, wipe the exterior of each ornament with a paper towel moistened with rubbing alcohol, which will ensure that the surface is thoroughly clean and free of any soap residue.
-
Protect the work surface by placing a sheet of waxed paper over it.
-
Slightly insert a popsicle stick inside the glass ornament and wrap the stick and neck of the ornament with stencil tape creating a “handle.”
-
Using the Direct Pour Technique, squeeze a small amount of White onto the glass ornament while holding onto the popsicle stick handle and keeping it over the waxed paper. Working quickly and while still wet, squeeze a small amount of blue and any other desired FolkArt Marbling color onto the ornament too. Gently tilt the ornament from side to side allowing the FolkArt Marbling Paints to slightly swirl creating marbleized patterns.
-
When the entire surface is covered with FolkArt Marbling Paint, carefully set the handle into a styrofoam block to allow excess paint to drip and then allow the ornament to dry without touching a surface.
-
Marbling paint will dry within 24 hours and will be cured within 48 hours. Once cured, it is best to spray seal the painted marble with FolkArt Clear Acrylic Sealers.
NOTE: All marble painted surfaces should be kept for decorative purposes only as FolkArt Marbling is not dishwasher safe.
What's your favorite Christmas painting craft? Let us know below in the comments!

