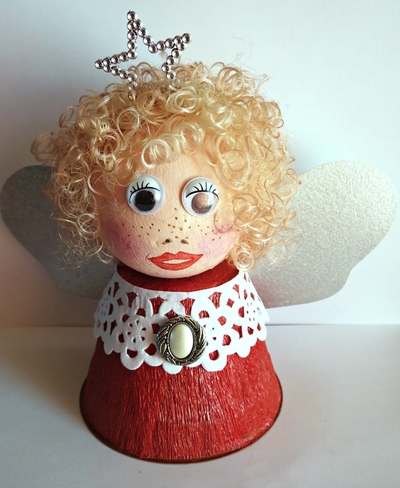
Itty Bitty Angel

Give your garden a little festivity during the winter season with this Itty Bitty Angel. Made from an old plastic flower pot, this sweet angel is a great way to decorate your home both indoors and out. She makes a sweet mantel decoration or can be used as a centerpiece for your Christmas table. This Itty Bitty Angel could also sit in the windowsill to greet holiday visitors this season. No matter how you use it, you're sure to love this Itty Bitty Angel...and she's sure to keep you, and your home, in the holiday spirit all season long!
Primary TechniquePainting

SeasonWinter
Materials:
- Provided pattern for the wings
- 3” high plastic flower pot
- Polystyrene ball with a diameter of 3”
- Thick red crepe paper (choose the type that does not “bleed” when it gets wet)
- Curly blonde synthetic doll hair
- Pair of wiggle eyes
- Star wand
- White cardstock for the wings
- One white round paper doily
- Suitable silver button
- Flesh colored acrylic paint
- Dark pink, red, brown and black colored felt-tip pens
- Satin Mod Podge
- Heritage Spray-on Contact Glue
- Silver quick-drying spray paint
- Clear drying craft glue
- Hairdryer
- 10/32” paint brush
- Standard scissors
- Pencil
- Sharp knife
Instructions:
- Wash the flower pot in warm soapy water and then leave it upside down overnight to dry thoroughly.
- Cut strips from the red crepe paper.
- Turn the flower pot over, so that the bottom of the pot will now be on top. Paint a substantial amount of Modge Podge on the pot.
- Put the first strip of crepe paper in position on the pot. Paint Modge Podge over the strip of crepe paper, so that it will stick to the pot. As the crepe paper can stretch or tear easily, it is best to start painting from the middle of the strip towards the sides, and working in small triangles.
- Repeat step 4 with the other strips of crepe paper, until the pot has been covered with the red crepe paper.

- Use the hairdryer to dry the flower pot.
- Cut the lace edge off the paper doily. Add Mod Podge all around the edge of the flower pot and glue the lace edge in place. This will be the angel’s lace collar.

- Insert the sharp end of the pencil into the polystyrene ball. Keep the pencil in the polystyrene ball until you have completed the angel’s face and hair the pencil makes for easier handling.
- Paint the polystyrene ball with the flesh paint. Allow to dry thoroughly and repeat if necessary. The polystyrene ball will become the angel’s head.

- Use the Spray-on Contact Glue to add hair to the polystyrene ball. Keep spraying glue and adding bits of hair until the angel has a thick shock of hair.
- Use the Spray-on Contact Glue to add the wiggle eyes.
- Add the rest of the facial features, i.e. rosy cheeks, a mouth, a nose and small freckles.

- Cut the stem of the wand to make it shorter and push the wand into the polystyrene ball to give the angel a star crown.
- Use the knife to cut a very small piece off the bottom of the ball, and then use the Spray-on Contact Glue to glue the head to the flower pot.
- Trace the wings onto the cardstock and cut them out.
- Spray one side of the wings with the silver spray paint and allow to dry thoroughly. Repeat with the other side.

- Use the clear drying craft glue to add the wings to the flower pot.
- Glue the button in place.
Up Next:
Read NextRepurposed Lighting Antique Angel