Green and Red Topiary Spires
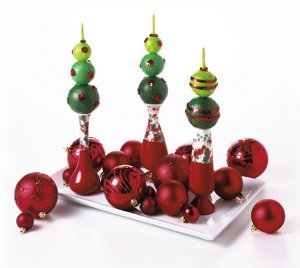
These beautiful Green and Red Topiary Spires are a great way to decorate for the holiday season. Arrange them on the mantel or use them as a centerpiece to create a lovely and stunning Christmas decor that everyone is sure to love. This simple Christmas craft project can easily be adapted for New Year's Eve celebrations or birthday parties. Simply use whatever color combinations you'd like to create beautiful topiaries that are eye-catching and fun to make.
See this project and more in 27 Topiary Craft Projects.

Materials:
- Bisque: 21674 Three Assorted Bud Vases
- Underglaze: Concepts CN 074 Really Red (for bisque & majolica)
- Glazes: Crystals CR 916 Holly Berries
- Paintbrushes: No.6 Fan Glaze, No.6 Round
- Craft foam balls: (three each) 1 1/2", 2", 2 1/2"
- Tissue paper: lime green, dark lime green, medium lime green
- 3 yds. red sequin trim
- Decoupage medium
- Fast-drying tacky glue
- Foil
- Golf tees
- Jar
- Pushpin
- Ruler
- Scissors
- Skewers
- Sponge
- Straight pins
- Toothpicks
- Wire cutter
Instructions:
-
Preparation. Wipe ware with damp sponge to remove dust.
-
Apply glazes. Squeeze a puddle of Really Red onto foil. Use No. 6 Fan Glaze brush to apply three even flowing coats of Really Red to lower half of vase (Photo A). Stir jar of Holly Berries, using brush handle. Use same brush to apply two coats of Holly Berries to upper half of vase and slightly inside rim. Stir glaze again. Pour onto foil. Scoop crystals from glaze. Use No. 6 Round brush to dab crystals on top of vase, applying a thick coat of glaze and crystals. Fire. Stilt and fire to cone 6.
-
Make spire structure. Use scissors to cut 1" from tip of golf tee, rounding tip slightly. Apply a dot of tacky glue to flat end of tee. Press tee onto small foam ball. In same way, glue tees to two small and one medium foam ball. To hold tees in place, use straight pins pushed into adjacent balls. Remove pins when dry.
-
Decoupage. Cut 1" wide strips from dark lime green tissue paper. Cut strips into 1" squares. Insert a skewer into large foam ball. Insert another skewer into opposite side of ball to use as a handle while working.
-
Squeeze a puddle of decoupage medium onto foil. Brush a thin, even coat over entire foam ball. Press brush onto a square of tissue. Press tissue onto ball (Photo B). Brush another thin coat of medium over tissue. In same way, apply a layer of tissue onto entire ball. Apply two more layers of tissue for even color. Set in jar to dry. In same way, cover medium balls with several layers of medium lime green tissue and small balls with several layers of lime green tissue, using smaller pieces of tissue around base of and up to tip of tee.
-
Assemble balls. Squeeze a small puddle of tacky glue onto foil. Carefully remove all skewers. To fasten balls together, insert ends of toothpicks dipped into glue. Insert toothpick into skewer holes or use a pushpin to make new holes, if needed.
- Finish. Place topiary onto desired vase. Press slightly, rolling around rim to create an indention in ball. Run a line of tacky glue along rim of vase. Press topiary into wet glue (Photo C). Apply a thin line of tacky glue around center of large ball. Press sequin trim into wet glue, trimming ends to meet (Photo D). Repeat for all stripes wanted. Glue small rounds of sequin trim where desired. Glue sequins around base of tee.
Read NextMason Jar Christmas Gifts with Ball®
Report Inappropriate Comment
Are you sure you would like to report this comment? It will be flagged for our moderators to take action.
Thank you for taking the time to improve the content on our site.

