Little Baker Pastry Bag
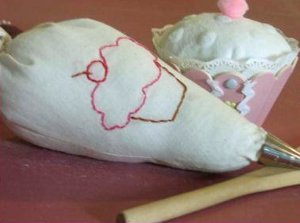
Do you have a little one that loves to bake? Let your little chef help out in the kitchen with this Little Baker Pastry Bag from Laura Bray. This easy sewing project is great for play time and doesn't leave any mess!

Materials:
- Pastry Bag Pattern
- Muslin or cotton fabric scraps
- Fabric Scissors (regular & pinking shears)
- Thread
- Sewing machine
- Cupcake Embroidery Pattern
- Embroidery needle, thread and hoop
- Pastry bag tip (optional)
- Fabric glue (optional)
- Polyfill
- Ribbon
Instructions:
-
From fabric, cut 2 triangles (see pattern attached)
-
Take one fabric piece and transfer embroidery pattern (see attached). Embroider onto outside of the fabric piece as located on the attached pattern.
-
Place two fabrics pieces, with wrong sides facing each other. Sew triangle pieces together, using a straight stitch, along the two long sides of the triangle. DO NOT sew the short side!
-
Press and turn the fabric right side out. Using pinking shears, finish the top of the short side by cutting along the edge of the fabric.
-
Stuff sewn pastry bag about ¾ full.
-
Sew a running stitch as outlined on pattern. Pull closed tightly and knot. Tie decorative ribbon over closure.
- Glue pastry tip to end of the bag. Please Note: If you are creating this bag for a small child, you may want to omit attaching a pastry tip as they can cause safety issues.
Read NextCardboard Tube Lambs

