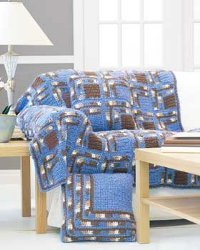
Beautifully Designed Afghan and Pillows Set
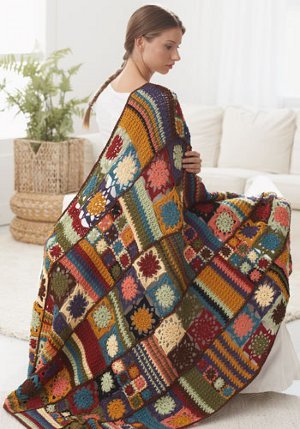
Using Bernat Harmony you can crochet this beautifully designed afghan and pillow set for your living room. This makes for a great gift. It's an easy crochet pattern from Bernat Yarns you'll love putting together.

Materials:
- Bernat® Harmony
- (Solids: 100 g/3.5 oz / Ombres: 80 g/2.8 oz)
- Afghan (Pillow A-Pillow B)
- Main Color (MC)
- (Blue) 5 (1-2) ball(s)
- Contrast A
- (Brown) 3 (1-1) ball(s)
- Contrast B
- (Ombre) 4 (1-1) ball(s)
- Size 6 mm (U.S. J or 10) crochet hook or size needed to obtain gauge.
14 inch [35.5 cm] square pillow form for Pillow A, 16 inch [40.5 cm] square pillow form for Pillow B.
GAUGE
12 sc and 12 rows = 4 ins [10 cm].
Instructions:
Afghan
Note: Each Motif should measure approx 6 ins [15 cm] square.
Motif 1 (make 28)
Corner Square:With MC, ch 10.
1st row: (RS). 1 sc in 2nd ch from hook. 1 sc in each ch across. Turn.
2nd row: Ch 1. 1 sc in each sc across. Turn.
Rep last row 7 times more. Fasten off.
Mitered Section: 1st row: With RS facing, join A with sl st in first sc of last row. Ch 1. 1 sc in same sp. 1 sc in each of next 7 sc. 3 sc in next sc for corner. Work 8 sc evenly up side of Corner Square. Fasten off.
2nd row:With RS facing, join B with sl st in back loop only of first sc of last row. Ch 3 (counts as dc). Working in back loop only of each st, 1 dc in each of next 8 sc. 5 dc in next sc for corner. 1 dc in each of next 9 sc. Fasten off.
3rd row: With RS facing, join MC with sl st in top of ch 3 of last row. Ch 1. 1 sc in same sp. Working in back loop only of each st, 1 sc in each of next 10 dc. 3 sc in next dc for corner. 1 sc in each of next 11 dc. Fasten off.
4th row: With RS facing, join A with sl st in back loop only of first sc of last row. Ch 1. 1 sc in same sp. Working in back loop only of each st, 1 sc in each of next 11 sc. 3 sc in next sc for corner. 1 sc in each of next 12 sc. Fasten off.
5th row: With RS facing, join B with sl st in back loop only of first sc of last row. Ch 3 (counts as dc). Working in back loop only of each st, 1 dc in each of next 12 sc. 5 dc in next sc for corner. 1 dc in each of next 13 sc. Fasten off.
6th row: With RS facing, join MC with sl st in top of ch 3 of last row. Ch 1. 1 sc in same sp. Working in back loop only of each st, 1 sc in each of next 14 dc. 3 sc in next dc for corner. 1 sc in each of next 14 dc. 3 sc in last dc for corner. Work 14 sc across top of Motif to next corner. 3 sc in corner. 14 sc down side of Motif. 2 sc in same sp as first sc. Join with sl st to first sc. Fasten off.
Motif 2 (make 28)
Corner Square: With A, work as for Motif 1.
Mitered Section: 1st row:With MC, work as for Motif 1.
2nd to 6th rows:Work as for Motif 1.
FINISHING
With MC, crochet Motifs tog into 7 strips, 8 motifs long, alternating
Motif 1 and Motif 2. Crochet strips tog.
Edging: 1st rnd: Join A with sl st in any corner of Afghan. Ch 1. 3 sc in same sp. Work sc evenly around, working 3 sc in corners. Join MC with sl st in first sc. Break A.
2nd rnd:With MC, ch 1, working in back loop only of each sc, work 1 sc in each sc around, working 3 sc in each corner sc. Join with sl st to first sc. Fasten off.
Pillow A
Make 4 each of Motif 1 and Motif 2.
FRONT and BACK (make alike)
With MC, crochet 2 each of Motifs 1 and 2 tog alternating Motif 1 and Motif 2 as shown.
2nd rnd:Work as for Afghan.
FINISHING
With RS Front and Back tog, join MC in any corner and crochet 3 sides of pillow tog. Insert pillow form. Crochet rem side closed.
Pillow B
FRONT and BACK (make alike)
Corner Square:With MC, ch 27.
1st row: (RS). 1 sc in 2nd ch from hook. 1 sc in each ch across. 26 sc. Turn.
2nd row: Ch 1. 1 sc in each sc across. Turn.
Rep last row 24 times more. Fasten off.
Mitered Section: 1st row: With RS facing, join A with sl st in first sc of last row. Ch 1. 1 sc in same sp. 1 sc in each of next 24 sc. 3 sc in next sc for corner. Work 25 sc evenly up side of Corner Square. Fasten off.
2nd row:With RS facing, join B with sl st in back loop only of first sc of last row. Ch 3 (counts as dc). Working in back loop only of each st, 1 dc in each of next 25 sc. 5 dc in next sc for corner. 1 dc in each of next 26 sc. Fasten off.
3rd row: With RS facing, join MC with sl st in top of ch 3 of last row. Ch 1. 1 sc in same sp. Working in back loop only of each st, 1 sc in each dc to next corner st. 3 sc in next dc for corner. 1 sc in each dc to end of row. Fasten off.
4th row: With RS facing, join A with sl st in back loop only of first sc of last row. Ch 1. 1 sc in same sp. Working in back loop only of each st, 1 sc in each sc to corner st. 3 sc in next sc for corner. 1 sc in each sc to end of row. Fasten off.
5th row:With RS facing, join B with sl st in back loop only of first sc of last row. Ch 3 (counts as dc). Working in back loop only of each st, 1 dc in each sc to corner st. 5 dc in next sc for corner. 1 dc in each sc to end of row. Fasten off.
Rep 3rd to 5th rows twice more. Fasten off.
Edging row: With RS facing, join MC with sl st in top of ch 3 of last row. Ch 1. 1 sc in same sp. Working in back loop only of each st, 1 sc in each dc to next corner st. 3 sc in next dc for corner. 1 sc in each dc to last dc. 3 sc in last dc for corner. Work sc evenly across top to next corner. 3 sc in corner. Work sc evenly down side. 2 sc in same sp as first sc. Join with sl st to first sc. Fasten off.
FINISHING
With RS of Front and Back tog, join MC to any corner and crochet 3 sides of pillow tog. Insert pillow form. Crochet rem side closed.
Your Recently Viewed Projects
mememouse
Mar 16, 2010
I have seen many afghans throughout my year but never one this stunning! The only downside is that it's made with single crochet stitches which I have found to take forever to make. But I will copy it anyway and will save it for a rainy day. Thanks,
Member 18932
Mar 15, 2010
how do i downlod the patterns ? when i download to save a pattern for a few wks. then go back to print it's gone.........
Report Inappropriate Comment
Are you sure you would like to report this comment? It will be flagged for our moderators to take action.
Thank you for taking the time to improve the content on our site.

