Crocheted Monkey Blanket
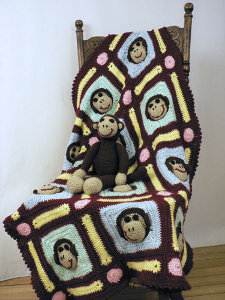
This project will teach you how to crochet a blanket to match your soft plush monkey. The colorful crocheted monkey blanket is the perfect addition to a child's room.

Materials:
- One crochet hook size US H-8 (5 mm), or size to obtain gauge
- Yarn Needle
- Row counter
- Polyester fiberfill
- Stitch marker
- Caron International's Simply Soft (100% acrylic; 6 oz/170 g, 315 yds/288 m skein): #9750 Chocolate (A), 1 skein, #9703 Bone (B), 1 skein, #9719 Soft Pink (C), 1 skein, #9712 Soft Blue (D), 1 skein, #9739 Soft Green (E), 1 skein, #9726 Soft Yellow (F), 1 skein, #9730 Autumn Red (G), 2 skeins, #9727 Black (H), 1 skein (small amount used for eyes' and noses)
- Chart
Instructions:
GAUGE
In single crochet, using size US H-8 (5 mm) hook, 13 sts and 20 rows = 4"/10 cm.
STITCHES USED
- Chain (ch)
- Double crochet (dc)
- Half double crochet (hdc)
- Single crochet (sc)
- Treble crochet (tr)
- Slip stitch (slip st)
SMALL SQUARE (make 20)
With C, ch 2.
- Round 1: Work 8 sc in second ch from hook; join with slip st in first sc—8 sts.
- Round 2: Ch 2 (counts as first dc), dc in same st as join, 2 dc in each sc around; join with slip st in top of beginning ch-2—16 sts.
- Round 3: Ch 1, *sc in next st, 2 sc in next st; repeat from * around; join with slip st in first sc—24 sts. Fasten off C.
- Round 4: Join G with slip st in any st of last round, ch 1, *sc in next 3 sts, hdc in next st, (2 dc, ch 1, 2 dc) in next st, hdc in next st; repeat from * around; join with slip st in first sc—36 sts and 4 ch-1 corner sps. Fasten off G.
RECTANGLE (make 31)
With F, ch 23 (foundation ch).
- Round 1: (Dc, ch 1, dc, 3 hdc, dc, ch 1, 2 dc) in third ch from hook (beginning ch-2 counts as first dc), dc in next 19 ch, (2 dc, ch 1, dc, 3 hdc, dc, ch 1, 2 dc) in last ch; pivot to work in free loops on opposite side of foundation ch, dc in next 19 ch; join with slip st in top of beginning ch-2—56 sts and 4 ch-1 corner sps. Fasten off F.
- Round 2: Join G in next ch-1 corner sp, ch 2 (counts as first dc), (2 dc, ch 1, dc, hdc) in same ch-1 sp, hdc in next 5 sts, (hdc, dc, ch 1, 3 dc) in next ch-1 corner sp, dc in next 23 sts, (3 dc, ch 1, dc, hdc) in next ch-1 corner sp, hdc in next 5 sts, (hdc, dc, ch 1, 3 dc) in next ch-1 corner sp, dc in next 23 sts; join with slip st in top of beginning ch-2—76 sts and 4 ch-1 corner sps. Fasten off.
MONKEY SQUARE (make 12 – 6 with D background and 6 with E background)
With B, ch 2.
- Round 1: Work 6 sc in second ch from hook; do not join—6 sts. Work proceeds in continuous rounds, do not join and do not turn unless otherwise instructed. Place a stitch marker to indicate the beginning of a round. Move the marker up as each round is completed.
- Round 2: 2 sc in each st around—12 sts.
- Round 3: *Sc in next st, 2 sc in next st; repeat from * around—18 sts.
- Round 4: *2 sc in next st, sc in next 2 sts; repeat from * around—24 sts.
- Round 5: *Sc in next 3 sts, 2 sc in next st; repeat from * around—30 sts.
- Round 6: Sc in next 2 sts, *2 sc in next st, sc in next 4 sts; repeat from * 4 more times, 2 sc in next st, sc in next 2 sts—36 sts.
- Round 7: *2 sc in next st, sc in next 5 sts; repeat from * around—42 sts. Fasten off B.
- Round 8: Join A with sc in any st of last round, sc in next 2 sts, *2 sc in next st, sc in next 6 sts; repeat from * 4 more times, 2 sc in next st, sc in next 3 sts—48 sts.
- Round 9: *Sc in next 7 sts, 2 sc in next st; repeat from * around—54 sts.
- Round 10: Sc in next 3 sts, 2 sc in next st, sc in next 8 sts, 2 sc in next st; skip next 3 sts, working in front loop only, 8 dc in next st, skip next 3 sts; working in both loops, sc in next st, *2 sc in next st, sc in next 8 sts; repeat from * 1 more time, 2 sc in next st, skip next 3 sts; working in front loop only, 8 dc in next st, skip next 3 sts; working in both loops, sc in next st, 2 sc in next st, sc in next 5 sts; join with slip st in first sc—62 sts. Fasten off A.
- Round 11: Join background color with sc in first st, sc in next 6 sts, hdc in next 2 sts, dc in next st, (dc, tr) in next st, ch 1, (tr, dc) in next st, dc in next st, hdc in next 2 sts; hdc in next 3 skipped sts of Round 9, hdc in free back loop of next st of Round 9, hdc in next 3 skipped sts of Round 9, skip the 8 dc of Round 10; hdc in next 2 sts of Round 10, dc in next st, (dc, tr) in next st, ch 1, (tr, dc) in next st, hdc in next 2 sts, sc in next 7 sts, hdc in next 2 sts, dc in next st, (dc, tr) in next st, ch 1, (tr, dc) in next st, dc in next st, hdc in next 3 sts; hdc in next 3 skipped sts of Round 9, hdc in free back loop of next st of Round 9, hdc in next 3 skipped sts of Round 9, skip the 8 dc of Round 10; hdc in next 2 sts of Round 10, dc in next st, (dc, tr) in next st, ch 1, (tr, dc) in next st, hdc in last 3 sts; join with slip st in first sc—68 sts and 4 ch-1 corner sps.
- Round 12: Ch 2 (counts as first hdc), hdc in next 11 sts, *(2 hdc, ch 1, 2 hdc) in next ch-1 sp, hdc in next 17 sts; repeat from * 2 more times, (2 hdc, ch 1, 2 hdc) in next ch-1 sp, dc in next 5 sts; join with slip st in top of beginning ch-2—84 sts and 4 ch-1 corner sps.
- Round 13: Ch 2 (counts as first dc), dc in next 13 sts, *(2 dc, ch 1, 2 dc) in next ch-1 sp, dc in next 21 sts; repeat from * 2 more times, (2 dc, ch 1, 2 dc) in next ch-1 sp, dc in next 7 sts; join with slip st in top of beginning ch-2—100 sts and 4 ch-1 corner sps. Fasten off background color.
- Round 14: Join G with slip st in any ch-1 corner sp, ch 2 (counts as first dc), (dc, ch 1, 2 dc) in same sp, dc in next 25 sts, *(2 dc, ch 1, 2 dc) in next ch-1 corner sp, dc in next 25 sts; repeat from * 2 more times; join with slip st in top of beginning ch-2—116 sts and 4 ch-1 corner sps. Fasten off.
MUZZLE (make 12)
With B, ch 2.
- Rounds 1–6: Work Rounds 1–6 of Monkey Square.
- Round 7: Sc in each st around. Fasten off leaving a long tail for sewing.
EYES (make 24)
With H, ch 2.
Round 1: 5 sc in second ch from hook; join with slip st in first sc. Fasten off leaving a long tail for sewing.
FINISHING
- Using yarn needle, weave in ends.
- With yarn needle and matching yarn, sew one muzzle to the front center of each monkey square. Lightly stuff muzzle before completing sewing. Using photograph as a guide, with H and yarn needle, sew eyes above muzzle. With H and yarn needle embroider nostrils. With G and yarn needle embroider mouth.
- Arrange small squares, rectangles and monkey squares as shown in assembly diagram. With yarn needle and G, sew pieces together.
EDGING
Join G with slip st in any ch-1 corner sp.
- Round 1: Ch 2 (counts as first dc), (dc, ch 1, 2 dc) in same sp, *dc in each st and ch-1 sp across to next ch-1 corner sp, (2 dc, ch 1, 2 dc) in next ch-1 corner sp; repeat from * 2 more times, dc in each st and ch-1 sp across to first corner; join with slip st in top of beginning ch-2.
- Round 2: Ch 1, *sc in next st, ch 3, slip st in third ch from hook, sc in next st; repeat from * around; join with slip st in first sc. Fasten off and weave in ends.
For other great crochet afghan ideas, check out this collection.
Read NextIsobel's Afghan Pattern
Your Recently Viewed Projects
ros 8423982
May 13, 2013
Is there an amended version of this pattern? There are definitely errors in it i.e. round 14 (monkey square) says join G (red?) but this should be the brown which is A? I also cannot get the stitch count to work on rows 11 & 12? Anyone else having difficulties with this?
jmda58 1343219
Jan 24, 2013
I made this blanket for our grandson and love it , one of the cutest ones i have made.
jbea1973 4931135
Feb 06, 2012
Has there been corrections for rows 11 &12 . I tried calling but no one has called back , it's been about 2 wks
sisnicky 0139236
May 29, 2012
Rows 11 and 12 are correct. You just have to follow them carefully step by step. The first square I got missed up and took awhile to figure it out. But the next time, I carefully followed the instructions and it came out right.
JennyBee1
Sep 15, 2011
@amcardinal58 7763095, We suggest contacting the pattern designer directly to determine if this is possible. Here is the link for Caron's contact information: http://www.caron.com/contact.html --Editor of FaveCrafts
amcardinal58 77630 95
Sep 15, 2011
Can this be made following the directions, but without the puffy muzzle as the picture shows ?
Crafter 2645397
Jan 05, 2011
Hey Debbie, Click on the green highlighted & underlined words soft plush monkey & it will take you there to the pattern.
Report Inappropriate Comment
Are you sure you would like to report this comment? It will be flagged for our moderators to take action.
Thank you for taking the time to improve the content on our site.

