Patchwork Felted Bag
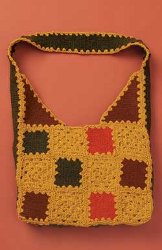
This is the perfect seasonal bag to tote around all your belongings. This free crochet pattern from Patons features a felted technique and crochet patchwork that creates a beautiful design in your favorite colors. Try this free pattern felting crochet.
MATERIALS
- Patons® Classic Wool (100 g / 3.5 oz)
- Main Color (MC) (204 Old Gold) 2 balls
- Contrast A (205 Deep Olive) 1 ball
- Contrast B (206 Russet) 2 balls
- Contrast C (238 Paprika) 2 balls
- Crochet Hook: Size 5 mm (U.S. H or 8) or size needed to obtain tension.
- Awl tool 4 mm diameter for holes.
- Tapestry needle.
MEASUREMENTS
Approx 14 ins [35.5 cm] wide x 16 ins [40.5 cm] high.
TENSION
Granny Square Motif = 3½ ins [9 cm] square. 16 sc and 16 rows = 4 ins [10 cm].
Important to know before felting:
- Record all the measurements and changes before and after felting. You will be able to adjust the method to produce proper results.
- Always test a sample. Different colored yarns may felt differently.
- Colorfastness can be affected by very hot water.
- Any knitting that has been properly felted becomes very dense and matted.
Felting:
- Put knitted pieces in top-loading washing machine. Using low water level, run a Hot/Cold cycle for 5-15 min. Put in a pair of jeans or large towel (in non-interfering color) for extra agitation.
- Add 2 tablespoons of baking soda for a small load. After one cycle, check for size. Repeat as necessary.
- Run through the rinse and spin cycle.
- Lay felted piece on a dry towel, away from heat or sunlight.
- Shape piece to correct measurements.
- Allow to dry thoroughly. Do not use a clothes dryer.
- If an edge ripples, baste a thread through the edge and gather in. Remove the thread after the felting is dry.
INSTRUCTIONS
Granny Square (make 12)
With MC, ch 4. Join with sl st to form ring.
1st rnd: Ch 3 (counts as dc). 2 dc in ring. (Ch 1. 3 dc ) 3 times in ring. Ch 1. Sl st to top of ch-3.
2nd rnd: Ch 4 (counts as dc and ch-1 sp). [(3 dc. Ch 1) twice in next ch 1 sp] 3 times. (3 dc. Ch 1. 2 dc) in last ch-1 sp. Join with sl st to top of ch 3.
3rd rnd: Ch 3 (counts as dc). 2 dc in next ch-1 sp. Ch 1. *(3 dc. Ch 1) twice in next ch-1 sp. 3 dc in next ch-1 sp. Ch 1. Rep from * twice more. (3 dc. Ch 1) twice in last ch-1 sp. Sl st in top of ch-3. Fasten off.
Piece A (make 1 each with A, B and C)
Ch 46.
1st row: 1 sc in 2nd ch from hook. 1 sc in each ch to end of ch. 45 sc. Turn.
2nd row: Ch 1. 1 sc in each sc to end of row. Turn.
Rep last row until work from beg measures 12 ins [30.5 cm]. Fasten off.
Piece B
With B, ch 30.
1st row: 1 sc in 2nd ch from hook. 1 sc in each ch to end of ch. 29 sc. Turn.
2nd row: Ch 1. 1 sc in each sc to end of row. Turn.
Rep last row until work from beg measures 15 ins [38 cm]. Fasten off.
Handle/Gusset
With B, ch 10.
1st row: 1 sc in 2nd ch from hook. 1 sc in each ch to end of ch. 9 sc.Turn.
2nd row: Ch 1. 1 sc in each sc to end of row. Turn.
Rep last row until work from beg measures 95 ins [241.5 cm]. Fasten off.
FINISHING
Felt Pieces A, B and Handle/Gusset.
Felted Piece A should measure approx 8 x 8 ins [20.5 x 20.5 cm]. Felted Piece B should measure approx 5½ x 11 ins [14 x 28 cm]. Felted Handle/Gusset should measure approx 1¾ x 72 ins [4 x 183 cm].
Cut four 3½ ins [9 cm] squares from each Piece A (12 squares in total). With an awl tool, make 4 corner holes ¼ inch [.5 cm] in from both edges. Make 3 more holes evenly spaced between corner holes along each side of square.
With RS of work facing, join MC with sl st to any corner hole. Ch 1. *(2 sc. Ch 1. 2 sc) in corner hole. (3 sc in next hole) 3 times. Rep from * around. Join with sl st to first sc. Fasten off.
Cut four Triangle Motifs 4½ ins [11.5 cm] wide x 5 ins [12.5 cm] high from Piece B. With an awl tool, make corner hole ¼ inch [.5 cm] in from both edges at right angle. Make 1 hole at each point ½ inch [1 cm] below both edges. Make 6 holes along the shortest (bottom) side of Triangle Motif evenly spaced between corner holes. Make 10 holes evenly spaced between corner holes along the longest side of Triangle Motif. Make 8 holes evenly spaced between corner holes along last side of Triangle Motif.
Right Triangle Motif: With RS of work facing, join MC with sl st to bottom right corner hole. Ch 1. (2 sc. Ch 1. 2 sc) in corner hole. (3 sc in next hole up side of Triangle Motif) 8 times. (2 sc. Ch 2. 2 sc) in next point hole. (3 sc in next hole down longest side of Triangle Motif ) 10 times. (2 sc. Ch 2. 2 sc) in next point hole. (3 sc in each hole along bottom side of Triangle Motif) 6 times. Join with sl st to first sc. Fasten off.
Left Triangle Motif: With RS of work facing, join MC with sl st to bottom left corner hole of Triangle Motif. Ch 1. (2 sc. Ch 1. 2 sc) in corner hole. (3 sc in next hole along bottom side of Triangle Motif ) 6 times. (2 sc. Ch 2. 2 sc) in next point hole. (3 sc in next hole up longest side of Triangle Motif ) 10 times. (2 sc. Ch 2. 2 sc) in next point hole. (3 sc in next hole down side of Triangle Motif ) 8 times. Join with sl st to first sc. Fasten off.
Trim Handle/Gusset to measure 70 ins [177.5 cm] long. With an awl tool, make 4 corner holes ¼ inch [.5 cm] below both edges. Make 2 holes evenly spaced between corner holes along short sides of Handle. Make rem holes ½ inch [1 cm] apart along long sides of Handle/Gusset, ¼ ins [.5 cm] below edge. With RS of work facing, join MC with sl st to any corner hole. Ch 1. *(2 sc. Ch 1. 2 sc) in corner hole. Work 3 sc in each hole along sides, having (2 sc. Ch 1. 2 sc) in corner holes. Join with sl st to first sc. Fasten off.
With RS of work facing and MC sew all squares and triangle motifs for Front and Back, as shown on Diagram I. Sew short sides of Handle/Gusset tog to form a ring, taking care not to twist gusset. Pin Handle/Gusset to Front, with gusset seam at center bottom of bag.
Starting at top of Triangle Motif, with RS of work facing and MC, sew Handle/Gusset and Front tog. Rep for Back.
Read NextHip Hobo Crochet Bag Pattern

![Battenberg Crochet Granny Square Bag Pattern [Free]](http://irepo.primecp.com/2022/08/532101/Battenberg-Bag-02_Category-CategoryPageDefault_ID-4857588.png?v=4857588)
