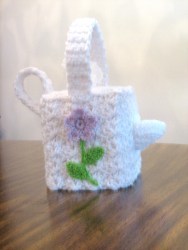
Floral Watering Can Tissue Cover
Decorate your tissue box with some fun flowers. This tissue cover is fun as it looks like a watering can. Free crochet patterns are always great when you can get a little creative with it.


Materials:
- 1 skein White Red Heart 4-ply yarn
- 2 yds. Pink Red Heart 4-ply yarn
- 2 yds. Light Lavender Red Heart 4-ply yarn
- 3 yds. Spring Green Red Heart 4-ply yarn
- F, G and H crochet hooks or size needed for guage
- Sewing Needle and Thread
- Tapestry Needle
- Boutique Tissue Box
Graph
GAUGE: With G hook – 2 rows = 1 ¼”
2 small shells = 2”
STITCH GUIDE
Chain (ch), Single Crochet (sc), Half Double Crochet (hdc), Double Crocht (dc), Slip Stitch (sl st)
Special Stitch: Small Shell (Sm Sh) – 2 dc, ch 2, sc
COVER
Rnd 1 – With G hook and white ch 64 and form a ring, ch 3, (dc, ch 2, sc) in same ch, *skip 3 ch,
Sm Sh in next ch, rep from * around, join to top of beg ch 3 and turn. (16 Small Shells)
Rnd 2 – Sl st in first 2 ch sp, ch 3, (dc, ch 2, sc) in same sp, Sm Sh in each ch 2 sp around, join to
top of beg ch 3 and turn.
Rep Rnd 2 for a total of 10 rounds, fasten off leaving yarn for joining to top.
TOP
Row 1 – With G hook and white ch 21, dc in 4th ch from hook, (dc, ch 2, sc) in same ch, *skip 3
ch, Sm Sh in next ch, rep from * across ending sc in last ch, ch 2 and turn. (5 Small
Shells)
Row 2 – Sm Sh in each ch 2 sp across ending sc in last dc, ch 2 and turn.
Row 3 – Rep Row 2.
Row 4 – Sm Sh in each of next 2 ch 2 sps, ch 2, sl st in next ch 2 sp, ch 2 (this starts tissue
opening), cont. Sm Sh across ending sc in last dc, ch 2 and turn.
Row 5 – Sm Sh in each of next 2 ch 2 sps, ch 6 (for tissue opening), cont. Sm Sh across ending
sc last dc, ch 2 and turn.
Row 6 – Sm Sh in each of next 2 ch 2 sps, skip 2 ch, Sm Sh in next ch, skip 3 ch, cont. Sm Sh
across ending sc in last dc, ch 2 and turn.
Row 7 – Rep Row 2.
Rnd 8 – Rep Row 2 ending dc in last dc and fasten off.
HANDLES
Top Handle: Row 1 – With I hook and double strands of white ch 4, sc in 2nd ch from hook, sc
in each ch across, ch 1 and turn. (3 scs)
Rows 2-38 – Sc in each sc across, ch 1 and turn.
Row 39 – Sc in each sc across and fasten off.
Side Handle: Rep as for Top Handle for a total of 24 rows.
SPOUT
Row 1 – (Beginning) With G hook and white ch 4, sc in 2nd ch from hook, sc in each sc across
and fasten off. Do Not Turn.
Row 2 – Starting at beg of row sl st in first sc, ch 2, 1 dc in same sp, 3 dc in next sc, 2 dc in last
sc and fasten off. Do Not Turn.
Row 3 – Starting at beg of row sl st in first dc, ch 2, 2 dc in each dc across and fasten off. Do
Not Turn.
Row 4 – Starting at beg of row sl st in first dc, ch 2, *2 dc in next dc, dc in next dc, rep from *
across ending 2 dc in last dc and fasten off.
FLOWERS AND LEAVES
Flowers: (make 1 light lavender and 1 pink)
Split flower color yarn into 2 strand pieces
Rnd 1 – With F hook ch 4 and form a ring, work 10 sc in ring, join to beg sc.
Rnd 2 – Ch 2, 3 dc in next st, ch 2, (sl st in next st, ch 2, 3 dc in next st, ch 2) around, join
with a sl st to last round and fasten off.
Leaves: (make 4)
Split spring green into 2 strand pieces
With F hook ch 7, sc in 2nd ch from hook, sc in next ch, hdc in each of next 2 chs, sc in next
ch, 3 sc in next ch, working along opposite side of chain, sc in sc, hdc in each of next 2 hdcs,
sc in each of next 2 scs, join with a sl st to beg ch st and fasten off.
Stems: (Make 2)
Split spring green into 2 strand pieces
With F hook make chain length you need plus 7 extra chains, sl st in 7th ch from hook to
form the top of the stem and fasten off.
JOINING
1. Sew flowers, leaves and stems on front and back as shown on Flower Graph.
2. With white sew on spout to side
3. With white whipstitch cover to top.
4. With white sew on side handle opposite of spout.
5. With white sew on top handle.
Your Recently Viewed Projects
Thanks for your comment. Don't forget to share!
diabcprint 0657481
Jul 10, 2019
I am working this beautiful watering can tissue holder. Can you enlighten me as to HOW the spout and 2 handles will stay rigid once the pattern is completed. TIA Dianne Turnbull
Editor Dana
Jul 15, 2019
Hi there! It seems to me that the tension of the stitches should hold the handle and spout upright naturally. If the stitches were too lose the handle would not stay up. If you're experiencing this issue, I'd suggest trying a smaller crochet hook to try and stiffen those stitches. I hope that helps!
Report Inappropriate Comment
Are you sure you would like to report this comment? It will be flagged for our moderators to take action.
Thank you for taking the time to improve the content on our site.