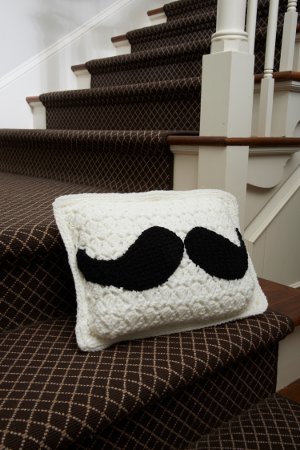
Mustache Pillow
 Teens, kids, and adults are all sure to love this cute Mustache Pillow. Learning how to make a decorative pillow like this is easy and fun, and it's a great crochet project if you're looking for something quick and easy to do this weekend. This sweet pillow would be a fun accent pillow for a couch or a bed.
You can find this project, as well as many others, in our new eBook, Welcome to Our Home: Knit and Crochet Ideas from Red Heart. Download your own free copy today!

Materials:
- 1 skein Red Heart® Super Saver® yarn in Soft White (A)
- 1 skein Red Heart® Super Saver® yarn in Black (B)
- 5mm [US H-8] Susan Bates® Crochet Hook
- 12" long x 16" wide (30.5 x 40.5 cm) pillow form
- Yarn needle
Gauge: 3 repeats = 3½" (9 cm) across widest points in pillow pattern; 6 rows = 4" (10 cm). CHECK YOUR GAUGE. Use any size hook to obtain the gauge.
Special Stitches:
- sc2tog = [Insert hook in next stitch, yarn over and pull up a loop] twice, yarn over and draw through all 3 loops on hook.
- sc3tog = [Insert hook in next stitch, yarn over and pull up a loop in next st] 3 times, yarn over and draw through all 4 loops on hook.
Instructions:
Pillow measures 12" long x 16" wide (30.5 x 40.5 cm)
Side (Make 2)
- With A, ch 40.
- Row 1 (right side): Dc in4th ch from hook (beginning ch count as first dc), *skip next 3 ch, (sc, ch 3, 3 dc) in next ch; repeat from * to last 4 ch, skip next 3 ch, sc in last ch, turn—9 sc and 8 ch-3 sps.
- Rows 2–24: Ch 3 (counts as first dc here and throughout), dc in first sc, *skip next 3 dc, (sc, ch 3, 3 dc) in next ch-3 space; repeat from * to beginning ch-3, sc in top of beginning ch-3, turn.
- Row 25: Ch 3, dc in first sc, ch 1, sc in next ch-3 space, *ch 3, sc in next ch-3 space; repeat from * to last 2 sts, dc in next dc, dc in top of beginning ch-3, turn.
- Round 26: Ch 1, 3 sc in first st, *working across long side, sc 46 sts evenly spaced to last sc, 3 sc in last st, working across ends of rows of short side, sc 33 sts evenly spaced to last row,* 3 sc in last row; repeat from * to * once; join with slip st in first sc.
Mustache
First Half
- With B, ch 5.
- Row 1: Sc in 2nd ch from hook and each ch across, turn—4 sc.
- Row 2: Ch 1, 2 sc in first sc, sc in remaining 3 sc, turn—5 sc.
- Row 3: Ch 1, 2 sc in first sc, sc to last sc, 2 sc in last sc, turn—7 sc.
- Row 4: Ch 1, sc in each sc, turn.
- Row 5: Repeat Row 3—9 sc.
- Row 6: Ch 1, sc in each sc to last sc, 2 sc in last sc, turn—10 sc.
- Row 7: Repeat Row 4.
- Row 8: Ch 1, sc2tog, sc in remaining sc—9 sc.
- Row 9: Ch 1, 2 sc in first sc, sc in remaining sc, turn—10 sc.
- Rows 10-14: Repeat Rows 8 and 4 twice, then repeat Row 4 once more—8 sc.
- Row 15: Ch 1, sc in first 6 sc, sc2tog, turn—7 sc.
- Rows 16 and 17: Repeat Rows 8 and 4 once—6 sc.
- Row 18: Ch 1, sc in first 4 sc, 2sc2tog, turn—5 sc.
- Row 19: Repeat Row 8—4 sc.
- Row 20: Ch 1, 2 sc in next sc, sc in next sc, sc2tog, turn.
- Row 21: Ch 1, sc2tog, sc in next sc, 2 sc in next sc, turn.
- Rows 22 and 23: Repeat Rows 20 and 21 once.
- Row 24: Ch 1, 2 sc in first sc, sc3tog, turn—3 sc.
- Row 25: Ch 1, sc2tog, 2 sc in next sc, turn.
- Row 26: Ch 1, 2 sc in first sc, sc2tog, turn.
- Row 27: Ch 1, slip st in first 2 sc, 2 sc in last sc, turn—2 sc.
- Row 28: Ch 1, 2 sc in first sc, slip st in last sc, turn.
- Row 29: Ch 1, skip first sc, 2 sc in last sc, turn.
- Round 30: Ch 1, sc evenly spaced around mustache; join with slip st in first sc. Fasten off.
Second Half
- Repeat Rows 1-28.
- Row 29: Ch 1, skip first sc, 2 sc in last sc, do not turn.
- Round 30: Ch 1, sc evenly spaced around mustache; join with slip st in first sc. Fasten off.
Finishing
- Weave in ends. Using photograph as a guide, sew mustache halves in place on right side of one pillow side. With wrong sides of pillow sides held together, join A with slip st to inner loops of any pair of corner sts in Round 26. Working through inner loops only, sc in each st around 3 sides. Insert pillow form and sc in remaining sts; join with slip st in first sc. Fasten off.
- Working through both layers of sides around base of Round 26, embroider with back st around pillow form. Secure last stitch and weave in remaining ends.
If you're looking for more great home decor crafts, check out 10 Free Crochet Pillow Patterns.
Read NextFlower Square Bag
Your Recently Viewed Projects
evelynhouska 03575 96
Dec 17, 2013
I I am not pleased! tried to print the moustache pillow instructions & got on 4 pages of ads; that's 4 pages of wasted paper and ink.. These as yo9u know are not cheap!!!!!! 1
Report Inappropriate Comment
Are you sure you would like to report this comment? It will be flagged for our moderators to take action.
Thank you for taking the time to improve the content on our site.

