DIY Ombre Button Monogram
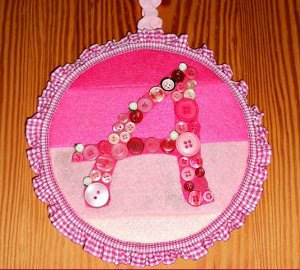
This fun DIY Ombre Button Monogram from Lelanie Denso is a great way to decorate a little girl or boy's room. Made with felt and a variety of buttons, this is a quick and easy project that's great for using up fabric scraps and your favorite colored buttons.

Materials:
- Felt or fabric pieces (with different shades that will give an ombre effect)
- Embroidery hoop (I used one with 17 cm. diameter)
- Buttons of different sizes
- Elastic ruffled trim (or any other trimming)
- Fabric glue/hot glue or any other strong glue
- Sewing machine
Instructions:
-
First, cut the felt (I used 4) into 5.5 cms If you use more felt pieces/colors, then you will have to adjust the measurement. I mased this measurement on the 17 cms (diameter) embroidery hoop which I used for this project.

-
Join the felt pieces by sewing them together 1/8" away from the seam. If you don't have a sewing machine, use fabric glue or any other stronger glue to attach the felt pieces together.

-
Now, we have one felt piece with ombre effect. Pretty!

-
Fit the felt in the embroidery hoop. Cut excess felt. I left 1/2" so I could glue it to the hoop using hot glue.

-
I traced a nice letter A (my daughter's initial) on a felt piece and cut it.

-
Glue the monogram to the felt in the hoop and glue on the felt monogram buttons of different sizes to fill the letter A.

-
I used buttons of different sizes and shades. I even used small rose beads to fill smaller spaces.
-
I glued an elastic ruffled gingham trim on the hoop.

-
Hide the raw edge by folding once 1/8" down and apply glue.

-
I used gingham trim to hang the hoop art on my daughter's bedroom's door. She loved it!
- It was so easy, quick and fun to make!
Read NextRain Boots Vase

