End Table Upcycle
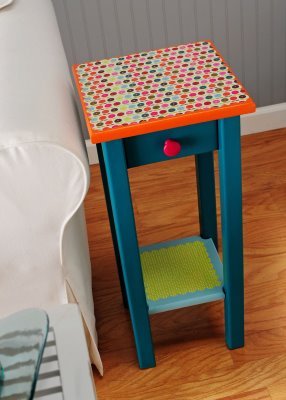
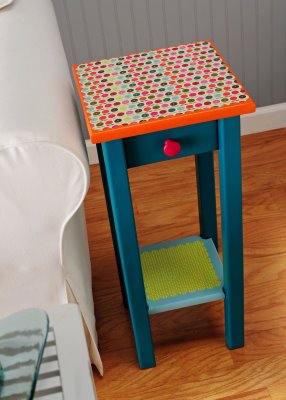
Use some scrapbook paper to transform a boring end table with this decoupage craft project from Amy Anderson. This upcycle project is a great way to add color to any room in the house.
Materials:
- FolkArt® Acrylic Paint - Teal, Glazed Carrots, Magenta, Sky Blue
- Mod Podge® Hard Coat, 8 oz.
- Scrapbook paper of your choice – 2 sheets (I used Carolyn Gavin Greenhouse papers from Michaels)
- 1” Flat Paint Brush
- Craft Glue
- Scalloped Edge Scissors
- Pencil
- Ruler
- 1 ½” wood knob
Note: Correspond the paint colors to your scrapbooking papers, like I did! Also, if your table starts out really dark and you are painting with light colors, I suggest basecoating with White to limit the number of coats you have to paint.
Instructions:
- Using the paint brush, basecoat the top of the table Glazed Carrots, the sides and legs of the table Teal and the bottom shelf Sky Blue. You will need several coats of all colors. Allow to dry.
- While the table is drying, select two pieces of scrapbooking paper and measure the size you will need. Cut the correct shape and size out of two different (but coordinating) sheets of paper with the scalloped edge scissors. Set aside.
- Glue the papers down to the table (top and shelf) using Mod Podge. Allow to dry at least 15-20 minutes.
- While the paper is drying, paint the knob Magenta. Allow to dry and glue to the front of the table using craft glue. Allow knob to dry. Coat the entire table with at least two coats of Mod Podge. Allow to dry for at least 48 hours before using.
For more decoupage furniture projects, check out our collection of 33 Fabulous Decoupage Ideas Plus 3 Helpful Tutorials.
Read NextUpcycled Sweater Wreath
Your Recently Viewed Projects
Report Inappropriate Comment
Are you sure you would like to report this comment? It will be flagged for our moderators to take action.
Thank you for taking the time to improve the content on our site.

