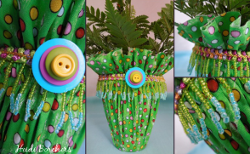
Polka Dot Vase Cover
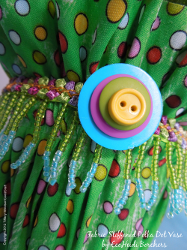
Add a splash of color and a dash of fun to your decor with a Polka Dot Vase Cover from Heidi Borchers. Use Aleene’s Fabric Stiffener and Draping Liquid and cover a plain pot with decorative fabric. Add buttons and beads afterward for a whimsical touch.
Materials:
- Aleene’s Fabric Stiffener and Draping Liquid
- Fabric (print of your choice)
- Clay pot
- Measuring tape
- Pencil
- Scissors
- Cardboard or plastic squeegee
- Rubber band
- Wax paper
Instructions:
- To measure the size of fabric that you will need to cover your clay pot, wrap measuring tape along one side, under bottom and back up the other side of clay pot. Add approximately 1-1/2″ to measurement on each side. This extra fabric will create the ruffle along the top of your vase cover. Cut square to measurement. (On my small clay pot, I measured and cut a 9″ square.)

- Fold square in half and in half again.

- Then fold over from corner to corner. Using pencil, mark a slightly curved line from edge to edge.

- Cut along pencil pattern line. You should have a piece of fabric that looks like this and when opened, it should be an almost perfect circle.

- Open fabric and place on wax paper. Find center and place a pencil mark on right side of fabric.

- Turn fabric wrong side up on wax paper. Squeeze Fabric Stiffener from bottle directly onto fabric.

- Pull Fabric Stiffener across fabric with squeegee. This will force the Fabric Stiffener into fabric threads while keeping the fabric smooth. Continue until you have applied Fabric Stiffener to entire fabric on both sides returning excess Fabric Stiffener to bottle.

- Place pot face down on wax paper. Drape fabric over bottom of pot using pencil mark to center fabric on bottom of pot.

- Use rubber band to hold fabric in place along rim of pot, adjusting to gather fabric under rubber band. If you feel that ruffle is too long, you can cut excess fabric at this point, while it is still wet.

- Place pot face down on top of glue bottle (or other raised object) adjusting ruffles. Let fabric dry completely overnight.To finish off pot, add braids, trims and embellishments.

For a comprehensive video tutorial of this project, check out How to Make a Fabric Stiffened Vase Cover.
Read NextFarmhouse Egg Wreath