Chandelier Earrings
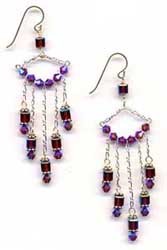
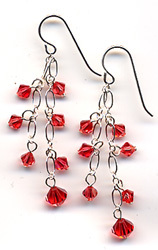
These chandelier earrings from The Bead Studio are perfect for a night out on the town. Use your favorite crystals to create chandelier earrings with this easy technique that anyone can master. These colorful accessories will complement any outfit and are perfect for girls of any age. While these earrings are simply stunning in purple crystals, you can easily use black, silver, or any other color you'd like ot create a pair of earrings that you're sure to love.
Find this homemade earrings project and 45 other beading craft projects in our free downloadable eBook, Beautiful Beads.

Materials:
- 1 foot fine sterling chain w/open links
- 10 24g sterling silver headpins
- 9″ 24g sterling wire (half hard)
- 1 pair sterling earwires
- 20 sterling spacers
- 22 4mm crystals
- 12 6mm crystals
Instructions:
-
Cut wire: 2 pieces 1½″, 2 pieces 3″.

-
Cut chain: 8 pieces ½″, 4 pieces ¾″, 2 pieces 1¼″.

-
With one 3″ piece of wire create a wire wrap loop & attach to earwire.

-
Add one 6mm bead. Place the tip of the chin-nose plier against the bead and bend wire to a 90 degree angle.

-
Make loop bringing the wire tail back to a right angle.

-
Slip two ½″ pieces of chain into the loop.

-
Wrap wire until it meets the base of the bead. Trim wire & tuck end down.

-
Make a simple loop on the end of the 1½″ piece of wire, link onto one of the pieces of chain dangling from the earwire.

-
String 4mm beads & chain on wire alternating in this pattern.

-
Trim wire to ¼″. Make loop after the last bead and link to the other piece of chain attached to earwire, bend gently to shape.

-
String a 4mm bead, a spacer, a 6mm bead and another spacer onto each of the headpins.

-
Make a loop & attach to the ends of the chain.

Read NextSpringtime Gypsy Earrings
Your Recently Viewed Projects
Weberme
Oct 26, 2016
This tutorial is very well explained and good pictures to go with each step. These chandelier earrings can ban worn with a lot of different necklaces that you make or even a store bought one. Change the bead colors or he length of the chain hanging down to give it your own look. There is so much you can do. Make some for gifts and see what you can come up with.
Melissa Ryan
Nov 27, 2012
Just a note to say that we tried to make the photos bigger, as requested, however the images from The Bead Studio weren't big enough to enlarge...if you continue to have questions about particular steps in this project, please feel free to contact the designer (The Bead Studio) with your questions! Thanks for all your comments, and keep em' comin!
Lyn1959
Sep 22, 2012
I'm a beginner beader and found the instructions easy to follow. The photo of the item could be bigger but otherwise a very pretty design.
pzavitz 5208592
Apr 25, 2012
I am very empressed with this sight I am looking forward to making some of theese things
Joyfully
Jun 28, 2011
Definitely not a beginner project....THANK goodness!! Very pretty earrings and my only wish was that the photos were larger.
ksaugustsson
Oct 21, 2010
To many elements and too much time. If one was to sell these earrings they would not get what they would really worth. A lot of time would go into these earrings to create
feleria
Jan 14, 2010
These are very nice earrings, the illustrations are a bit confusing for a beginner, but I'm an experienced jewelry maker, so I could follow along, but for someone who is not, this would present some peoblems. I like them, I hope in the future, the instructions will be a lot more user friendly, because not everyone is an experienced jewelry maker.
Report Inappropriate Comment
Are you sure you would like to report this comment? It will be flagged for our moderators to take action.
Thank you for taking the time to improve the content on our site.

