Bunny Land Easter Box
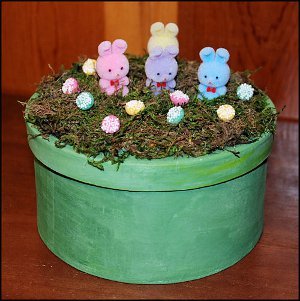
This Bunny Land Easter Box from Alyice Edrich and Consumer Crafts is a great Easter gift for everyone! This Easter gift box is easy to make and you can fill it with all kinds of goodies! Make this cute Bunny Land box for all your "little bunnies!"

Materials:
- 6″ Round Paper Mache Box
- Set of Acrylic Paints in white, yellow, green, and magenta
- 4 1.5″ Flocked Pastel Rabbits
- Preserved Sheet Moss
- Candies
- 8×8 Non-stick Glue Pad by Darice
- Glue Gun
- Glue Sticks
- 3 mm Tulip Embossing Stencil
- Sponge Brush
- Thin tipped paint brush
- Small, square tipped paint brush
Instructions:
- Use a sponge to paint the Paper Mache box with two coats of White acrylic paint. Since the box has a porous surface, it will absorb any paint you use. By painting the surface with the white first, you build up a protective layer that will allow the true colors of the colored paint to show.

- While the white is still wet, squeeze a small amount of Green onto the outer part of the lid, and spread with the sponge until the entire surface (top and sides) is covered. By using the same sponge you used to paint the white, and by painting the surface while it’s still wet, you’re blending the two colors, creating a softer, more “Eastery” green.

- Do the same thing to the bottom of the box. If you notice that parts of the box has too much green, dab on a little white. If you find you are getting white streaks, dab on a little green. Allow to dry.
- While the box is drying, wash the paint out of the sponge brush, then squeeze the sponge dry with a paper towel.
- Once dried, paint the inside of the lid and the bottom of the box with yellow. You’ll notice that this paint is a little transparent. You can continue to build up the yellow color by painting the surface, allowing to dry, and then repainting the surface until you reach the depth of yellow you like. Or, you can paint two coats of yellow and allow the darkness of the paper mache box to come through—thus giving it an aged feel.

- Use the tulip stencil to paint two tulips inside the box. The easiest way to paint the tulips is to grab a little painter’s tape to hold down the stencil. Or, if you’re impatient like me, just hold the top and bottom corner of the stencil with a finger and a thumb.

- Use a small brush to dab Magenta onto the tulip and Green on the stems, then gently remove the stencil and let dry before painting the second tulip.

- Once both tulips have dried, dry brush Green on top of the stems of both tulips.
- While the tulips dry, and the hot glue gun warms up, rip up some of the sheet moss.
- Place hot glue on top of the lid, then working in small sections, glue down the moss. Once the lid is covered with moss, hot glue rabbits to the moss.

- (This is where you can get creative with older kids — they can build a fence around the rabbits, include miniature eggs and ducks, or create an entire Easter scene with miniatures.)
- Fill the box with the recipient’s favorite candies, place lid on top, and Voila! You’ve just created a fun and unique Easter gift for someone special!
Read NextEaster Cardboard DIY Wreath

