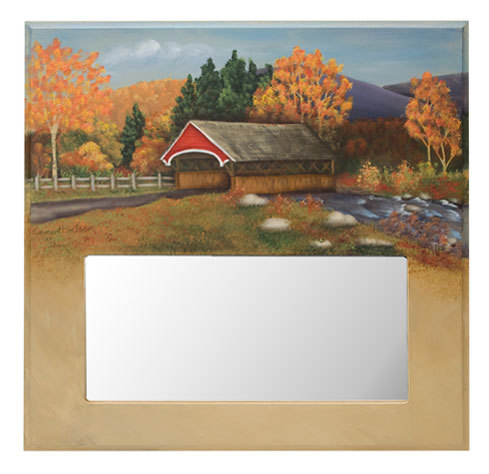
Covered Bridge Mirror
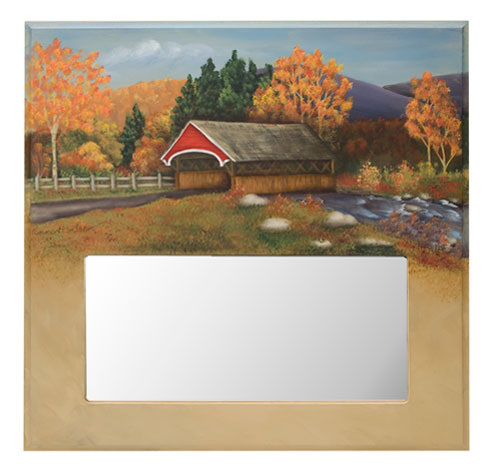
Here's a fall project with lots of bright color, a framed mirror with a countryside covered bridge.
Materials:
DecoArt Products Required
Americana Acrylics
- DAO1 - Snow (Titanium) White
- DAO8 - Yellow Ochre
- DAO10 - Cadmium Yellow (transparent)
- DAO15 - Cadmium Red
- DAO43 - Salem Blue
- DAO58 - Antique White
- DAO61 - Sable Brown
- DAO82 - Evergreen (transparent)
- DAO84 - Midnite Green
- DAO86 - Uniform Blue
- DAO88 - Charcoal Grey
- DAO93 - Raw Sienna
- DAO95 - Neutral Grey
- DA155 - Soft Black
- DA165 - Napa Red
- DA167 - Payne's Grey
- DA171 - Driftwood
- DA172 - Black Plum
- DA180 - Asphaltum
- DA197 - Violet Haze
- DA239 - Warm White
Hot Shots
- DHS4 - Fiery Red
Brush 'N Blend Extender
- DAS1 - Brush 'n Blend Extender
DuraClear Varnishes
- DS60 - DuraClear Matte Varnish
Multi-Purpose Sealer
- DS17 - Multi-Purpose Sealer
Faux Glazing Medium
- DS18 - Faux Glazing Medium
Supplies
- 2 round brush
- 10/0, 0, liner brush
- 2, 8, 10, 12, 20 flat brushes
- 3/4" oval wash brush
- 1/4" angle shader brush
- 1/8, 1/4" deerfoot brushes
- 2 fan brush
- 4, scumbler brush
- 1/4", 1/2" foliage brushes
- 1/4" Rake brush
- Extra fine grit sandpaper
- Tack cloth
- 1" basecoat brush
- Water container
- Disposable palette pad
- Paper towels
- Tracing paper
- Transfer paper
- Stylus
- 16" square frame with 6" X 12" mirror; JB Wood Products, Attleboro,MA; J.B. Wood
- Pattern 1
- Pattern 2
Steps:
- Remove mirror from frame. Sand frame with extra fine sandpaper. Tack to remove all sanding dust. Seal frame with 1" basecoat brush and Multi-Purpose Sealer. When dry, paint entire frame with two coats of Antique White. Let dry completely.
- Trace design onto tracing paper. Transfer outlines of mountains, hill, background and foreground areas, and water.
- Background 1- All background areas are painted using Faux Glazing Medium and Antique White over section to be painted. Apply Faux Glazing Medium to small area, and then, while wet, add Antique White. While still wet, pick up color to be used and blend into wet glaze mix. Working with dirty brush, continue until all sections are painted in: Sky, Salem Blue; mountains on right, Payne's Grey; hill on left, Sable Brown; middle ground, Midnite Green; foreground, Raw Sienna.
- Apply Brush 'n Blend Extender over sky. Moisten 3/4" oval wash brush in extender and sideload into Salem Blue and brush across sky; add Uniform Blue to dirty brush and paint top and both sides. While still wet, pick up Warm White and fluff in clouds with short horizontal strokes. Add some Snow White to brush and fluff in some highlights toward tops of clouds. Add tint of Uniform Blue to bottom of some clouds. (Keep this light and airy.) Add more Brush 'n Blend to brush as needed to keep surface moist for blending.
- Background 2- Moisten mountains on right with Brush 'n Blend. Side load 20 flat brush with Violet Haze and highlight tops of mountains. Sideload Payne's Grey into dirty brush and add shadows at base of mountains.
- Hill on left is stippled with 1/4" foliage brush loaded with Sable Brown, Pumpkin, and then Yellow Ochre here and there for accent.
- Middle ground is lightly stippled with 1/2" foliage brush loaded with Midnite Green, Raw Sienna, Black Plum, and Cadmium Orange here and there for accent.
- Transfer covered bridge, evergreen trees, and tall birch trees.
- Trees- Paint birch tree trunks and branches with #2 round brush loaded with Antique White. Add dark patches on trunks and larger branches with Neutral Grey. Shade right sides of trunks and lower part of branches with 2 flat brush sideloaded with Raw Sienna. Tap in foliage with 1/4" foliage brush loaded with Cadmium Orange, then Pumpkin and touches of Cadmium Yellow; pick up some Yellow Ochre and tap in few lighter highlights. Before washing out brush, pick up some Hauser Light Green and lightly tap in some foliage around trunks of trees behind bridge.
- Evergreens are stippled with 1/4" foliage brush loaded with Midnite Green; pick up Evergreen and stipple lighter tones on left to middle. Add Hauser Light Green to brush and stipple highlights on left.
- Trees and bushes along back side of road are stippled in with splashes of Pumpkin, Cadmium Red, Cadmium Yellow, Evergreen, and Hauser Light Green.
- Covered Bridge- Roof front is painted Cadmium Red. Create clapboards with Napa Red. Shade under eaves with 10 flat brush sideloaded with Napa Red. Scumble highlight with 4 scumbler brush sparsely loaded with Hot Shots Fiery Red. Roof is painted Neutral Grey. Create shingles with 1/4"rake brush loaded with thinned Antique White. Pull across roof in horizontal strokes.
- Load brush with thinned Charcoal Grey and pull vertical strokes. Shade right side with 20 flat brush loaded with Charcoal Grey; highlight left and top side with Antique White. Paint trim on roof front #2 round brush loaded with Warm White. Shade trim with 2 flat brush loaded with Soft Black. Shade small section of roof at back with 2 flat brush sideloaded with Soft Black.
- Bottom walls of bridge are painted Raw Sienna. Scumble some vertical strokes with 4 scumbler brush sparsely loaded with Pumpkin to create wood graining. Separate front from back with 10 flat brush loaded with Asphaltum. Add vertical lines with #0 liner brush loaded with Asphaltum to make vertical boards. Shade top, bottom, and right sides of walls with Asphaltum. Add few grain lines with #10/0 liner brush loaded with thinned Charcoal Grey.
- Cross beams on back of bridge are painted with #2 round brush triple-loaded with Raw Sienna, Neutral Grey, and Charcoal Grey. Front beams are painted Raw Sienna, Pumpkin, and Charcoal Grey. Shade front and back beams at crossing and top and bottom with 10 flat brush sideloaded with Soft Black.
- Basecoat road with wash of Neutral Grey. Shade along sides of road and where road disappears into bridge with 10 flat brush sideloaded with Charcoal Grey. Reinforce shading with Soft Black at bridge and along back side of road. Scumble in highlight with 4 scumbler brush sparsely loaded with Antique White.
- Rocks- Rock foundation under bridge is painted with #2 round brush randomly loaded with Charcoal Grey, Driftwood, and Antique White. Shade foundation with 8 flat brush sideloaded with Soft Black.
- Large rocks in and around water are Driftwood. Add shadows along bottom of rocks with 10 flat brush sideloaded with Charcoal Grey; reinforce with Soft Black. Add highlights with 4 scumbler brush sparsely loaded with Antique White. Pick up Warm White and brighten highlights.
- Water- Water is shaded along front and back shores and under bridge with 12 flat brush sideloaded with Payne's Grey. Add some ripples in water with Payne's Grey in dark areas; place highlights against shadows with 1:1 mixture of Uniform Blue and Salem Blue. Reinforce highlights with 1:1 mixture of Salem Blue and Warm White. Add some splashes over rocks and at shore with the chisel edge of 1/4" angular shader brush loaded with Warm White.
- Foreground grasses and foliage Grasses are tapped in with #2 white bristle fan brush, mixing colors wet into wet. Start on left of road with Raw Sienna, Cadmium Red, Pumpkin, and Hauser Light Green. Work small area at a time, moving from top to bottom. As you move toward right, pick up Evergreen and Midnite Green, tapping in a little Black Plum toward right bottom. Be sure to tap color under and around rocks with some grasses slightly over rocks here and there.
- Fence- Fence is painted with #2 round brush double-loaded with Antique White and Neutral Grey. Keep Antique White toward top of horizontal rails and to left of vertical posts. Shade rails where they come out from behind posts and on right side of posts with 1/4" angular shader sideloaded with Charcoal Grey.
- Foreground bushes- Stems and branches are painted with #10/0 script liner brush doubleloaded with Black Plum and Antique White. Sparsely tap in foliage with 1/4" foliage brush loaded with Black Plum, then Antique White. Pick up touch of Cadmium Orange, tapping here and there for interest.
- Finishing- Let dry completely. Apply generous, even coat of Faux Glazing Medium to set design. Let dry overnight. Apply multiple coats of DuraClear Matte Varnish and let dry. Replace mirror in frame.
Read NextEasy Decoupage Frames
Your Recently Viewed Projects
SylviaC
Jul 17, 2013
This is so pretty. I am not too good at painting but this is lovely so I may just try it. The instructions are so detailed, I might just make it. It will not be a total waste of money if I fail as I will still have the leftover paint for my grand daughter. :) I look forward to the challenge. annheineck - I love Oregon, beautiful scenery. I live in Canada.
annheineck
Jul 16, 2013
This mirror is very cool... of course Oregon gets the difficult one though...hahaha!!
Report Inappropriate Comment
Are you sure you would like to report this comment? It will be flagged for our moderators to take action.
Thank you for taking the time to improve the content on our site.

