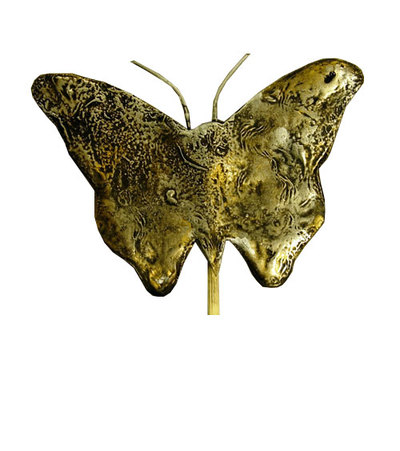
Burnt Bag Butterfly Plant Stake
Use inexpensive brown grocery bags, florist wire and glue to create surprisingly elegant garden or plant stakes. This unique technique gives an antique metal look at a fraction of the cost. This project comes to us from Tiffany Windsor of Inspired at Home.

Materials:
- Aleene’s Super Thick Tacky Glue
- 18 gauge florist wire (cut into 3” length and bent in U shape for antenna)
- Wooden skewers
- Brown grocery bags
- Rub ‘n Buff – gold and silver
- Plumbers candle and matches (or other candle with tall flame)
- Soft cloth (for wiping away soot)
Instructions:
- Transfer your pattern to 1 layer of brown bag. We used a stencil for our pattern only tracing the outside lines.


- Next, cut two additional layers of brown bag and glue all three layers together with the pattern on top.


- Immediately cut out the butterfly pattern. You want to do this quickly because in the next step, you need to insert the wooden skewer in between two of the layers and if you wait too long for this step, the glue will start drying making it very difficult to pull the layers apart and insert the skewer. While you’re at it insert the antenna inbetween two layers at the same time.


- Now it’s time to apply the glue to one side of the butterfly covering all of the brown bag with the glue. Do not leave any of the brown bag exposed because it will burn if it is not covered with the glue. Apply the glue with your finger in a generous coat. You do not want to see any of the brown bag.

- Light the candle and hold the glued side of the butterfly right in the top of the flame. Keep the butterfly moving around at all times. In this step, you are blackening the glue. Some bubbling will occur from the heat of the flame. This is fine and adds texture to the design but be sure to keep the butterfly moving in the flame until the entire glue surface is blackened.

- Let the butterfly set for several minutes and then gently wipe away the soot with a soft cloth. Use a gentle touch because if you press to hard, you will break through the skin of the glue. If this happens, you will see white glue oozing out. Just return that spot to the candle flame and re-burn. Your finished side should look shiny and the glue will have turned to a shiny charcoal grey color. The surface should have ridges which either developed during the burning process or while you were wiping away the soot. Let butterfly set for a few minutes and repeat process on back side.
- Apply gold and silver antiquing paste with finger lightly over the surface. Apply enough paste to add a nice patina effect but be sure to let some of the black show through.


Tiffany’s Designer Tip: This burnt brown bag technique looks great in many different designs and several pieces grouped together make a great sculpture. You can also use 18 gauge wire for the stem (in place of the wooden skewer). Do not try this technique with any other glues. We have tested the Aleene’s Super Thick Tacky Glue for this technique and it is the only glue that we recommend. Also, always have a bowl of water handy just in case you have any sort of flame flare-up with the brown bag while you are burning your butterfly.

Read NextPlastic Bottle Planter
Your Recently Viewed Projects
Cheryl Y
Aug 10, 2017
Wow oh wow, who knew a plain brown paper bag can be so beautiful? I just love this Burnt Bag Butterfly Plant Stake! I need to find this glue! I love butterflies and want to make this craft for my home and garden. Such a great idea and it's not all that hard.. Thank you so much for sharing this cool craft idea.
Weberme
Apr 03, 2016
I love this butterfly stake. Looks like it is going to be fairly easy and it looks like a real butterfly. I would like to make some of these and put in my garden. Does it harden so it will not get destroyed by the rain or do I need to add something else on front?Is the rubbing have to be done just right to make it look like yours?
memoriesbykelley 7 567202
Jan 17, 2013
Question..??? does the finished product get hard like metal or at least will it hold its shape for lets say a breast plate or shoulder pads...
beatlesfan48 42468 00
May 14, 2012
Okay, maybe I'm dense, but is it the rubbing on of the antique paste and the rubbing off of the black that makes the design on the butterfly? It almost looks like the bag had the design on it to start with and the rubbing of these things just enhances it. Sorry, don't mean to be dumb, but I'd really like to try this...it looks really easy and very elegant!
rachelsoriginalart 0328
Sep 14, 2011
I love this project. Inexpensive, fun and easy and looks great! Thanks
Daisies
Jun 17, 2010
I just love them! Bet you can spray them with an acrylic sealer for outdoors.
sherriebeth
Jun 01, 2010
I am amazed at how cool this is... My garden is going to have a new look soon enough. Thank you!
Member 3750563
May 03, 2010
Quedo lindisima la mariposa, me encanto la tecnica. Muchas gracias. Me la llevo a casa para hacerla. Un abrazo.
mem123
Feb 21, 2010
I used to watch Aleene's years ago and learned this process. I made a cat chasing a mouse this way and it is still attached to the bottom inside front door of my house after 20years. Thanks Tiffany.....
Crafter 5932793
Feb 20, 2010
Are these water-proof? They are beautiful but I'd like to be sure they last outside.
houghchrst
Feb 09, 2010
All I have to say is WOW! How on earth did this idea take off. I love it. I think I just may have to try it for my little bed out back.
Report Inappropriate Comment
Are you sure you would like to report this comment? It will be flagged for our moderators to take action.
Thank you for taking the time to improve the content on our site.


![Pill Bottle Crafts: Reuse Pill Bottles [15 Ideas]](http://irepo.primecp.com/2017/06/334076/PILL-BOTTLE-CRAFTS-Header_Category-CategoryPageDefault_ID-2274135.jpg?v=2274135)
