Hot Pink Centerpiece Pots
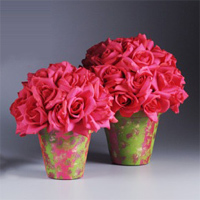
Add some color to your life.Learn how to make flower pots with bright hot pink accents. They'll make a great decoration for your home or a special occasion such as a baby shower or wedding shower. You can also use them to decorate your space and bring some color to an otherwise drab room. In fact, house decorating ideas that utilize shocking colors help you add a personal touch to your space. No matter what, you'll love the look of this DIY idea and will want to make a bunch for your next party. If pink isn't your color, use another bright shade instead.

Materials:
- STYROFOAM™Brand Foam:
- 5" ball, one; 4" balls, two
- Terra cotta pots: 4" and 5", one each
- 4" skewers or wooden picks, two
- Bright pink roses, 50 2"
- Acrylic paints: white, fuchsia pearl, leaf green, metallic gold
- Clear sealer
- Sea sponge
- Scissors
- Floral shears
- Serrated knife and old candle
- Paint brushes: 2" and small flat
- Measuring tape or ruler
- Pencil
- Blue painters tape (optional)
- Felt furniture protectors, adhesive backed (optional)
- Glue gun and glue sticks
Instructions:
- Paint both pots white; let dry.
- Paint 4" pot and both foam balls fuchsia pearl. Paint 5" pot leaf green. Let dry.
- Measure around the top rim of each pot and mark four, evenly spaced 1" wide stripes. Mark vertical stripes with blue painters tape (optional; stripes can also be painted freehand).
- Paint the stripes on each pot using alternating colors. For the 4" pot, paint the stripes in leaf green; for the 5" pot, paint the stripes in fuchsia pearl.
- Cut from sea sponge two, 1/2" or smaller, uneven shapes. Dip the ends of the sea sponge pieces into each paint color and randomly sponge onto each pot. Sponge the colors on the edges of the stripes to soften and blend them. Repeat dipping and sponging, until the colors are blended and overlapping.
- Cut another small piece of the sea sponge into an uneven shape. Dip in metallic gold paint and randomly sponge each pot, creating gold highlights.
- Spray the painted pots with clear sealer.
- Trim the rose stems to approximately 2" and starting at top of foam balls, insert roses in circular rows. Position roses to conceal the foam ball, and leave only a small portion of the ball bottom exposed. You'll need approximately 30 roses for 5" ball and 20 roses for 4" ball.
- Place rose covered balls in pots and check fit to be sure the bottom row of roses rest on the top rim of the pot. If needed, reposition the roses to fill any gaps. Remove each rose, apply glue to the ends of each stem, and reinsert in foam ball.
- Wax knife with old candle and cut remaining 4" ball in half. Glue one half into bottom of each pot; insert 4" skewer into centers of half balls.
- Apply glue to exposed ends of skewers and push the rose covered balls onto the skewers until the bottom rows of roses rest on the top rims of the pots.
- Place four small, adhesive-backed felt protectors on the bottom of each pot to protect furniture (optional).
Your Recently Viewed Projects
princess6860504
Feb 24, 2017
These painted flower pots are going to be gorgeous in my home. I can see them on my end tables and lined up down the center of my dining room table. These can be customized to fit any decor, too, if you are not too keen on the hot pink and bright green as I am. Picture these in a classic black and white, or a gold and white with ivory/white flowers. I bet you could do these for wedding party tables- maybe even if you offered your services you could get paid for them, too.
Report Inappropriate Comment
Are you sure you would like to report this comment? It will be flagged for our moderators to take action.
Thank you for taking the time to improve the content on our site.

