Halloween Gift Bags
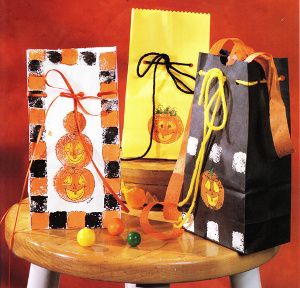
Use craft sponges to stamp jack-o-lanterns and a friendly witch onto Halloween gift bags. These Halloween stamped bags designed by Heidi Borchers of Inspired at Home are a great way to hand out treats to friends or Halloween party favors.


Materials:
- For all: Pop-up craft sponges
- Waxed paper
- Acrylic paint: orange, yellow, green, white, black, blush
- Paper bags: white, yellow or black
- Paintbrushes: small round tip, fine-tip
- Permanent marker – black fine tip
- ¼” diameter hole punch
- 1 yard (1/8”) wide ribbon or acrylic yarn: black, orange or yellow
- Pattern
Instructions:
-
For witch, transfer patterns and cut 1 hat, 1 blouse and 1 skirt from craft sponges. For pumpkins, cut 1 each (1”, 1-3/4” and 2” diameter) circle from craft sponges. Dip each sponge into water to expand. Wring out excess water.
-
Pour separate small puddles of paints onto waxed paper. Dip sponge into desired color and blot excess paint on side of waxed paper. Continue to blot until color is evenly dispursed on sponge. Do not oversaturate the sponge. Press sponge on bag and lift. Let design dry. Wash sponge thoroughly and wring out excess water before dipping into different paint color.
-
For white jack-o’-lantern bag: sponge-stamp pumpkins on bag. Sponge border around pumpkins using square sponge. Let dry. Use small brush and fine-tip brush to paint facial features and stems on pumpkins. Let dry. Add design details with black marker.
-
For yellow bag: sponge-stamp 2” pumpkin on bag. Let dry. Use small brush and fine tip brush to paint facial features and stems on pumpkins. Let dry. Add design details with black marker.
-
For black bag: sponge-stamp 1-3/4” pumpkin and square on bag. Let dry. Use small brush and fine-tip brush to paint facial features and stems on pumpkins. Let dry. Add design details with black marker.
-
For witch bag: sponge stamp using 1” sponge for witch’s face and 2 pumpkins. Sponge paint skirt, hat and blouse. Paint hair, cheeks, hands and feet on witch and stem on pumpkin with fine-tip brush. Let dry. Add design details with black marker.
- For each: punch holes along top of bag. Thread ribbon or yarn through holes and tie in bow on front.
Heidi’s designer tip: Practice stamping design on side of waxed paper several times before stamping on bag. If your design doesn’t stamp in its entirety on bag, simply load sponge with paint again, re-align stamp and re-stamp design. These stamped designs can be used on other Halloween projects including clay pots, wearables and home décor.
Read NextWhich Witch DIY Costumes

