Halloween Mystery Pumpkins
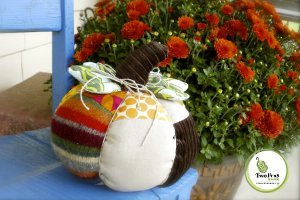
Fabric pumpkin patterns make adorable decorations for Halloween or any other autumn celebrations. Make these Halloween Mystery Pumpkins from Trish Preston with patchwork fabric for a shabby chic look. Add quilted fabric leaves for the finishing touch! These Halloween Mystery Pumpkins will add just the right element of eeriness to your home. Enjoy these delightful Halloween pumpkin patterns and watch your guests' eyes light up with wonder.

Materials:
- 18 quantity of 4-1/2″ squares. Use up your quilting cottons and add to it some fun pieces for texture. I used some wool from an old sweater and also corduroy.
- Twine
- Poly fiber stuffing
- Template 1
- Template 2

Instructions:
- Once you have your materials gathered, sew 3 of your squares together in a row using 1/4″ seams. You will sew these together until you have a total of 6 groups of 3 squares each.

- Print out template 1. You may need to do some adjusting on the size – your pattern piece should measure roughly 10-1/2″ from point to point and roughly 4-1/8″ at the center widest point.
- Lay out the template on the 6 panels you created. Center the template over the center block and cut out your pattern on each of the 6 panels.

- Now, take 2 of the panels and lay them right sides facing. Pin and with 1/4″ seams, sew down one long edge.

- Continue to add panels on in the same manner. You are forming a ball.
- When you get to the last panel and you are stitching your “ball” closed, LEAVE AN OPENING about 3″ long towards the bottom. Sew your corner points and come up just a bit from the bottom and leave that opening towards the bottom.


- Turn your “ball” right side out and stuff it firmly with your stuffing. Then slip stitch the opening closed.


- Cut 3 pieces of your twine about a yard in length (36″ or so). Find the middle of one piece, center it on the bottom of your mystery ball, and following one of your seams, tie it in a knot at the top and pull it tight. Repeat this until you have your twine tied up on each seam. Leave the excess twine for now – don’t trim it. Now you will see our ball has been “quilted” and has these puffy, defined sections. You can put a few stitches on the bottom to keep the twine in place or even a dot of hot glue if you’d like.


- Save template 2 and print it out.
- Choose a green print for the leaf pattern and a brown fabric for the stem. Take two of the leaf pieces, right sides facing, and stitch all the way around leaving about a 1-1/2″ opening in the base. Repeat for the other set as well as for stem. Turn them all right sides out and fill with your stuffing. Don’t overfill the leaves too much.


- See the little red arrow up there? You could hand stitch OR machine stitch some detail on the leaf to resemble veins.
- Next, tuck under your opening on the leaves, and then place the leaves on the top of your ball and stitch on. Place the stem in the center of the leaves, tuck under your edges, and stitch it on. Next, take your excess twine that was left hanging and tie it in a bow around your stem.


These other 20 No Carve Ideas for Halloween Pumpkin Decorating + 7 New Ideas for Decorating a Pumpkin make for easy Halloween crafts for kids and look as good during the day as they do at night.
Read NextWhich Witch DIY Costumes


