For a Special Friend Card
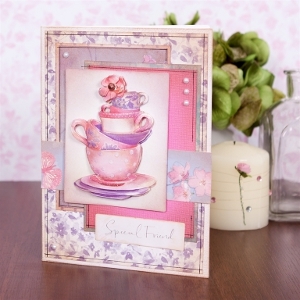
Get back in touch with a long lost friend with this cute For a Special Friend Card. Get together for a tea date, wish your friend a happy birthday, or just write to see how she's doing. This handmade card design is easy and quick to make. This card is also a great way to send out bridal shower invitations.

Materials:
- A4 Ultimate Decoupage & Die-cut Pack (48pk) - Lucy Cromwell
- A4 Glitter Decoupage (2pk) - Lucy Cromwell - Tea & Cake
- Fluid Chalk Cat’s Eye - Creamy Brown
- 5 x 7” Cards/ Envelopes (10pk, 300gsm) - White
- Adhesive Pearls (104pcs) - White
- Mini Ink Pads Dye Based (20pk) - Assorted Colours
- Gel Pens (2pk) - Jet Black
Instructions:
-
Ink the edges of a 7x5 card blank to add a vintage feel. Trim the purple patterned paper to measure 12x17cm and ink the edges. Ink the edges to add a vintage effect and draw a border with a black gel pen. Glue centrally.
-
Trim purple flower paper to measure 8x12cm. Ink and layer onto edged spotty paper measuring 8.5x12.5cm. Position towards the top left and add a hand-drawn border.
-
Layer inked pink cardstock measuring 8x12cm onto inked teal patterned paper measuring 8.5x12.5cm. Position to the right of centre. Add a hand-drawn border.
-
Trim a 3.5cm border of the floral paper and ink as before. Apply across the card as shown and trim flush with the edges of the card.
-
Ink the edges of the first layer of the cups decoupage to age. Position centrally onto the card using 3D foam pads.
-
Pop out and ink the rest of the decoupage layers. Shape in your fingers to echo the round nature of the cups and use 3D foam pads to layer up. Use two layers in the centre of the image and one layer to eight side to support the shaping.
-
Ink the edges of one of the die-cut sentiments. Position to toward the bottom of the card.
- Add white adhesive pearls to finish.
Read Next64 Handmade Cards for Every Occasion

