Unique Florals Card
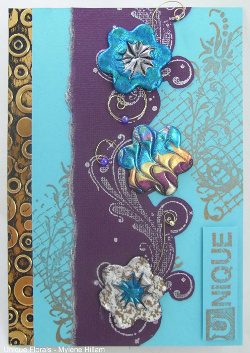
This beautiful card craft features a floral theme made with metallic Friendly Plastic embellishments. Give your homemade card texture, color and dimension with the addition of Friendly Plastic. Also, check out Mylene's other Friendly Plastic card craft, the Three Kings Christmas Card.

Materials:
- White card stock 9” x 6 ½” (230mm x 163mm)
- Gold Mirror Board 4 ½” x 6 ½” (115mm x 163mm)
- Doodlebug Swimming Pool 4” x 6 ½” (102mm x 163mm) and a scrap
- Bazzill Purple 2 ¾” x 6 ½” (70mm x 163mm)
- Encore! Ultimate Metallics Silver stamp pad
- Encore! Ultimate Metallics Copper stamp pad
- Black acrylic paint
- Stamp-It stamp set Laura Koh siset008lk
- Friendly Plastic® Silver Spectra, Turquoise, Gold, Burgundy, Yellow/Orange, Swirl, Silver
- 22g gold wire
- Assorted beads
Tools:
- Griddle with thermostat control
- Non-stick toaster oven tray
- Plastic container larger than the toaster oven tray
- Bowl of cool water with a few drops of cooking oil
- Wilton Daisy cookie cutter set
- Tim Holtz Tonic scissors
- Cuttlebug
- Cuttlebug Embossing Folder Spots & Dots
- AMACO Marbling Comb
- AMACO Needle Tool
- Double sided tape
- Silicone adhesive
- Foam mounting tape
- Paintbrush
- Scissors
Steps:
- Using the Cuttlebug and embossing folder, texture the gold mirror board. Paint with a coat of black paint. Allow it to partially dry and then wipe away the excess leaving some in the depressions. Attach to the white card with double sided tape and set aside.
- Ink the floral mesh stamp with copper ink and stamp it twice diagonally across the blue card. Attach to the right hand edge of the mirror board with double sided tape. Stamp Younique on the blue scrap and then trim away the first two letters leaving the word “Unique”. Mount it vertically with foam tape in the bottom right hand corner.
- Stamp the swirl twice along the right hand edge of the purple card with silver ink. Trim closely around the scrolls. Tear the left hand edge and swipe the silver ink pad along the torn edge. Tape to the centre of the card front.
- Pre-heat the griddle to 265°F (130°C). Place the oven tray onto the griddle. Place the medium flower shaped cookie cutter into the bowl of water. Fill the plastic container with 1½” cool water.
- Cut a square of Silver Spectra Friendly Plastic® and place it on the toaster oven tray. Whilst it is melting, cut a 1cm circle of Turquoise. Place the circle in the centre of the square. Once melted together, draw the needle tool through the turquoise into the silver spectra, creating several points.
- Remove the tray from the heat and place it on a heat proof surface. Press the cookie cutter into the silver spectra centering the turquoise. Remove the cookie cutter and return it to the bowl of water. Plunge the oven tray into a tray of cool water. The plastic will cool in about 30 seconds. Remove the tray and dry both the flower and the tray.
- Repeat Steps 6 and 7 using Turquoise as the base and silver as the circle.
- Cut ¼” strips from the remaining colour. Place the oven tray back on the griddle and place the first strip in the centre. Once it has melted, butt a second piece up to the first. Continue with the remaining colours until you have a piece slightly larger than the cookie cutter. Once all pieces have melted together smoothly and with the tray still on the griddle, take the marbling tool and place it an angle of 45° to the tray, draw the marbling tool through the strips in a wavy pattern from top to bottom. Try not to drag it along the bottom of the tray, only through the foil surface. Clean the excess Friendly Plastic® from the comb. Repeat from bottom to top but line the teeth up in between the original pattern.
- Remove the tray from the heat and place it on the heat proof surface. Use the cookie cutter to cut the third flower. Cool the tray in the water bath and then wipe dry.
- Using the scrolls of the stamped image as a guide, coil 4 short lengths of the wire. Thread on a few beads and attach to the purple card with double sided tape. Use silicone adhesive to at the Friendly Plastic® flowers over the top.
Project courtesy of Myléne Hillam, Mill Lane Studio www.milllanestudio.com
Read NextYou Are Amazing Greeting Card

