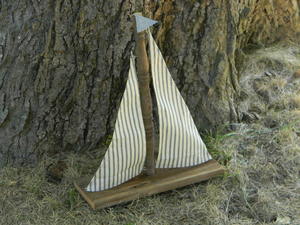
Rustic Sailboat Craft
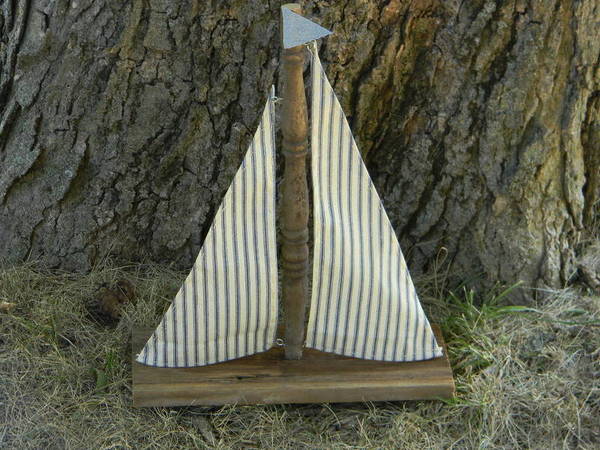
You can sail away to the place of your dreams this summer with this Rustic Sailboat Craft tutorial. This decoration is fit for any nautical themed room, boathouse, or lakeside cabin. Whether you love sailing or the idea of the ocean, you'll fall in love with this simple craft. There is a free instruction guide for this sailboat craft so you can do it yourself. Parts of this project are upcycled because it uses repurposed spindles and scrap wood, which is good for your wallet and the environment.
Primary TechniqueGeneral Crafts

Sewn byHand
Materials:
- Scrap board
- Measuring tape
- Miter saw or jig saw
- Dowel or spindle
- Pencil
- Drill, 1/16-inch bit and screwdriver bit
- 2-inch wood screw
- Wood glue
- Wrapping paper
- Ruler
- Scissors
- Muslin or ticking fabric
- Straight pins
- Iron
- Off-white crochet thread
- Embroidery needle
- 6 eye screws
- Small scrap of denim or burlap
- Hot glue gun
Instructions:
- Cut a 12-inch length from a scrap weathered board. My board was 4 1/2 inches wide. Your board width does not need to be exactly the same width as mine, but try to keep it within that ballpark. My board was also 3/4 inch thick. Your board needs to be at least this thick so that the boat will not tip over.
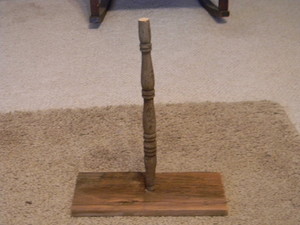
- Cut a 14-inch length from a scrap dowel or spindle. I used a recycled chair spindle. Determine which end of the dowel will be the bottom. Drill a 1/16-inch pilot hole in the bottom end of the dowel.
- Lay the board flat on your work surface. Measure to find the center and mark with a pencil. Drill a pilot hole through the center mark on the board. Working from the bottom of the board, insert a 2-inch wood screw in the pilot hole and rotate until the tip pokes through the top of the board. Apply wood glue to the bottom end of the dowel. Place the pilot hole on the end of the dowel over the tip of the screw. Continue to attach the screw through the dowel until it is secure. Allow the glue to dry.
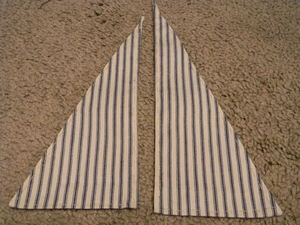
- Lay wrapping paper on your work surface with the back side facing up. Draw a right angle on the paper with a 6 1/4-inch vertical line and a 12-inch horizontal line. Connect the ends of the right angle to create a right angle triangle. Draw another right angle triangle with a 6 1/4-inch vertical line and a 14-inch horizontal line. Cut out the triangles. These are your sail patterns.
- Pin the sail patterns to one layer of muslin or ticking fabric with the small sail angling to the left and the large sail angling to the right. Cut out the sails.
- Fold each edge of the sails 1/4 inch to the wrong side and press. Using off-white crochet thread and an embroidery needle, sew a running stitch along the folded edge to create a hem.
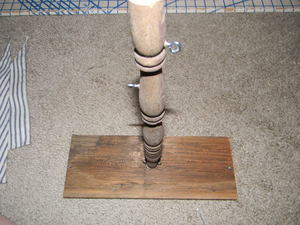
- Position the wood sailboat in front of you with the length of the boat laying from left to right. Measure down 1 1/2 inches from the top of the sail pole and attach an eye screw on the right side of the pole. Measure down 3 1/2 inches from the top of the pole and attach an eye screw on the left hand side of the pole. Measure 1/2 inch up from the bottom of the pole and attach eye screws on the left and right side of the pole. Center and attach an eye screw on each end of the boat. You will have attached a total of six eye screws.
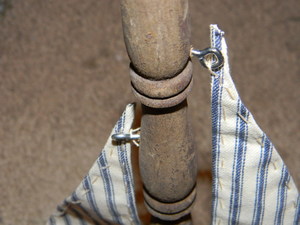
- Thread your embroidery needle with more crochet thread. Insert the thread at one corner of a sail. Cut the thread with 3-inch tails extending from each side of the sail. Repeat on each corner of both sails.
- Thread the tails of the top point of the smaller sail through the eye screw on the top left hand side of the pole. Knot the thread tails to the screw. Position the sail so that the straight edge runs straight down the side of the pole. Attach the bottom, right hand corner to the screw at the bottom of the pole. Attach the outer corner of the triangle to the screw on the left hand end of the boat. Attach the larger sail to the other side of the pole in the same way.
- Cut a 1 1/2-inch triangle from denim or burlap for the flag. Hot glue the flag to the top of the pole.
Read NextFaith Over Fear Free Printable Art
Your Recently Viewed Projects


Thanks for your comment. Don't forget to share!
quanahs 5032097
Mar 02, 2016
Such a cute little boat. Imagine a group of young boys, a warm summer day and a fleet of these boats floating merrily down the stream. While this boat is beautiful and decorative, I think kids could build something similar with a little bit of supervision and some prepared supplies. thanks for sharing
Report Inappropriate Comment
Are you sure you would like to report this comment? It will be flagged for our moderators to take action.
Thank you for taking the time to improve the content on our site.