Simply Reversible Window Valance
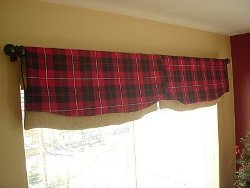
Use this basic pattern with any design of your choice to create an easy update for your living room decor. Jennifer Juniper teaches us how with an easy tutorial.

Materials:
- Two coordinating styles of fabric
- Brown craft paper
- Measuring stick or tape
- Sewing machine
- Thread
- Scissors
Steps:
- Begin by measuring your window to determine the width of the valance. I was beginning with a 66 inch window, and I wanted two valances side by side, so I used fabric that was 34 inches wide and 28 inches long. This gave me a nice 12+ inch length on the valance after it was hung over the bar and allowed for the seams. Make a simple pattern using your craft paper and your measurements. I've shown it below on a smaller sheet of paper:

- To get a nice, symmetrical pattern, fold the paper in quarters and draw half of the shape as shown below, then cut it out. Both of your sides and the top and bottom will be perfectly symmetrical!

- Use this pattern to cut out the fabric in the desired size and shape. Cut out two pieces of coordinating fabric for each valance.
- Pin the pieces, right sides together, and sew around the outside edge. Mark a 3-4 inch space on one side. When sewing, leave a gap in your marked space along the side in order to turn the fabric right side out after you've finished.
- Turn the whole thing right side out. Press.
- Hang over a wooden bar, pulling the back down a bit lower than the front. Easy-peasy lemon-squeezy!

Read more about Jennifer, author of this craft project and Featured Craft Designer at FaveCrafts!
Read NextCopper Foil Coasters
Your Recently Viewed Projects
Report Inappropriate Comment
Are you sure you would like to report this comment? It will be flagged for our moderators to take action.
Thank you for taking the time to improve the content on our site.

