Festive Holiday Cookies
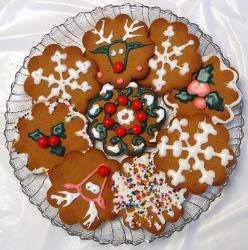
Looking for Christmas cookie decorating ideas? Look no further than this fantastic project! These Festive Holiday Cookies from Candace Jedrowicz look so good you'll want to display them!

Materials:
- Any roundish cookie – Anna’s Ginger Thins are wonderful and they have a lovely scalloped edge.
- Wilton White Cookie Icing
- Cake Mate Writing Icing - I used pastels, but primary colors would be great, too.
- Almond flavoring (optional) - I don’t care for the flavor of the Wilton’s so I add a couple of drops.
Instructions:
- Straight lines first –Take a few cookies out for practice, broken ones work great for this. A straight line begins with a touch down (let the tip of the icing touch the cookie) and a slight lift with steady pressure moving which ever direction you are comfortable with (I’m left-handed and I move right to left) followed with a gradual release of pressure at the end. The amount of pressure depends on the consistency of the icing. If you’re straining, try rinsing the cap in hot water. If it’s still very hard to get the icing out, add a few drops of water at a time and shake well. Practice until you are comfortable with the movement.

- Tapered lines – Begin as you did with straight lines, but release the pressure before the end. It’s a touch down, steady pressure and slight lift and a release of pressure about half the length of the line.

- Now for dots – Dots take a slow hand. Touch the tip down, give a little pressure and release pressure before lift AND lift very slowly. There will be a tail and you don’t want that tail to flop sideways, you want it to plop strait down. Use more pressure for large dots and less for smaller dots, keeping in mind that cookie icing is soft and will spread a bit.

Snowflake Design:
- Snowflakes are a simple repeated pattern. They always have six sides, and each line has the same marks. Start with one line straight across.

- This cookie has nine scallops, so each of the three lines you make will begin at the peak of a scallop and end at the valley of a scallop.

- I made crossed lines near the center here.

Holly Design:
- This cookie design has three colors. The white outline is done as you would a straight line. The difference is that you’ll want to steady your icing hand with your other hand to create the motion of a scalloped edge, holding the icing vertically over the line as you draw it.

- For the center of the cookie, I made holly leaves. It’s a touch down, a squiggly movement back and forth, with a release of pressure at the tip, as you would a tapered line.

- Make three leaves.

- Finally add your holly berry dots. I could have gone a bit smaller dots here, they spread quite a bit.

Rudolph Design:
- Start with a rectangle that’s tapered at one end. Give it some ears.

- Add dot eyeballs and the first antler lines.

- Add a few tapered lines to the antlers.

- Plop two blue sprinkles on the eyes. Finish with some dots for balance.

Wreath Design:
- For this wreath cookie, you’ll start with tapered line curls. Touch down, pressure and lift, release pressure half way through.

- Make a squiggly middle line.

- Place some cinnamon candies around.

- Snow is optional.

Simple Design:
- Drizzle icing on the cookie from an inch or two above it.

- Shake on some sprinkles. Simple and elegant.

Read NextMini Pinecone Christmas Tree

