Rad Racecar Clock
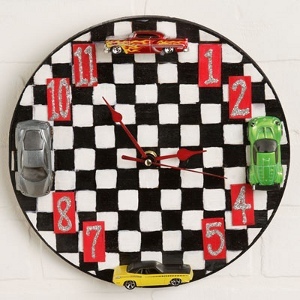
Looking for kids' room decorating ideas? This Rad Racecar Clock from I Love to Create can dress up your child's bedroom. Real toy cars give a 3D effect!

Materials:
- Aleene's® Paper Glaze™
- Crafty Chica® Little Chica Paint Packs™
- Aleene’s® Spray Acrylic Sealer™
- Crafty Chica® Chunky Glitters™: Sci Fi Silver
- Aleene's® Platinum Bond 7800® All-Purpose Adhesive
- Wood clock base
- Blue painter’s tape
- Mini toy cars
- Wood pieces
- Paintbrushes
- Paper towel
- Clock mechanism set
Instructions:
- Paint two coats White to the clock base. Let dry after each coat.
- Create a grid with the painter’s tape on the clock base.
- Use a paintbrush and paint clock base with Black, painting over the taped grid. Let dry. Remove tape.
- Fill in areas with paint as needed to create a checkerboard look.
- Paint the wood pieces with Red. Let dry. With Aleene’s® Paper Glaze™, draw numbers on each of the red wood pieces. Immediately pour on Silver glitter. Let dry. Dust off excess glitter onto paper towel.
- Use Aleene’s® Platinum Bond 7800® to glue toy cars to 12, 3, 6, and 9 o’clock positions. Use painter’s tape to hold in place until dry.
- Use Platinum Bond 7800® to glue the red wood pieces to 1,2,4,5,7,8,10 and 11 o’clock positions. Hold in place with painter’s tape if necessary until dry.
- Add two coats of Aleene’s® Spray Acrylic Sealer™. Let dry.
- Attach clock mechanism and add hanger to the back.
Read NextEasy Painted Kids Table
Your Recently Viewed Projects
M Altenberg
Aug 26, 2016
This is super adorable. I would love to make this for my nephew's room. Does not look that hard to make. Can't wait to try it.
Report Inappropriate Comment
Are you sure you would like to report this comment? It will be flagged for our moderators to take action.
Thank you for taking the time to improve the content on our site.

