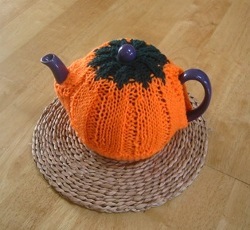
Pumpkin Tea Cozy
This adorable pumpkin tea cozy will make even your tea time a festive one! This free knitting pattern is easy to make and a great gift for this autumn.

Materials:
- Any DK or worsted weight yarn with a little stretch. I used 100% acrylic DK approx. 25gs and a little green for the lid.
- Knitting Needles: Pair of 6mm needles (I used straight as my circular needles were too long)
- Darning needle
- Stitch holder.
Stitches and Abbreviations:
Cast On
K - Knit
P - Purl
c/o Cast Off
dec - Decrease
K2 tog – knit 2 together
P2 tog – purl 2 together
Rep – repeat
Dec. decrease
CC – change colour (bottle green)
MC – main colour (orange)
Note:
Before beginning your project please measure your teapot and note the measurements down. Here m tea pot measured 13” circumference at the base and the lid. The fullest part of the pot measured 19.5” circumference I designed the pattern to fit this size of teapot. If yours differs then you will need to adjust the pattern. The beginning of the handle was 1” from the base and the beginning of the spout was 1.5” from the base.
Steps:
Cast on 70 sts.
Row 1 – K1, *P5, K2*, **rep to end finishing with K1
Row 2 – P1, *K5, P2*, ** rep to end finishing with P1
Row 3 – Work as row 1
Row 4 – Work as row 2
Rows 5,6,7,8 - work in same pattern of row 1 & 2
Row 9 – work in pattern until 33rd St c/o 2 sts
Row 10 – work in pattern until 32nd stitch c/o 2sts, put remaining 33 stitches onto a stitch holder
Row 11- c/o 1 st at beg of row, work in pattern to end of row
Row 12 – work in pattern and dec. 1st at end of row
Row 13 – dec. 1 st work in pattern to end.
Row 14 – work in pattern to end, break off yarn and put all stitches onto a stitch holder.
Row 15 – take stitches of stitch holder from other side of the cosy and put back onto the needle. c/o 1st, work in pattern to end.
Row 16 – work in pattern dec 1 st at end of the row
Row 17 – dec 1 st work in pattern to end
Row 18 – work pattern across all sts, cast on 10 new stitches, join with other side and work straight across all sts in pattern.
Row 19 & 20 – work both rows in pattern
Row 21 – K1, *P5, K2 tog*, ** repeat to end
Row 22 – Work pattern across all sts
Row 23 – *K1, P2 tog, P1, P2 tog,*, ** rep to end
Row 24 – Work pattern across all sts
Row 25 – *K1, P1, CC P1*, ** rep to end
Row 26 – with *MC (p1), CC – K3, (p1 MC)* rep to end and tie off MC
Row 27 – working in CC (dark Green) work pattern across.
Row 28 – *P1, K2 tog, k1*, ** rep to end
Row 29 – Work pattern across
Row 30 – *P1, K2 tog*, ** repeat to end
Row 31 – K1, P1 to end
Row 32 – K2 tog repeat to end
Row 33 – P all across
Row 34 – K all across
Row 35 – P 2 tog repeat to end
Row 36 – Cast off Knit wise.
Finishing
Begin by sewing up to the handle and then above the handle to the lid. I left a small ring gap at the top to grip the lid, but you may wish to sew up completely.
I then crocheted around the spout gap and the handle to finish off.
If you find the bottom of the cosy isn’t as tight as you wish you can add a knitted or crocheted cuff at the bottom. Pick up the stitches and work around reducing stitches each row until you feel it is snug.
This could be done with plain garter stitch or standard ribbing. Here I crocheted as follows.
Row 1- crocheted into 63sts using sc (dc US)
Row 2 – sc all around decreasing every 7th st,
Row 3 – sc all around decreasing every 6th st,
Row 4 – sc all around decreasing every 5th st,
Row 5 – sc all around decreasing every 4th st,
Bind off and darn all ends in.

Read NextBasic Cotton Dishcloth
Your Recently Viewed Projects
Thanks for your comment. Don't forget to share!
Marilyn B
Nov 03, 2017
Thank you for the great detailed instructions! This is super and saves so much space and money instead of buying a teapot for fall! Make a red or green one for the winter holidays as an ornament! This would be such a great gift for the rea lover in your family! And it could double for a trivet or tea cup mug rug too! Great and creative idea!
Report Inappropriate Comment
Are you sure you would like to report this comment? It will be flagged for our moderators to take action.
Thank you for taking the time to improve the content on our site.