Tie Dye Plate
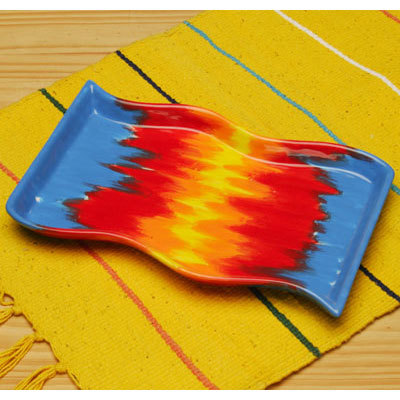
Trendy tie-dye is not just for clothing. Get the look of tie-dye on ceramic with neon underglazes. This tie-dye plate from I Love to Create is a great way to bring color to your kitchen. Give as a gift for any occasion. For another tie-dye home decor craft, see the Tie-Dye Vase.

Materials:
- Concepts® Underglazes for Bisque and Majolica
- CN 501 Neon Yellow
- CN 502 Neon Blue
- CN 504 Neon Orange
- CN 507 Neon Red
- Dinnerware Bisque Designs
- 24811 Wavy Edge Plate 9.5" x 6" x 1"
- Signature Brushes
- SB 806 No. 6 Round
- SB 807 No. 6 Fan Glaze
- pure brilliance™ Clear Glaze
- Foil
- Sponge
- Pencil
Instructions:
- Lightly wipe ware with damp sponge to remove any bisque dust.
- Using the pencil, lightly sketch in seven wavy-shaped sections for colors on plate. Refer to photo.
- Pour an amount of each color onto a piece of foil. Using the No. 6 Round, apply Neon Yellow to the middle section in loose, uneven strokes.
- Apply Neon Orange on both sides of Neon Yellow in the same manner, allowing colors to blend. Apply Neon Red next to the Neon Orange sections and Neon Blue next to the Neon Red sections, blending colors. Apply three coats of each, letting dry between coats.
- Using the Fan Glaze brush, apply one flowing coat of Pure Brilliance™ to the front and back of the plate.
- Stilt and fire to witness cone 06.
Read Next27 Coffee Mug Crafts
Your Recently Viewed Projects
Foodie 123456
Jun 21, 2013
I love the look of this tray; however the problem with a craft like this, for me, is I don't have a kiln for firing. How many of us do?
ang133
Dec 24, 2009
The step where the colors on the foil are put on the tray seems to be missing. Does the foil melt onto the tray during the firing?
Report Inappropriate Comment
Are you sure you would like to report this comment? It will be flagged for our moderators to take action.
Thank you for taking the time to improve the content on our site.

