Sizzix Memory Frame
Looking for Sizzix ideas? Make a Sizzix Memory Frame from Theresa Cilafi! It's a great keepsake and a fantastic gift!

Materials:

Sizzix Scoreboard Pro Die #656835-Frame and Frame Back w/Stand by Eileen Hull
Sizzix Big Shot Pro
Sizzix Little Sizzles-12x12 Mat Board Pack, 3 White Sheets
Preserve it Frames 15x15 Black Frame Kit
Raven Black Paper by Bazzill
White Paper
Vellum
Polka Dot Paper by Time Flies
B&W Alphabet Paper by Rusty Pickle
Vintage Chalk by Rusty Pickle
Black Soot Distress Ink by Tim Holtz
Crayola Chalk
1/8" stripped ribbon
Mod Podge
Black Chalk Paint by Plaid
Brown Acrylic Paint
Foam Brushes
Sakura Gelly Roll Glitter Pen
Ultra Fine Point Black Sharpie
White Paint Pen
Foam Tape
Double Stick Tape
Sand Paper
Xacto Knife & Mat
Stipple Brush
Flat Wood Strips
Textural Wood Image
Instructions:
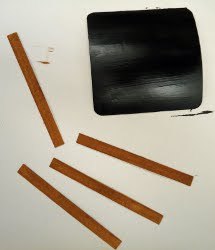
- I painted the back piece according to the directions on the Chalk Paint. You really want to do this first because it needs a couple of coats and then needs to cure for 24 hours. Then you can work on other elements. Then I took thin flat wooden strips that I got from Michaels. I used my Xacto to cut them to the desired size, then gave them one light coat of paint. **Just a note - the chalk paint is going to make the mat board curl. Don't worry about it. It will flatten out some on it's own AND if need be you can always straighten it out later.**

- In between coats of paint and drying time, I set to work on my layout.

- I took a piece of Raven Black Paper by Bazzill and rubbed a piece of white chalk over half of it. I like this effect because the the Bazzill paper has a texture to it. I tore the polka dot paper and with a stipple brush gently brushed Black Soot ink across the edges. I repeated this process with the chalk paper. Finally, I adhered them to each other in this order....

- Doesn't that chalk paper look cool!!!! I didn't get a good pic of it, but once I was at this stage, I took a pice of sand paper to the edges of the chalk and polka dot papers.

- I took the scalloped edge frame and and taped the B&W Alphabet paper to the front of the frame. With my Xacto I trimmed away the excess paper. The next frame layer that I put underneath, I used my stipple brush again just at the edges.

- Now, in between the two frames I sandwiched a photo that I printed on vellum paper and then layered over white. WHY?? I just happen to like the effect. It comes out softer than when printed on photo paper. Oh, I also went into Photoshop and converted my pics to black and white to stay consistent with my theme.

- Again, I took some sandpaper to the front frame to distress it some. I assembled all the layers and added the ribbon and the heart (which is one of the elements in Eileen's die!). I stippled some Black Soot on the edges of the heart, used a Black Glitter Sakura Pen to make the stitch marks and a fine tipped Sharpie.

- I took the smallest frame and again stippled the edges, but I also took a textured stamp and stamped it all over the front of the frame in the Black Soot. Then I layered the vellum and white paper underneath it. I tied a simple ribbon and used Mod Podge to fix it to the frame.

- Now remember that back piece that I painted with the Chalk Paint? Yanno, that stuff really works great?! I was very impressed with how well it works. Anyway, I just used double stick tape to frame the "chalkboard". I drew on the hearts with a white paint pen....but I used CHALK to write "first day of school".

- I tied ribbon around one piece of chalk and added a couple more pieces of chalk which I adhered with Mod Podge. I attached all the elements to my page and then set it aside as I waited for the chalk to dry.

- I really like how the this page turned out. I wanted to do something special with it, especially because it is so dimensional, so I decided to frame it with a Preserve it Frame kit I had. The plexiglass is actually a cube with a 1/4" inch lip around the perimeter and it us UV coated so that my papers and photos are protected. It enables me to put dimensional pages underneath without having to use such a deep shadow box.
Read NextPenguin

