Christmas Hanging Bouquet
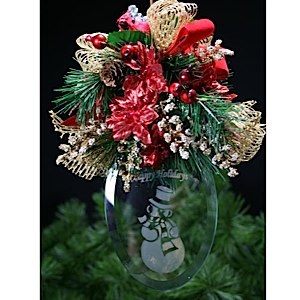
This Christmas decorate yourself a lovely hanging Christmas bouquet from Etchworld Armour. This beveled bouquet is exquisite with it's beauty. It would look great hanging in your own home, but it would also make a wonderful gift.

Materials:
- 20-0482 Rub N Etch Christmas stencil (Happy Holidays)
- 15-0150 Armour Etch Cream
- 29-2462 Clear Thick bevel oval ornament 4x6
- 21-1611 Over N Over Christmas stencil (snowman)
- Metallic Poinsettias, pine sprigs, gold “greenery” sprigs, red berry stems, red cardinal, wired ice crystals, small pinecones- w/ stems trimmed to 1 ½” long. Small gold plastic balls (not shown)
- 61-3329 Gold Rub N Buff
- 3” or 4” Round Styrofoam ball
- 1 ½” Red Velvet ribbon
- Holly leaves
- 1 1/2” Gold mesh wired ribbon
- 12”- 1/8” or ¼” gold metallic cord or red satin ribbon (for hanger)
- White cotton wrapped craft floral wire (thin)
- Quick grip or Glass, Metal & More craft glue
- 08-9415 Masking tape
- Hot glue gun
- 1” wide Kitchen knife
- 08-9777 scissors
- Wire cutters
- Long crochet hook or stiff wire
Steps:
- Apply Over N Over snowman stencil to the bottom center of the oval ornament.
- Apply masking tape all around stencil overlapping edges and covering face of ornament.
- Etch with Etch cream according to package directions. Remove stencil. Dry ornament
- Cut out and apply “Happy Holidays” stencil just over snowman. Rub down, mask and etch stencil according to package directions.
- Loop 12” piece of 1/8” or ¼” ribbon thru ornament hole and tie an overhand knot in the end. Set aside
- Drive the 1” kitchen knife thru the center of the styro ball all the way thru to the other side.
- Take the crochet hook or heavy wire with a hook made on the end and run it down thru the hole in the center of the styro ball until hook comes out the other side. Loop end of ribbon on crochet hook and pull back up thru middle until point of ornament penetrates ball. Wiggle the ornament in the opening gently until it is about 1 ½” inside ball.
- Pull ornament back out just enough so that you can apply some of the Quick grip glue onto the tip (cover about ½” of tip) of the ornament and re-insert it by pulling up on the ribbon until ornament is snug in the hole. Tie another overhand knot as close to the ball as you can and add a dab of quick grip. Set aside overnight to dry.
- Make 4- 6 loop 6” gold metallic bows and one red velvet bow. Tie with cotton wrapped wire and trim ends.
- Hot glue one gold bow on each side of the ball. Glue the red velvet bow at the top front and then the gold mesh bow on top of that. Glue the last gold mesh bow on the backside of the hanger, close to the velvet one to cover the top.
- Put a dab of Quick grip glue on the stem of the pine greenery and make a cascade down the front and the back of the ball. Next cascade the red poinsettias in between the greenery. Make a “nest” of holly leaves on the top of the ball over the bows for the bird to sit on, then glue on the bird. Fill in the gaps around the bird, ball and over the centers of the bows with holly leaves first, then layer up with the gold glitter sprigs, berry sprigs, pine cones, little gold balls and ice crystals using a dab of glue on the ends of each until ball is covered.
- Place a small amount of gold Rub N Buff on the end of a cotton swab and smear over etchings (don’t worry, you don’t have to be neat about it). After about a minute, wipe off the excess Rub N Buff, turn towel around and buff up to a luster. Any Rub n Buff that is on the shiny glass will come off during the buffing process. Set aside and allow to dry.
Best if hand washed!

