Wood Family Sign
By Chris Thornton- Deason from Delta Creative
Challenge yourself with this lovely hand painted "family" sign. Give it as a gift or use this as great home décor accent.
Supplies:
- Delta Creative Ceramcoat® Acrylic Paints:
- Blueberry (2513)
- Oyster White (2492)
- Coral (2044)
- Adobe Red (2046)
- Blue Danube (2013)
- Wedgewood Green (2070)
- OJ (2649)
- Village Green (2447)
- Straw (2078)
- Custard (2448)
- Dark Goldenrod (2529)
- White (2505)
- Stencils
- Delta Creative Stencil Mania™ Daisies
- Delta Creative Stencil Magic® 1/4” Stencil Brush
- Repositionable Stencil Adhesive Spray
- Delta Creative Ceramcoat® Satin Varnish
- Delta Creative® Sobo Glue
- 9”x12” finished edge canvas
- Family sign available from DC&C (www.dcccrafts.com)
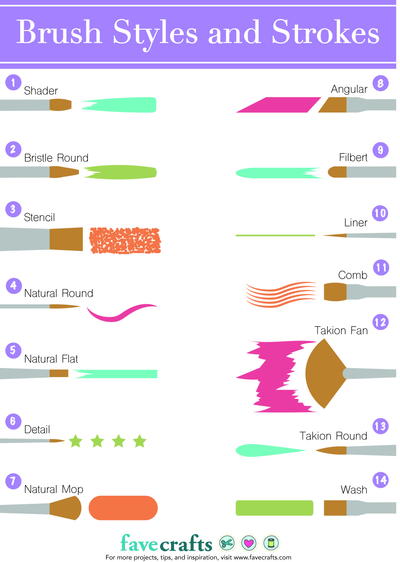
- Brushes
- Loew-Cornell La-Corneille Golden Taklon
- www.loewcornell.com
- Series 7300 Shader #8 and 12
- Series 7050 Script Liner #1
- Series 7350 1” Wash Brush
- Series 7500 Filbert #4
- Stylus
- Transfer paper
- Tracing paper
- Palette paper
- Water container
- Scissors
- Paper towel
- Low-tack painter’s tape
- Pencil
- Ruler
Project Design:
Steps:
- Basecoat the top of the canvas and the “Family” letters in Oyster White. Tip: to basecoat is total opaque coverage. Two thin coats are preferable, this keeps you from ending up with streaky thick paint. A good tip is to load brush, never more then halfway up bristles. Start in center of area to be painted, pushing color out to pattern line. This technique will leave no ridges.
- Apply spray adhesive to Daisies Stencil, allow to dry, pat off excess spray with paper towel. Press flower of choice firmly in place on canvas. Using 1/4” stencil brush, pick up small amount of White pat on palette to remove excess color. Using straight up and down motion pat over open areas of stencil. Repeat randomly as many times as desired covering the canvas. Tip: Applying two thin coats is preferable; applying to heavily will cause color to bleed under edge of stencil. Cover open areas of stencil not in use with low-tack painter’s tape so unwanted color does not appear.
- Lay tracing paper over pattern and trace all lines except those used to denote shadows. The shadow lines are generally short straight lines and several of them. Main lines are where there are color changes. Detail lines are facial features, patterns on fabric, and etc. Lay tracing on surface and tape at top and on one side. Slide graphite paper between tracing and surface with the dark side down; draw over the main lines only. Do not add the detail lines these will be applied after the basecoating is done.
- Apply pattern.
- Basecoat all of the leaves in a mix of 1:Wedgewood Green to 1:Village Green using the #8 shader.
- Float the shadows along the bottom edge in Wedgewood Green using the same brush. Tip: to float load brush first in floating medium or water, pat off excess on paper towel. dip one corner of brush in color, blend color through bristles using short back and forth motion on palette. Color should graduate from heavy color on one corner to no color on opposite corner. If when you begin to paint, you have color showing from both sides of brush, it is improperly loaded. Rinse and start again.
- Float the highlights along the upper edge with Village Green using the #8 shader.
- Using the #1 script liner do three small strokes in the center of each leaf. Tip: to make a stroke load the liner fully with color. Placing brush on surface, press firmly on tip of brush so bristles flatten out slightly forming an oval shape, as you start to pull brush lift up and rotate slightly between thumb and index finger this will give you a fine point to end on.
- Using the #4 filbert load the brush fully in Straw, place the tip of the brush at the tip of the petal and pull towards the center of the flower.
- Using the same brush float a shadow across the tip of each of the petals with Dark Goldenrod.
- After you have done all the tips of the petals add a touch of Adobe Red to the Dark Goldenrod and float the shadow on the petals at the center of the flower.
- Float highlights through the center of each of the petals in Custard using the #4 filbert.
- Using the #1 script liner pull long small strokes between each petal in Dark Goldenrod.
- Stroke the small Blue Danube flowers using the #4 filbert. This stroke is the same as for the yellow flowers.
- Using the same brush float the shadows at the center of the flower in Blueberry.
- Float the highlights at the tips of the petals using the same brush in White plus a touch of Blue Danube.
- Using the #1 script liner and the highlight color pull three little strokes in each petal.
- Basecoat in Coral using the #1 liner.
- Float the shadow across the bottom in Adobe Red using the #4 filbert.
- Float the highlight across the top in White using the #4 filbert.
- Basecoat the large flower petals in a mix of equal parts Coral and OJ using the #12 shader.
- Using the #12 shader float the shadows at the center of the flower in Adobe Red.
- Using the #8 shader float the shadow that divides the large petal into two petals.
- Float the highlights on all of these areas using the #8 shader in White plus a touch of Coral.
- Using the #1 script liner press small ovals around the outer edge of the middle petals.
- Basecoat the center in Straw using the #8 shader.
- Float the shadow across the bottom and in the center with Dark Goldenrod plus a touch of Adobe Red using the #8 shader.
- Float the highlight across the top and in the center with Custard using the #8 shader.
- Dot around the center using the stylus in Adobe Red. Tip: to dot use wooden end of brush or similar round object, depending on the size of dot you want. Dip into color then onto surface.
- Place a stripe of low-tack painter’s tape 1” up from the bottom of the canvas. Paint the bottom 1” in the OJ and Coral mix using the 1” wash brush.
- Paint the knobs at the ends of the hooks in Wedgewood Green using the #12 shader.
- Apply as many coats of Satin Exterior/Interior Varnish as desired to both pieces.
- Using Sobo Glue adhere “Family” to bottom of canvas.
Read NextCharming Country Mason Jars

