Pirate Set Stamped Cards
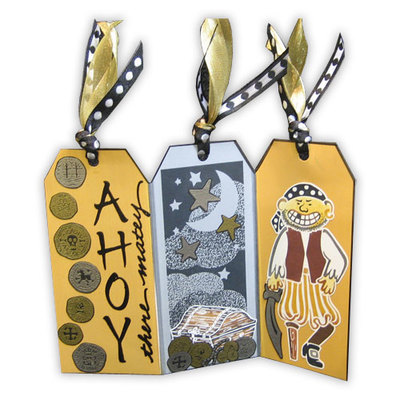
Stamp a three-tag card, invitation or greeting card with playful pirates and gold treasure to make a recipient smile. Three-tag cards from Posh Impressions offer space for three pirate scenes. Use the same pirate stamps to create invites or other cards.

Four More Designs Below!
Three Tag Card
Materials:
- Pirate stamp set
- Starry Night Background stamp
- Zig Zag tag
- Ribbon
- Blending Blox
- Marvy Brush Art Markers
- scissors
- Zyron or glue
- Tsukineko or any metallic silver & gold embossing ink pad
- Ranger or any embossing powder (princess gold & platinum for silver)
- Versafine black pad & black embossing powder for words in black
Steps:
- Use Blending Blox and brush art markers for providing colors.
- Stamp Starry Night background in center tag.
- Stamp chest on sticker paper, cut out leaving 1/32" border.
- Stamp pirate on sticker paper, cut out leaving same border.
- Stamp words before coins using Versafine or other black embossing pad & black embosssing powder. Heat. It looks good if bold & shiny.
- Coins are what make the card. Stamp with gold and silver embossing ink on black paper. Apply gold and silver embossing powder. Heat. Cut out leaving 1/32" in black.
- Apply coins with Zyron or glue.
- For coins Dee uses Tsukineko pads & Ranger princess powders but any brand will work. Just use those colors.
- Apply ribbon to top of card.
Greeting Card
Materials:
- Pirate stamp set
- Optional skeleton from Halloween set (available as set or single stamp)
- Optional Alphabet Set (makes any message possible)
- Single stamps of choice for selected card
- Crack and peel sticker paper
- Blending Blox colors of choice
- Marvy brush art markers of choice
- scissors
Steps:
- Stamp desired background onto card.
- Stamp featured images on sticker paper (Blending Blox will provide blends, pens straight colors).
- Cut out images leaving 1/32" white all around.
- Before removing protective paper, try different placement on card.
- Remove paper and adhere to card where wanted.
- Use alphabet set for making original words.
- Cut skeleton parts to rearrange in different positions.
- Heat emboss skeleton with white embossing powder.
- Place white skeleton on black paper beneath for definition


Read NextFree Printable Scripture Dolls

