Reflections Scrapbook Page
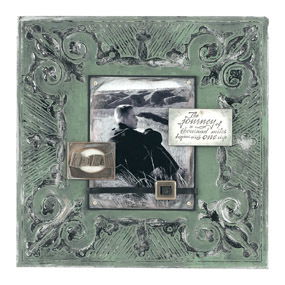
Colleen McDonald transforms a 12" x 12" embossed metal tin into a sentimental and personalized scrapbook page from Glue Dots. Make a scrapbook you will treasure forever by including a poignant photo in the center of the page.
Material:
- Mini Glue Dots
- Craft Glue Dots
- Pop Up Glue GOts
- 1" Glue Lines
- Continuous Glue Lines
- Teal Bayou Acrylic Paint, (Plaid)
- Dimensional Fluid, (Plaid)
- Ceramcoat Matte Interior Varnish Sealer, (Delta)
- Ebony Rub N' Buff, (Amaco)
- Silver Rub N' Buff, (Amaco)
- Metal Frame, Letters and Buckle, (Making Memories)
- Silver Brads, (Lasting Impressions)
- 8 in. faux leather stripping
- Black Cardstock
- White Cardstock
- Rubber Stamp, (PSX)
- 12 x 12 Embossed Metal Tin, (Artistic Expressions)
Step 1
Mix acrylic paint 85/15% with dimensional fluid. Apply several coats to metal tin using sponge wedge. (Three or four coats are adequate for 100% coverage.) Allow ½ hour drying time between each coat.
Step 2
Using Ebony Rub N' Buff, randomly darken the embossed areas of the tin design. Repeat this technique using Silver Rub N' Buff, overlapping the colors intermittently.
Step 3
Highlight the outer edge of the frame with Silver Rub N' Buff and apply a coat of sealer over the entire tin to protect the paint. Allow 2 hours drying time.
Step 4
Randomly dab the Making Memories letters, frame and edges of photo with Silver Rub N' Buff.
Step 5
Mat the photo with black cardstock and attach with silver brads in the four corners.
Step 6
Thread the leather stripping through the Making Memories buckle. And use Continuous Glue Lines to adhere stripping to photo and backside edges of photo mat. Adhere photo to tin sheet using Craft Glue Dots. Using 1" Glue Lines, mat white cardstock onto small metal frame and secure frame to tin. Mount letters to framed cardstock using Mini Glue Dots.
Step 7
Mount letters to framed cardstock using Mini Glue Dots. Stamp quote onto white cardstock and highlight edges with Silver Rub N' Buff. On backside, place one Pop Up Glue Dot in each corner plus the center and adhere to tin.

Read NextVintage Wedding Day Scrapbook Layout

