Road Trip Layout
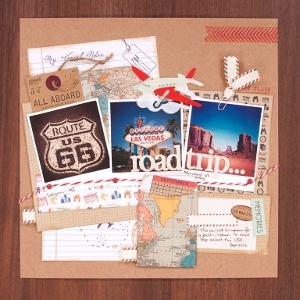
Takin' a trip down route 66? Remember the good times with this Road Trip Layout. With lots of room for mementos, photos, maps, and more, this is a great way to remember all the fun you had on your road trip.

Materials:
- Kraft Luggage Tags (10pk) - All Aboard
- Memory Pockets (5pcs) - All Aboard
- Travel Notepad - All Aboard
- Page Tabs (40pcs) - All Aboard
- 6 x 6” Paper Pack (32pk) - All Aboard
- Airmail Twine & Self Adhesive Reels (20pcs) - All Aboard
- Ribbon Clips (15pcs) - All Aboard
- Bookmark (5pcs) - All Aboard - Airplane
- 4 x 4” Urban Stamp - All Aboard - Air Mail
Instructions:
-
Trim panels of the All Aboard papers as shown and ink the edges of each. Arrange across the central part of the page.
-
Trim the lined sheet in half horizontally and tuck at the top and bottom.
-
Print 4 square photos and trim each leaving a wider gap at the bottom of each so as to resemble Polaroid photos. Arrange in a row across the centre of the page.
-
Tuck a kraft tag behind the left hand photo and the aeroplane bookmark over the centre photo.
-
Insert brads at the bottom of each photo and know a length of Bakers Twine around each in turn. Secure the ends on the reverse of the page.
-
Position a sheet from the Travel Notepad to the bottom right and adhere a Memory Pocket to the left of this. Trim the month calendar from the pattered paper and tuck inside.
-
Fold ribbon from the Ribbon Clips pack and tuck behind the envelope and the paper layers to the left hand side. Make up a Ribbon Clip and add to the top right of the photos.
-
Add a Page Tab, a snipped out ‘Memories’ message from the patterned paper and a stamped date image to the bottom right of the page.
-
Stamp ‘First Class’ to the top right of the photo and the large chevron image to the top right of the page.
- Add your title and journalling to finish.
Read NextVintage Wedding Day Scrapbook Layout

