Tiered Tulip Skirt
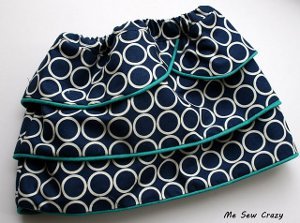
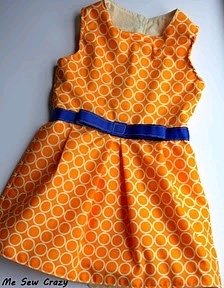
The Tiered Tulip Skirt from Jessica Gerblick is an elastic waistband skirt pattern for baby girls from 6 months to 4 years (or a size 4T). The "petals" or tiers of the skirt make this an adaptive clothing pattern for infants and toddlers alike. Plus it's super cute!

Materials:
- Approximately ½ yd - ¾ yd fabric (maybe a little less)
- Piping (optional)
- Zipper foot for sewing machine (only if using piping)
- ½” - ¾-inch wide thick elastic to fit child's waist
- coordinating thread
Instructions:
- Cut out fabric pieces according to dimensions given for correct size:
Size 6-12 Month:
Cut (4) 8L” x 13W” rectangles - ‘Longest Tier’
Cut (4) 6L” x 13W” rectangles - ‘Middle Tier’
Cut (2) 3.5L” x 13W” rectangles - ‘Upper Tier’
Cut (2) 3.5L” x 9”W rectangles - ‘Upper Tier Petal Long’
Cut (2) 3.5L” x 6”W rectangles - ‘Upper Tier Petal Short’
Cut (2) 3L” x 13W” rectangles - ‘Waistband’
Size 12-18 Month:
Cut (4) 8.5L” x 13.5W” rectangles - ‘Longest Tier’
Cut (4) 6L” x 13.5W” rectangles - ‘Middle Tier’
Cut (2) 3.5L” x 13.5W” rectangles - ‘Upper Tier’
Cut (2) 3.5L” x 9.5”W rectangles - ‘Upper Tier Petal Long’
Cut (2) 3.5L” x 6”W rectangles - ‘Upper Tier Petal Short’
Cut (2) 3L” x 13.5W” rectangles - ‘Waistband
18-24 Month:
Cut (4) 9L” x 14W” rectangles - ‘Longest Tier’
Cut (4) 6L” x 14W” rectangles - ‘Middle Tier’
Cut (2) 3.5L” x 14W” rectangles - ‘Upper Tier’
Cut (2) 3.5L” x 10”W rectangles - ‘Upper Tier Petal Long’
Cut (2) 3.5L” x 6”W rectangles - ‘Upper Tier Petal Short’
Cut (2) 3L” x 14W” rectangles - ‘Waistband
2T - 3T:
Cut (4) 9.5L” x 15W” rectangles - ‘Longest Tier’
Cut (4) 7L” x 15W” rectangles - ‘Middle Tier’
Cut (2) 4L” x 15W” rectangles - ‘Upper Tier’
Cut (2) 4L” x 11”W rectangles - ‘Upper Tier Petal Long’
Cut (2) 4L” x 6”W rectangles - ‘Upper Tier Petal Short’
Cut (2) 3L” x 15W” rectangles - ‘Waistband
3T - 4T:
Cut (4) 10L” x 17W” rectangles - ‘Longest Tier’
Cut (4) 7L” x 17W” rectangles - ‘Middle Tier’
Cut (2) 4.5L” x 17W” rectangles - ‘Upper Tier’
Cut (2) 4.5L” x 13”W rectangles - ‘Upper Tier Petal Long’
Cut (2) 4.5L” x 6”W rectangles - ‘Upper Tier Petal Short’
Cut (2) 3L” x 17W” rectangles - ‘Waistband’
- Place (2) of the ‘Longest Tier’ rectangles right sides together with the raw edges matching. Pin along the short sides and sew, giving you a tube of fabric. See Photo:

- Repeat for other (2) ‘Longest Tier pieces, (2) Middle Tier rectangles, the other (2) Middle Tier rectangles, and the (2) Waistband rectangles. When you are finished you should have this:

- Place the (2) Upper Tier Petal Long rectangles with wrong sides together. Lay flat. Cut a curved edge on the right hand side of the Length. See Photo:

- Place the (2) Upper Tier Petal Short rectangles wrong sides together and lay flat. Cut a curved edge on the LEFT hand side of the length.

- When you are finished, you should have this:

- Lay (1) Upper Tier right side up. Lay (1) Upper Tier Petal Long piece (now with a curved edge) on top of Upper Tier with right sides together, matching the straight length seam. Pin and Sew. See Photo:

- Repeat for other side of Upper Tier using (1) Upper Tier Petal Short piece. You will have this when finished:

- Now, lay the other (1) Upper Tier piece right side up. Lay the other Upper Tier Petal Long curved piece on the OPPOSITE side (the other side with the straight edge). Pin & Sew. See Photo:

- Repeat as above with the Upper Tier Petal Short piece.
- For Piping: You can skip the piping altogether if you wish; Simply sew the items together as I am about to without adding the piping.
- Unfold one of the upper tier pieces and measure around the outside curved edge withe the piping to see how long you will need to cut. Add 1 inch to ensure wiggle room, in case your measurements aren’t perfect. See Photo:

- Line up the raw edge of the piping with the outer curved raw edge of the fabric. See Photo:

- Laying the other curved edge fabric on top, right sides together - pin ALL raw edges together. (the piping will be sandwiched between the 2 right sides of fabric). It should look like this:

- Again, just to reiterate, the right sides of the 2 strips of fabric will be together, and the piping will be wedged between the outer curved raw edge. See Photo:

- Now, using your zipper foot, sew next to the piping. Turn right side out and press. You will now have this:

- Place the Middle Tier tubes right sides together (one tube will be inside the other). Match side seams. Measure the amount of piping you will need as above and slip piping inside the tube, matching the bottom raw edges. The only difference with this part is where the piping ends and begins. Keep the beginning end of the piping sticking out of the tube, so that the raw edge does not stick out when turned. See Photo:

- Continue pinning the piping to the bottom edge of the tube until you come to the end, leaving the end of the piping sticking out as well. See Photo:

- Sew, turn right side out and press. Repeat piping process for Longest Tier tubes. You will now have this:

- Slip the Middle Tier tube over the Longest Tier tube, matching the raw edges on top. See Photo:

- Now lay the tubes over the curved edge piece, matching the side seams. See Photo:

- Wrap front ends around and pin in place. See Photo:

- Pin around all upper raw edges and baste to hold in place.
- Slip the Waistband and over the top of the skirt wrong side out, matching up the raw edges. Pin and sew. See Photo:

- Flip upwards and Press.
- Turn under the top edge ¼” towards wrong side and press. See Photo:

- Now fold band in half towards the wrong side, enclosing the raw edge seams, and press. You will now have this:

- Sew along bottom waist band seam, leaving a 2” opening in the back so we can slip the elastic waistband in. See Photo:

- Measure your child’s waist for to determine elastic length. Cut the elastic 2 to 4 inches shorter than the child's waist measurement.
- With a safety pin attached to the elastic, slip it into 2” opening and work through entire waist, and out 2” opening again. See Photo:

- Sew elastic together with a zigzag stitch, and let slip inside opening. Sew opening closed and voila!

Read NextAmazing DIY Pillow Bed

