Audrey Table Runner
Plus! Your chance to win a Bachelorette Fusions Fabric Bundle

Join us and quilt one of the prettiest quilted table runners we have seen yet! The Audrey Table Runner pattern is an incredible way to show off your quilting skills. Think of how beautiful this will look in your kitchen! Or even over your mantel. The best part? You can decide which colors you would like to use! So, if you're looking for a festive Christmas table runner, swap the feminine colors for a bright green and vibrant red.
Notes*While all possible care has been taken to ensure the
accuracy of this pattern, We are not responsible for printing
errors or the way in which individual work varies.
Please read instructions carefully before starting the
construction of this quilt. If desired, wash and iron your
fabrics before starting to cut.
Project TypeMake a Project
Quilt Size35 inches wide x 65.75 inches long
Time to CompleteWeekend project
Primary TechniqueQuilting

Materials List
- Fabric A FUS-BC- 508 ⅔ yd.
- Fabric B FUS-BC- 505 ⅜ yd.
- Fabric C FUS-BC- 503 ⅔ yds.
- Fabric D PE-408 ½ yd.
- Fabric E PE-465 ⅔ yd
- Fabric F PE-431 ⅓ yd
- BINDING FABRIC: Fabric F -PE-431
- BACKING FABRIC: FUS-BC-503- 1 yd.
Cutting Directions
-
Four (4) of Template 1 triangle from Fabric A
-
Sixteen (16) of Template 2 triangle from Fabric A
-
Sixteen (16) of Template 2 triangle from Fabric B
-
Six (6) of Template 1 triangle from Fabric C
-
Eight (8) of Template 2 triangle from Fabric C
-
Eight (8) of Template 1 triangle from Fabric D
-
Two (2) from Template 2 triangle from Fabric D
-
Two (2) from Template 1 triangle from Fabric E
-
Fourteen (14) from Template 2 triangle from Fabric E
-
Six (6)strips of 1 1/2'' x WOF from Fabric F
Construction
Sew all rights sides together ith 1/4'' seam allowance.
-
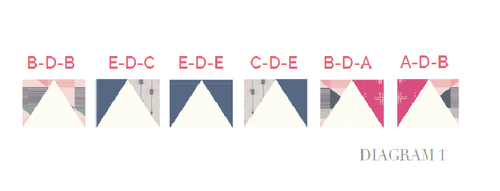
Start by taking all Template 1 Triangle pieces from Fabric D and pair them with Template 2 Triangle pieces from Fabrics: A, B, C, E as diagram below:
-
You will end up having two (2) blocks of B-D-B and E-D-E
-
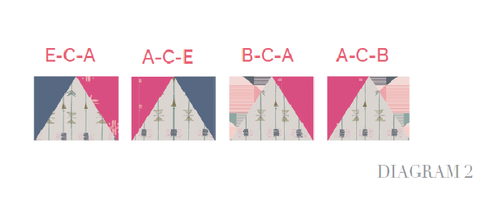
Now take all Template 1 Triangle pieces from Fabric C and pair them with Template 2 Triangle pieces from Fabrics: A, B, E as diagram below:
-
You will end up having two (2) blocks of E-C-A and A-C-E
-
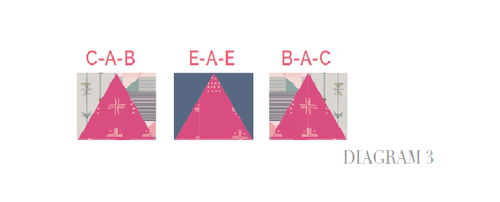
Now take all Template 1 Triangle pieces from Fabric A and pair them with Template 2 Triangle pieces from Fabrics: B, C, E as diagram below:
-
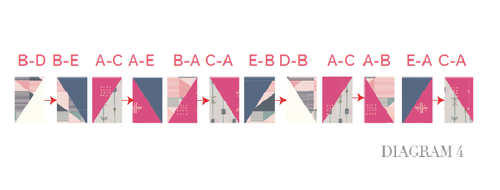
Now start pairing Template 2 Triangle from Fabric B with Template 2 Triangle from Fabric D.
-
Pair Template 2 Triangle from Fabric B with Template 2 Triangle from Fabric E
-
Pair Template 2 Triangle from Fabric A with Template 2 Triangle from Fabric C
-
Pair Template 2 Triangle from Fabric A with Template 2 Triangle from Fabric E
-
Pair Template 2 Triangle from Fabric B with Template 2 Triangle from Fabric A
-
Pair Template 2 Triangle from Fabric C with Template 2 Triangle from Fabric A
-
Pair Template 2 Triangle from Fabric E with Template 2 Triangle from Fabric B
-
Pair another Template 2 Triangle from Fabric A with Template 2 Triangle from Fabric C
-
Pair Template 2 Triangle from Fabric A with Template 2 Triangle from Fabric B
-
Pair Template 2 Triangle from Fabric E with Template 2 Triangle from Fabric A
-
Pair another Template 2 Triangle from Fabric C with Template 2 Triangle from Fabric A
-
Now, start pairing the pieces in the following manner:
ASSEMBLING THE TOP
Sew all rights sides together with ¼"seam allowance. Press open.
-
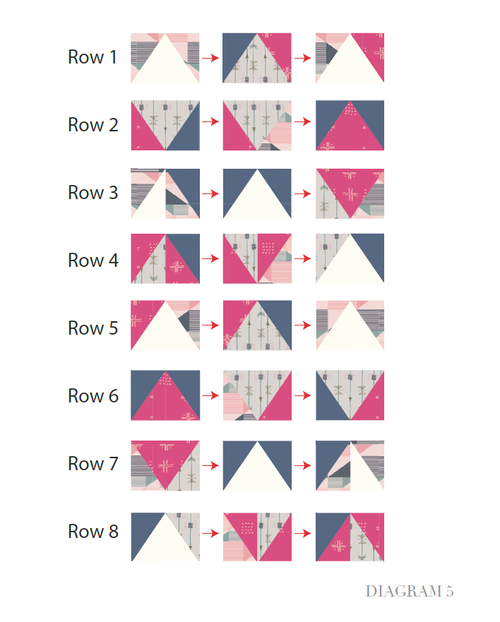
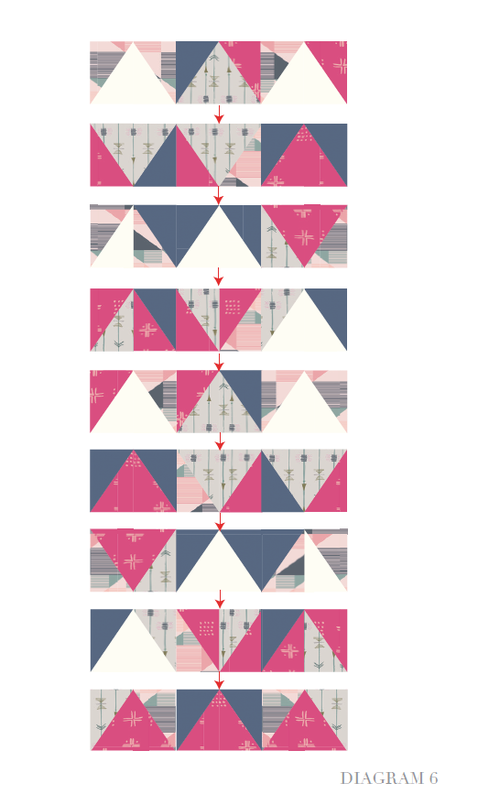
Refer to the cover quilt illustration and the diagram below to assemble the quilt top.
-
Next, assemble rows first and then sew rows together to complete quilt top.
-
Now, assemble the rows together to complete the table runner.
QUILT ASSEMBLY
Sew rights sides together.
-
Place BACKING FABRIC on a large surface wrong side up. Stretch it with masking tape against that surface.
-
Place BATTING on top of backing fabric.
-
Place TOP on top of the batting with right side facing up. Smooth away wrinkles using your hands.
-
Pin all layers together and baste with basting thread, using long stitches. You can also use safety pins to join the layers.
-
Machine or hand quilt starting at the center and working towards the corners. Remember that quilting motifs are a matter of personal preference. Have fun choosing yours!
-
After you finished, trim excess of any fabric or batting, squaring the quilt to proceed to bind it.
BINDING
Sew rights sides together.
-
Cut enough strips 1½" wide by the width of the fabric F to make a final strip 211 ½" long. Start sewing the binding strip in the middle of one of the sides of the quilt, placing the strip right side down and leaving an approximated 5" tail. Sew with ¼" seam allowance (using straight stitch), aligning the strip’s raw edge with the quilt top’s raw edge.
-
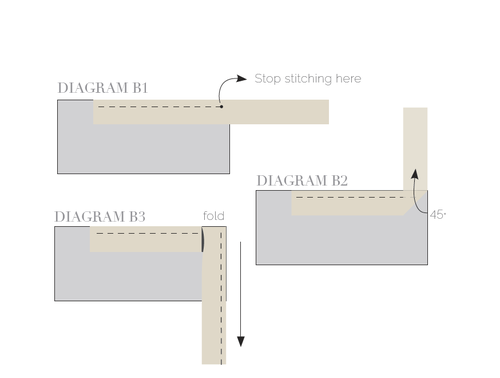
Stop stitching ¼" before the edge of the quilt (DIAGRAM B 1). Clip the threads. Remove the quilt from under the machine presser foot. Fold the strip in a motion of 45° and upward, pressing with your fingers (DIAGRAM B2). Hold this fold with your finger, bring the strip down in line with the next edge, making a horizontal fold that aligns with the top edge of the quilt (DIAGRAM B3). Start sewing at ¼" of the border, stitching all the layers. Do the same in the our corners of the quilt.
-
Stop stitching before you reach the last 5 or 6 inches. Cut the threads and remove the quilt from under the machine presser foot. Lay the loose ends of the binding flat along the quilt edge, folding the ends back on themselves where they meet. Press them together to form a crease. Using this crease as the stitching line, sew the two open ends of the binding with right sides together (you can help yourself marking with a pencil if the crease is difficult to see).
-
Trim seam to ¼" and press open. Complete the sewing. Turn binding to back of the quilt, turn raw edge inside and stitch by hand using blind stitch.
What other project would you make with this fabric?
Read NextHooded Long Cloak
Your Recently Viewed Projects
Thanks for your comment. Don't forget to share!
sharon56 5904978
Nov 20, 2017
I am a beginner quilter and I am starting out by making table runners. Would love to do this one for my grandson and his bride to be who are getting married in May.
contest718 7464146
Nov 19, 2017
I think I will change the colors but I like the pattern a lot.
Member 5526400
Nov 19, 2017
This is a very pretty pattern. It will be lovely in Christmas fabrics
katrina5
Nov 15, 2017
Such a neat look with only triangles!I think I could handle this and plan on trying soon. Thanks for the inspiration.
paperwings0764 159 4655
Nov 14, 2017
This is beautiful! I think the colors are great and would compliment any decor. What a great pattern.
CNSparks
Nov 09, 2017
Such a pretty way to brighten up your dining table or mantle. I love the colors! Connie
ridiculosity 67303 43
Nov 06, 2017
This would be pretty in a quilt or embellishing a jacket... with fabric flowers to wear in the hair to match.
rosemaryschild
Nov 06, 2017
Definitely this table runner - so pretty with it's wonderful Christmas colors!
Mistress of All Ev il
Nov 03, 2017
This might be the one project to ever make me want to learn how to quilt. This table runner is too cute and goes well with my current dining room color scheme. I also like how this one doesn't overtly scream "CHRISTMAS!" Means no one would be the wiser if I forgot to remove it once the holiday season was over and done.
Report Inappropriate Comment
Are you sure you would like to report this comment? It will be flagged for our moderators to take action.
Thank you for taking the time to improve the content on our site.