Rainbow Coffee Cozy
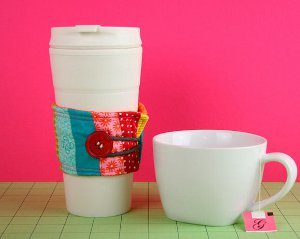
Looking for a fun way to use up those fabric scraps? Try making this beautiful Rainbow Coffee Cozy. This beginner's sewing tutorial makes a great gift and is a fun way to clean out your fabric stash. The great thing about this project is that the mixture of fabric colors and styles really make this project stand out...so the more colors you use, the better it will look! Say goodbye to those disposable coffee mug cozies and give a warm hello to this adorable sewn cozy.

Materials:
- Cutting mat
- Rotary cutter
- ¼ yard wide fabric scraps
- Sewing machine
- Thread
- Pins
- Button
- Embroidery needle
Instructions:
- First you’ll need some fabric scraps that are at least 4 ½” wide. Use your rotary cutting tool along with a cutting mat to cut 12 fabric scraps down to 1 ½” x 4 ½” strips.

- Arrange your strips on your work surface in the order you’d like them to appear. Once satisfied with the arrangement start with the two pieces on the far left and place them right sides together. Sew them together using a ¼” seam allowance. Continue adding one strip at a time until all 12 are sewn together. Iron seams open.

- Overlap two pieces of copier paper and tape together. Open up a recycled cardboard sleeve and temporarily adhere to the copier paper. Trace around the sleeve adding ¼” to the perimeter. This is your template. Flip the template over and mark the back with the words ‘wrong side’.

- Place a piece of fabric on your work surface, patterned side up. Pin the template piece, wrong side up, to the fabric. Cut around the pattern. Then flip the pattern piece over to the ‘right side’ and pin onto the wrong side of the sewn strips. Cut around the pattern. Place pattern onto a piece of batting and cut around the pattern.

- Sandwich the three pieces together. On the bottom layer you’ll place the solid piece of fabric right side up, then the sewn fabric strips right side down, then the batting. I chose to use felt instead of batting to reduce the bulk.

- Pin these layers together leaving a 3” space unpinned along the bottom edge. You will NOT sew this area. It needs to remain open to turn your layers. You will also insert an elastic hair band between the two fabric layers and pin in place. Be sure it is pinned between the two pieces of fabric and not the batting otherwise it will be stuck inside when you turn it inside out.

- Sew the three layers together and be sure to backstitch over the hair elastic several times to ensure it stays secure. Clip corners on an angle and turn right side out.

- Use the point of your scissor to push gently out the corner until you get a crisp point. Finger press the opening and top-stitch around the perimeter of the sleeve. Fold sleeve so the outside edge overlap by ¼”. Pin in place. Stretch your elastic to get an idea on where the button should go. Place a pin in that spot until you stitch the button in place through all three layers.


