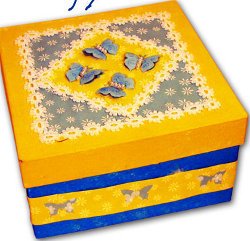
Bright Butterfly Box
Using paper punches and decorative papers you can make this brightly colored butterfly box from Beacon Adhesives. In eight steps you can store all your fun little things in this box including love notes from your significant other. Also makes a great recipe box.

Materials:
- ZIP DRY PAPER GLUE
- GEM-TAC EMBLLISHING GLUE
- Bright & Blue Butterfly Box
- 6” X 6” paper mâché box
- Yellow & blue decorative papers (a 4 1⁄2” square of blue, a 2 1⁄2” square of yellow, and a 1” band of yellow long enough to fit entirely around the box.)
- Cardstock: purple, yellow, pink, green, lavender
- Butterfly paper punches, large & small
- Small white round pearls
- White daisy trim
- Yellow & blue acrylic paints
- Small pearls
- Medium blue chalk
- Stylus, 1” craft brush, paper trimmer or scissors, pencil, ruler
Steps:
- Paint box lid with yellow paint using the craft brush. Let dry and apply a second coat.
- Paint box with blue paint. Let dry and apply a second coat.
- Using the ruler and a pencil, measure and cut out papers as indicated in the materials list. Apply ZIP DRY to the back of the blue decorative paper and press onto the center of the box lid. Glue the square of yellow paper to the center of the blue paper as in photo.
- Use the GEM-TAC to glue the daisy trim around the edges of both papers.
- Punch out 8 large butterflies from the blue paper. Turn 4 of them over and use the stylus to make a spiral embossed design on the wings. Use the blue chalk to enhance spiral design.
- Glue 4 flat butterflies to lid with ZIP DRY and then glue the embossed butterflies on top of the flat ones.
- Add pearls to the butterflies with GEM-TAC.
- Glue the yellow paper band around the box with ZIP DRY. Punch out the smaller butterflies and glue around the box.

