Summer Lemonade Stand
Get the kids outside and enjoying the sunshine with this Summer Lemonade Stand. Complete with directions on how to make the whole stand, this tutorial from Fiskars is a must for families who enjoy spending quality time together outside. This is also a great way to teach kids about money, business, and the art of the sale. So gather up the whole crew and make some delicious lemonade for your neighbors and friendly passerby's!

Materials:
- Cardstock
- Craft Tools
- Felt
- Glue
- Round ’n Round Squeeze Punch (Extra-Large)
- Corner Squeeze Punch (1/2 Round)
- Round 'n Round Twist and Flip Corner Punch
- 1/8" Circle Hand Punch
- 1/4" Circle Hand Punch
- Bracket & Journal Shape Template (8 1/2" x 11")
- Ultra ShapeXpress™ Shape Cutter
- Circle Cutter
- Everywhere Punch™ Window System - Starter Set
- Everywhere Punch™ Window System - Circle Punch Design
- Fresh Fruit Simple Stick™ Repositionable Rubber Stamps (4" x 8")
- Flower Garden Simple Stick™ Repositionable Rubber Stamps (4" x 8")
- Stamp Block Set
- Texture Plates - 6pk Asst. III
- Texturing Tool
- Titanium Comfort Stick Rotary Cutter (45 mm)
- Micro-Tip® Scissors (No. 5)
- Crafting Rotary Paper Trimmer (12")
Instructions:
-
Before I explain this simple system, let’s begin by creating the simple awning. Each pennant began as a 3” x 12” rectangle of (alternating) colored cardstock. Fold in half and round the bottom two corners with a corner punch. Sandwich two pieces of string between all folds and glue closed. Be sure the string is free at the top of the fold so the pennants can be slid later for easy placement. Add lettering if desired.

-
I imagined I would just strap some 1 x 2 poles or dowels to the legs of the kids’ play table from inside to support the awning. However, when I actually went to do this, I realized the table top extended out further than the legs. An easy solution was to sandwich another piece of wood, cut to size, between the leg and poles to fill in the gap.

-
I added two zip ties to each side for stability. You could likely use other bindings, such as ribbon or chenille stems. Be sure the binding won’t damage any delicate finishes.

-
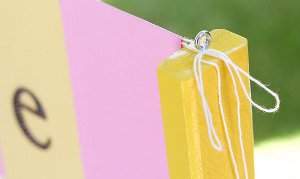
I spray painted my poles yellow, mostly because I am addicted to spray painting anything I can get my hands on. Especially in yellow. Or turquoise. Or white. This isn’t necessary of course. Screw in a threaded eyelet at the top of each pole.
-
Tie each end of the awning banner to the eyelets tautly. When you are done, untie and fold away for future use.

-
I leaned a chalkboard in front of the table to add a hand-written menu. Since my table legs were unusually wide, I figured I would come up with some decorations to hide the zip ties. I doubt my love of accordion circles will ever fade. Here I designed lemon slice circles, which I scattered around with rolled up masking tape on the back, but I left one zip tie showing for reference.

-
To get eight segments, I cut two strips of 1.5” x 6.75” yellow cardstock and used the scoring blade in my rotary trimmer to score every .75 inch. Accordion-fold and adhere in one long strip, and then adhere the ends together to form a continuous circle. Flatten at center and hot glue to a 4” paper doily layered onto a 4.25” circle of yellow cardstock easily cut with the circle cutter.

-
Now that the stand is constructed, the most important element to add is the lemonade! I decided to add a festive touch to the straws by creating little cardstock lemons.

-
To create texture, I embossed yellow cardstock using a texture plate called Carpet with the Texturing Tool. Next punch an XL circle squeeze punch once, then feed circle back into punch partially and punch again. Punch a hole at the center to thread onto straw. If straws are too thin , cut an X using a craft knife at the center to thread.

-
I found some other lemon shapes hidden in my Fiskars tools. This frame pops out from the layered frame in the Accents stamp set. I used these to add price tags to assorted candy jars.

-
Sticking with stamps, this lemon stamp in the Fresh Fruit set is cute enough on its own to decorate lemon cupcakes glued to toothpicks.

-
Another lemon shape was hiding in the Bracket & Journal shape template. To this one I added a stamped thank you message and lemon wedge. All of the tags were tied to mason jars using twine fed through a 1/8 inch hole punch.


-
Since the stand and consumables were all decorated, I figured I should craft up a little cuteness for the lemonade stand “staff”. I decided on a bright yellow bow tie but then remembered my sewing machine is currently broken.
-
I ended up designing a super quick felt bow tie. This is the kind of bow tie you throw on for fun and cuteness factor, not for a formal event.

-
Simply cut a 1.5” x 8.5” strip of yellow felt using a rotary cutter and acrylic ruler on a cutting mat. Overlap ends centered at back and hand stitch as shown. Cinch and tie off at the back. Wrap a 5/8” wide strip of felt around center and sew closed at back. Insert a bobby pin into center ring to attach to shirt. Alternatively you can sew another strip to feed through long enough to wrap around the child’s neck and secure with Velcro dots.

-
I thought marketing would be a good lesson to tie into the fun of lemonade stand, so my son and I crafted up door hangers to place around his friends’ doorknobs in the neighborhood.

-
To create a custom lemon stamp, trace a circle from the Circles-1 shape template onto the back of self-adhesive foam. Cut out using Fiskars’ new non-stick kids scissors. Cut the circle in half, then in half again, and once more. You now have eight pie pieces. Peel off self-adhesive backing and assemble onto a recycled lid for stamping.

-
The Everywhere Punch Window System makes easy work of adding a circle opening for a door hanger. Just cut a slit from the circle to edge to feed onto doorknobs.

Read Next47 Summer Crafts for Adults
Your Recently Viewed Projects
DarleneLynn1956 37 12085
May 14, 2013
I THINK YOU ARE VERY TALENT AND HAVE AWESOME IDEAS. WOW YOU ARE VERY GOOD. LOVE IT..... SO CUTE AND EVERYTHING IS SO PERFECT... WELL DONE.. A+++++++++
Report Inappropriate Comment
Are you sure you would like to report this comment? It will be flagged for our moderators to take action.
Thank you for taking the time to improve the content on our site.


