Recycled Wool Owl
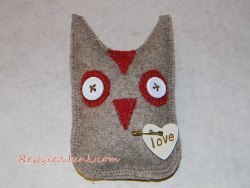
Save your old, ill-fitting sweaters and get inspired to make some Valentine's Day sewing crafts. Using simple felting techniques and a few easy-to-find materials, you can make your Recycled Wool Owl. Display one throughout February or give it as a sweet gift. This is a fun and simple project that anyone could make. In fact, these are so easy and fun that you can make a whole flock of owls in different colors and sizes for a decoration you can have on display from November through February!
Find this pattern and many more in our new eBook, 41 Valentine's Day Crafts: Valentine's Day Cards, Gifts, and More!

Materials:
- Card stock
- Pencil
- Ruler
- Scissors
- Felted wool sweaters-tan and red
- Nickel
- Marking pen
- Washable school glue
- Sewing machine
- Brown thread
- Straight pins
- Stuffing
- Two 1/2-inch flat white buttons
- Brown embroidery floss
- Embroidery needle
- File folder
- 1/4-inch letter stamps and black or brown ink pad
- Paper punch
- Miniature gold safety pin
Instructions:
-
Trace a 3-inch-wide by 4 1/2-inch-long rectangle on card stock and cut out. Turn the rectangle with the short edges at the top and bottom. Measure in 1/4 inch from each top corner and mark. From each mark, trace a valley 3/4 inch below the top edge. It should look like a big smile. Cut along the curved line. This is the top of your owl pattern. Round each of the two bottom corners to finish the owl body.
-
Trace and cut two triangles, one 3/4 inch tall with a 1/2-inch base, and the other 1 inch tall with a 3/4-inch base. The small triangle is the beak pattern and the larger triangle is the forehead patch.
-
Place the owl pattern on tan felted wool and trace around it. Place the two triangles on red felted wool and trace around them. On the same red wool, trace a nickel two times for the eyes. Cut out each shape just inside the traced lines.
-
Using the photo as a guide, position the red wool pieces on the owl shape. Glue each piece to the owl using washable school glue. The glue will hold the pieces in place while sewing. You could use pins, but I found the glue kept the pieces from shifting, and I didn't need to worry about sewing over pins.
-
Stitch the edges of each glued piece using a zigzag stitch and brown thread. This is the front of the owl.

-
Place the stitched owl, face up, on more tan felt and pin. Starting on the bottom edge, sew a zigzag stitch around the edge of the owl using brown thread. Leave a 1-inch opening on the bottom edge.
-
Cut around the stitched owl. Stuff the owl and sew the opening closed with the zigzag stitch.
-
Center a 1/2-inch, flat, white button on each eye. Using two strands of brown embroidery floss, attach the buttons.

- The finishing touch. Trace a 1-inch heart on an old file folder and cut out. Note: You can trace your heart free-hand, or use a pattern. Stamp the word "love" on the heart using 1/4-inch letter stamps and black or brown ink. Use a paper punch to punch a hole in the top of the heart. Finish the owl by pinning the heart to the bottom half of the owl's front using a miniature gold safety pin.
Read NextValentine Chocolates

