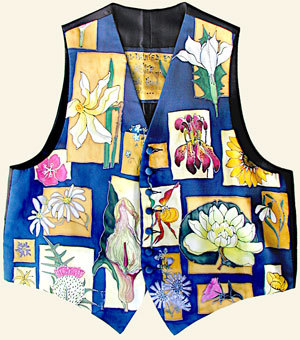
See My Vest
The best designer label name is you. Ignore the store and make your own waistcoat with this fun craft from Jacquard Products.

Materials:
- Waistcoat pattern
- Silk - 2 yards
- Jacquard Dye-Na-Flow (as many colors as you like)
- Paintbrushes
- Stretcher frame for silk painting
- Applicator bottle with metal tip
- Gutta or Water Based Resist
- Stainless steel push pins
- Auto Fade pen
Steps:
- Pin silk taut to painting frame.
- Cut out your paper pattern for waistcoat front panels.
- Pin pattern to silk. Leave room between both panels for cutting out and trim.
- Using an auto fade pen, draw the outline of your paper template. Remove paper and draw guidelines of your design.
- Pour the resist into the applicator bottle, replace the plastic insert and screw on the metal tip. In the resist technique, the gutta/water-based resist lines are drawn on and the dyes are applied within these lines. When painted on, the dyes will flow and spread on the silk until it reaches the resist lines. The resist acts as a boundary between colors much like lead in a stained glass window. These islands of color can be blended, highlighted or accented with other colors. Draw your design lines in with the gutta/water-based resist.
- Once you’ve completed the design, carefully examine the lines. Make sure the resist has penetrated through to the back. Go back and fill in any gaps. Let the resist dry completely, usually 30 minutes. Use a hair dryer to speed drying time.
- Paint and have fun! When your design is finished and dry, remove from frame and heatset as per directions on the bottle.
- Your fabric is now ready to cut out and sew. You may want to use some sort of interfacing if you are using a lightweight silk.
Read NextFaux Crochet Doily Shorts

