Waves and Donuts Set
This jewelry set uses the double needle method of right angle weave. Alternating three sizes of beads causes the weave to zigzag. Using three sizes of beads without alternating will cause the piece to curl in on itself to create a donut shape. Use any color you wish. This design will work with a variety of color combinations – one, two, three, four, five, or six different colors.
Materials:
- 5 ft. (152.4cm) - Beadalon 49 Strand 24k gold plated .015 in. stringing wire
- 26 - 6mm Green faceted glass pearlized beads 6G
- 15 - 4mm Green faceted glass pearlized beads 4G
- 28 - 3mm Green faceted glass pearlized beads3G
- 12 - 6mm Pink faceted glass pearlized beads 6P
- 28 - 4mm Pink faceted glass pearlized beads 4P
- 18 - 3mm Pink faceted glass pearlized beads 3P
- 1 - 15.3mm Medium lobster clasp, gold plating
- 1 pair - Earring posts, gold plating
- 4 - Double cup clamshell bead tips
- 3 - 6mm Medium split rings, gold plating
- 4 - 2mm Size #1 Crimp bead
- Designer flush cutter
- Designer chain nose pliers
- Designer round nose pliers

Instructions:
In the instructions, the different beads are referenced as 6G, 4G, 3G, 6P, 4P, 3P, as noted in the materials list. These materials will make a bracelet to fit a 7 in. (17.78cm) wrist.
For a Custom Fit: Measure the wrist and subtract 1 in., which will give the length for a tailored fit. Each color section measures approximately 7/8 in. (2.22cm).
- Cut two 12 in. (30.5cm) lengths of Beadalon 49 Strand 24k gold plated .015 in. stringing wire from the 5 ft. length and set aside.
- Begin the Bracelet: Center one crimp bead on the remaining 36 in. (91.44cm) of wire. Then pass both ends of the wire through one of the clamshell bead tips from the inside. Pull wires down through the hole in the clamshell so that the crimp bead sits in the bowl of the clamshell. Use chain nose pliers and close clamshell around the crimp bead.
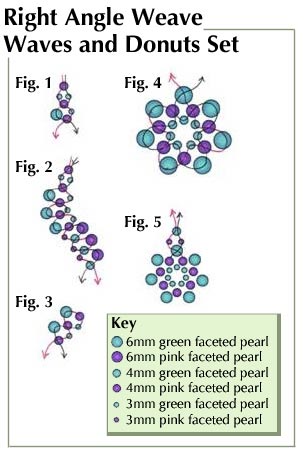
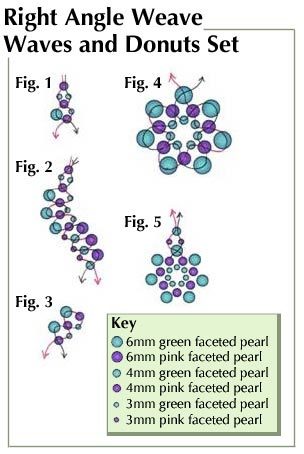
- The First Pass: Refer to Fig. 1. Pass both wires through one 4P bead. Separate wires and thread one 3G onto each wire. Pick up one 4P bead on one wire and pass second wire through it from the opposite direction and pull up snug. You have completed the top half of Fig. 1. Next, on one wire pick up one 6G and on the other wire one 3G and one 4P. Pass the wire holding the 6G bead through the 4P bead only from the opposite direction. Pull wires snug. Your piece should resemble Fig. 1.
- The Next Pass: pick up one 6G on the same side as the 6G from the first pass. On the other wire pick up one 3G and one 4P. Pass the first wire through the 4P bead and pull snug. Repeat once more. See Fig. 2.
- Bead to Desired Length: For the next three passes use 6P, 3P and 4G beads. Be sure the 6P beads are on the opposite side of the piece as the 6G beads. Refer to Fig. 2. Continue, changing colors every third pass, until the piece reaches the desired length.
- Completing the Beading: If your last woven section is pink, finish off by picking up a 3P bead on each wire and then passing both wires through a 4G bead in the same direction. If your last woven section is green, finish off by picking up a 3G bead on each wire and then passing both wires through a 4P bead in the same direction.
- Add Bead Tips: Pass both wires through a clamshell bead tip. Thread a crimp bead on one wire and tie off wires against this bead with knots. Trim ends of wires closely and close clamshell.
- Attach the Clasp: Attach one split ring to the loop end of the toggle. Turn bar of clamshell over split ring in a loop. Repeat for bar end of the toggle, attaching one split ring to the second and then to the bar.
- Begin the Earrings: Start with one of the 12 in. (30.5cm) wires. Thread on one 4P, one 6G, one 4P and one 3G. Center the beads. Pass the wire through the first 4P bead threaded in the same direction, making a loop. Pull snug. Pick up one 6G on the same side as the previous 6G and one 3G and one 4P on the other wire. Pass the first wire through the 4P bead from the opposite direction. Pull snug. Refer to Fig. 3.
- Right Angle Weave Donut: Repeat to create six patterns. Pick up one 3G and pass wire through the 4P bead. Then pick up one 6G on one wire and pass the second wire through it from the opposite direction. Pull snug. You have made a Right Angle Weave Donut.
- Finish the Earring: The wires will be coming out the sides of one 6G bead. Pick up one 3p on each wire. Then pass both wires through one 4G going the same direction. Pass the wires through a clamshell tip. Pick up a crimp bead on one wire and tie off, as in the bracelet. Attach the clamshell bead tip to the earring post finding. Repeat steps 9 – 11 to create the second earring.
Read NextWoven Golden Aqua Necklace
Your Recently Viewed Projects
Crafter 15993
Mar 02, 2010
I love it!!! Weaving is so beautiful! I am starting to research on jewelry making but leaning more towards weaving. It is so intricate! I saved this pattern! Thank you!
Report Inappropriate Comment
Are you sure you would like to report this comment? It will be flagged for our moderators to take action.
Thank you for taking the time to improve the content on our site.


